The System Administrator is responsible for adding, managing, and removing users. Review best practices for setting up and managing your plan's users.
We’ll explain the differences between user types, plus demonstrate how to generate reports that show how your organization uses Smartsheet.
In the Legacy Collaborator Model, the window is called User Management. In the User Subscription Model, it's called User roles and reports.

Admin Center overview
This article discusses information relevant to both the Legacy Collaborator Model and the User Subscription Model. f you're unsure about your model type, learn how to determine the model your plan is on.
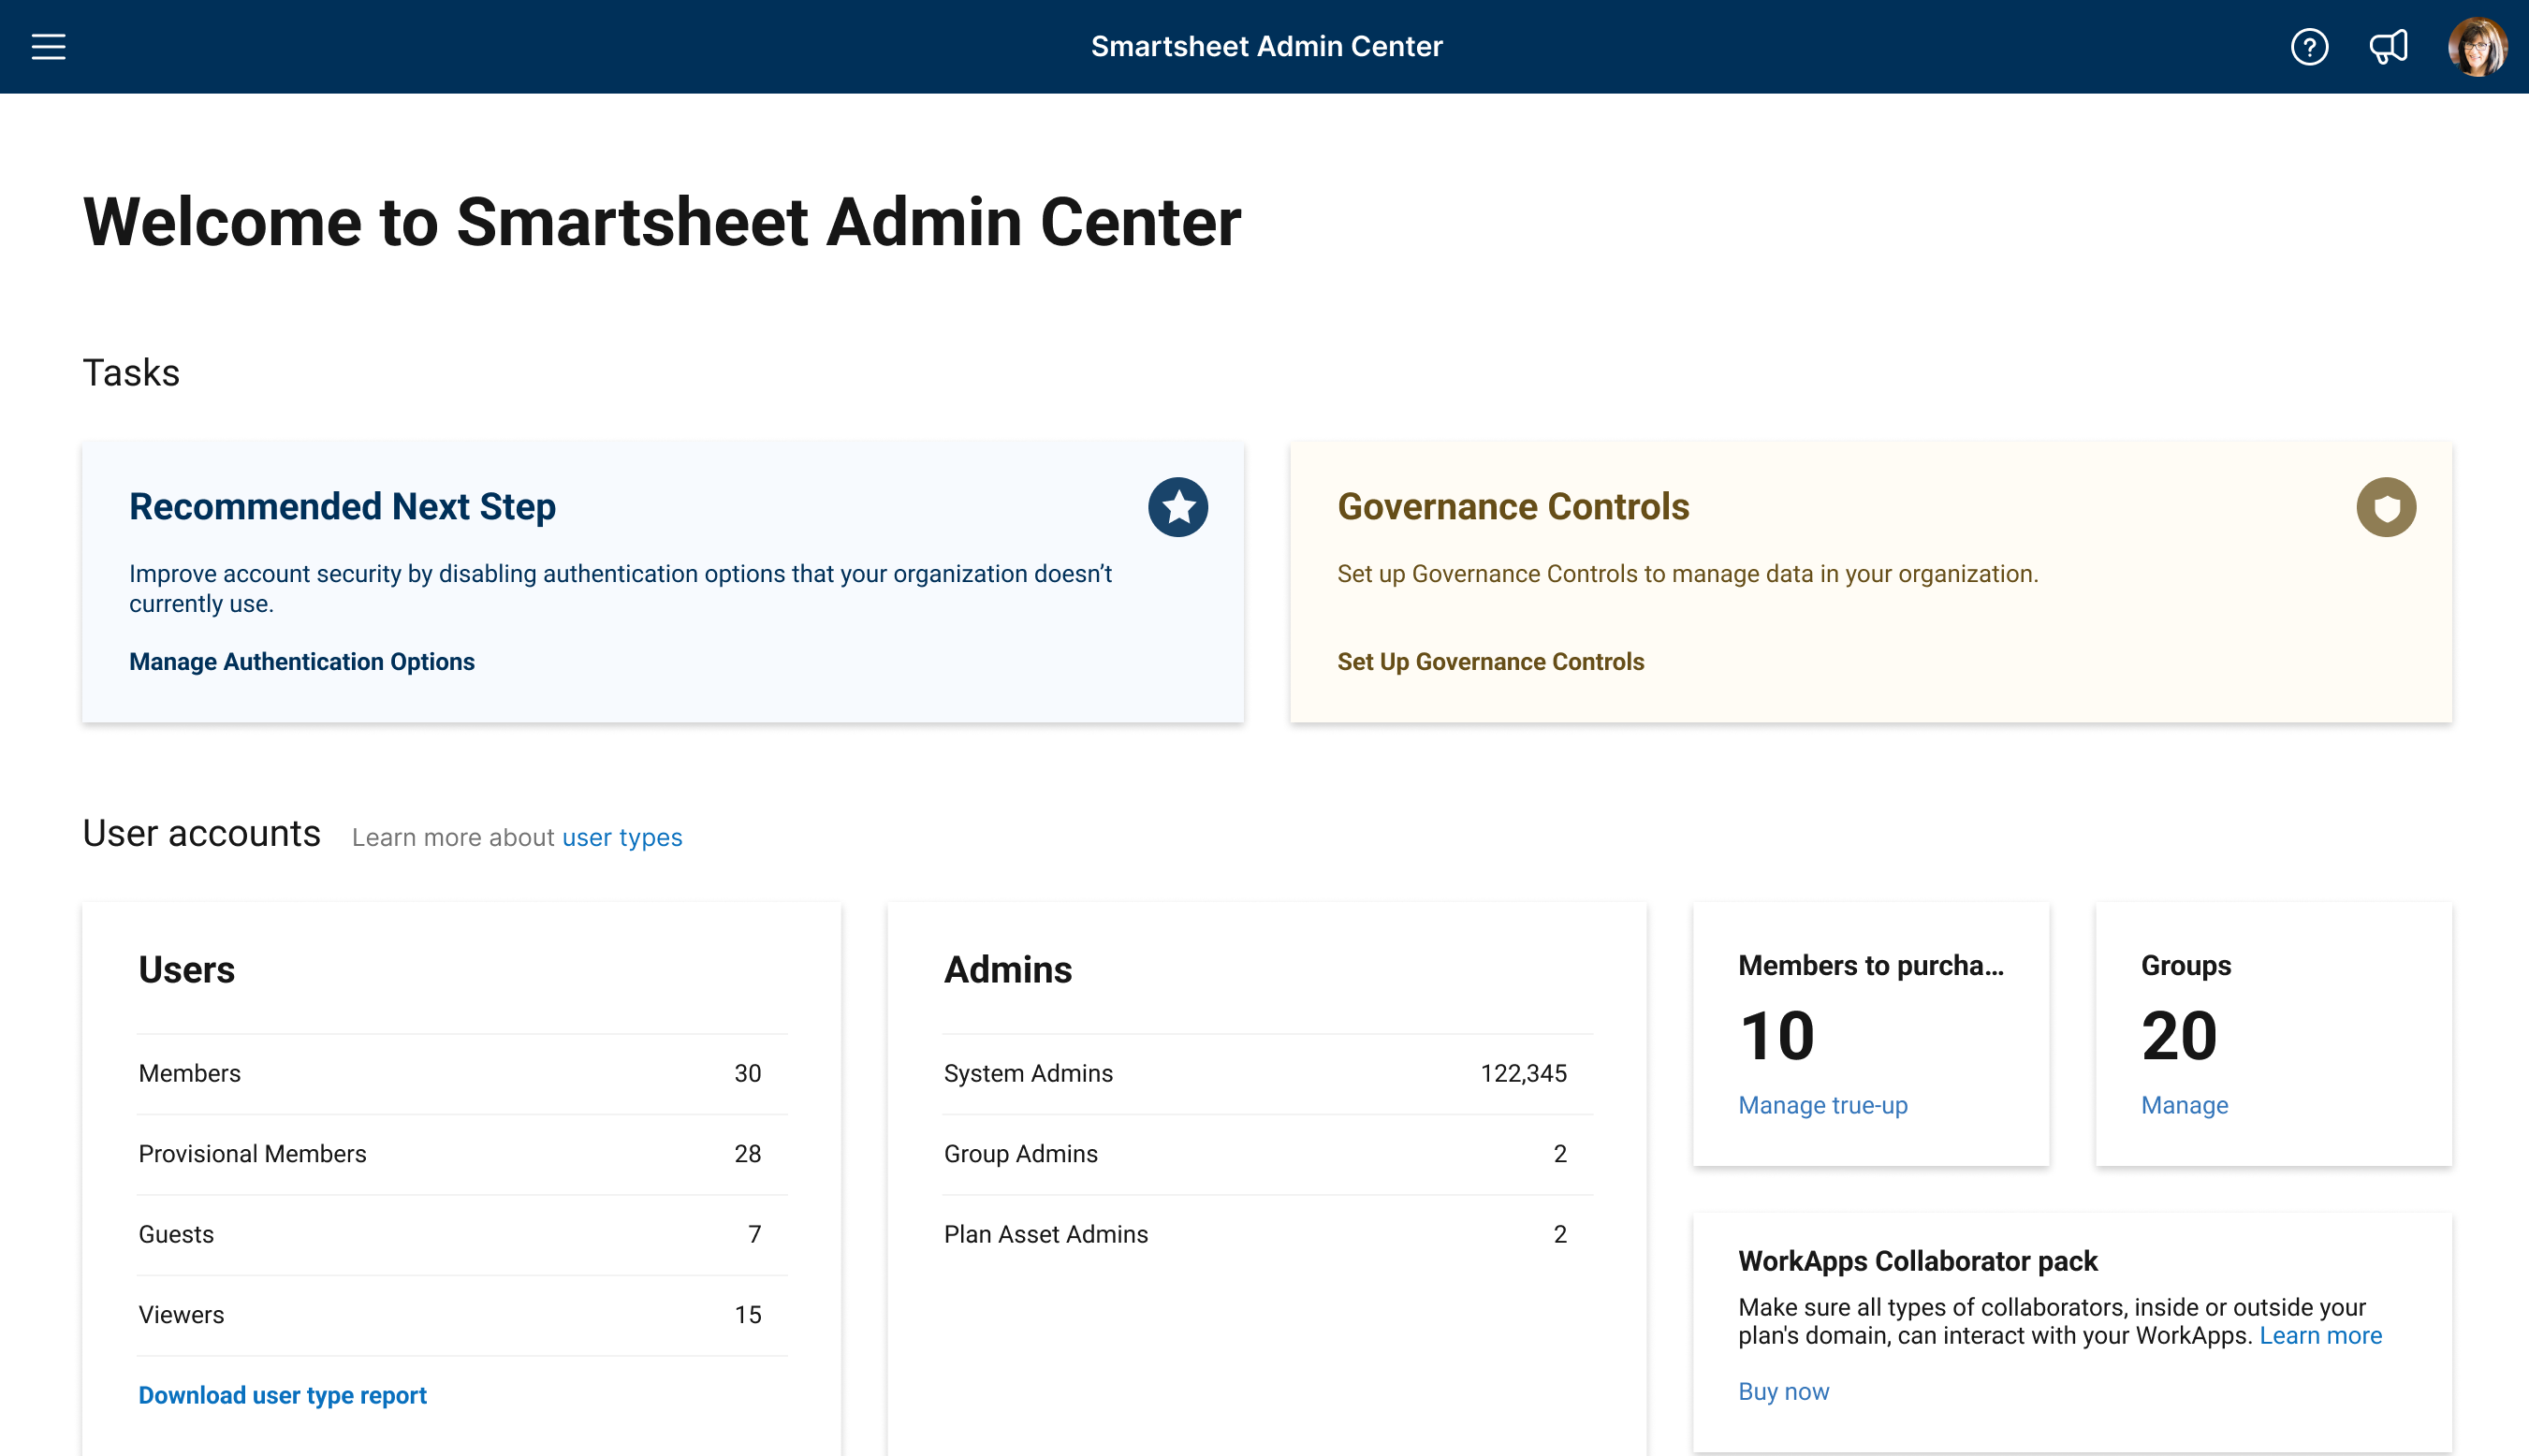
Admin Center home
The Admin Center homepage displays a summary of your plan and users. It gives you access to plan insights and user account information, including permission-based user types and Admin-access types. You can also download a detailed user-type report that will show you a full list of your users.
- To access the Smartsheet Admin Center, sign in with your Smartsheet credentials at https://admin.smartsheet.com/
Admin Center homepage: User Subscription Model
A filled bubble indicates a setting is active. Settings are plan-dependent; an upgrade icon
Brandfolder Image
![]() means you must upgrade to access that setting. Warning icons
Brandfolder Image
means you must upgrade to access that setting. Warning icons
Brandfolder Image
![]() indicate a setting that requires attention; hover over the warning to learn more.
indicate a setting that requires attention; hover over the warning to learn more.
Go to Admin Center and select the Menu icon in the upper-left corner of the screen to navigate to:
- User Roles and Reports
- Group Management
- User Types and True-Up
- Governance Controls
- Plan Insights
- Domain Management
- Settings
- Plan and Billing Info
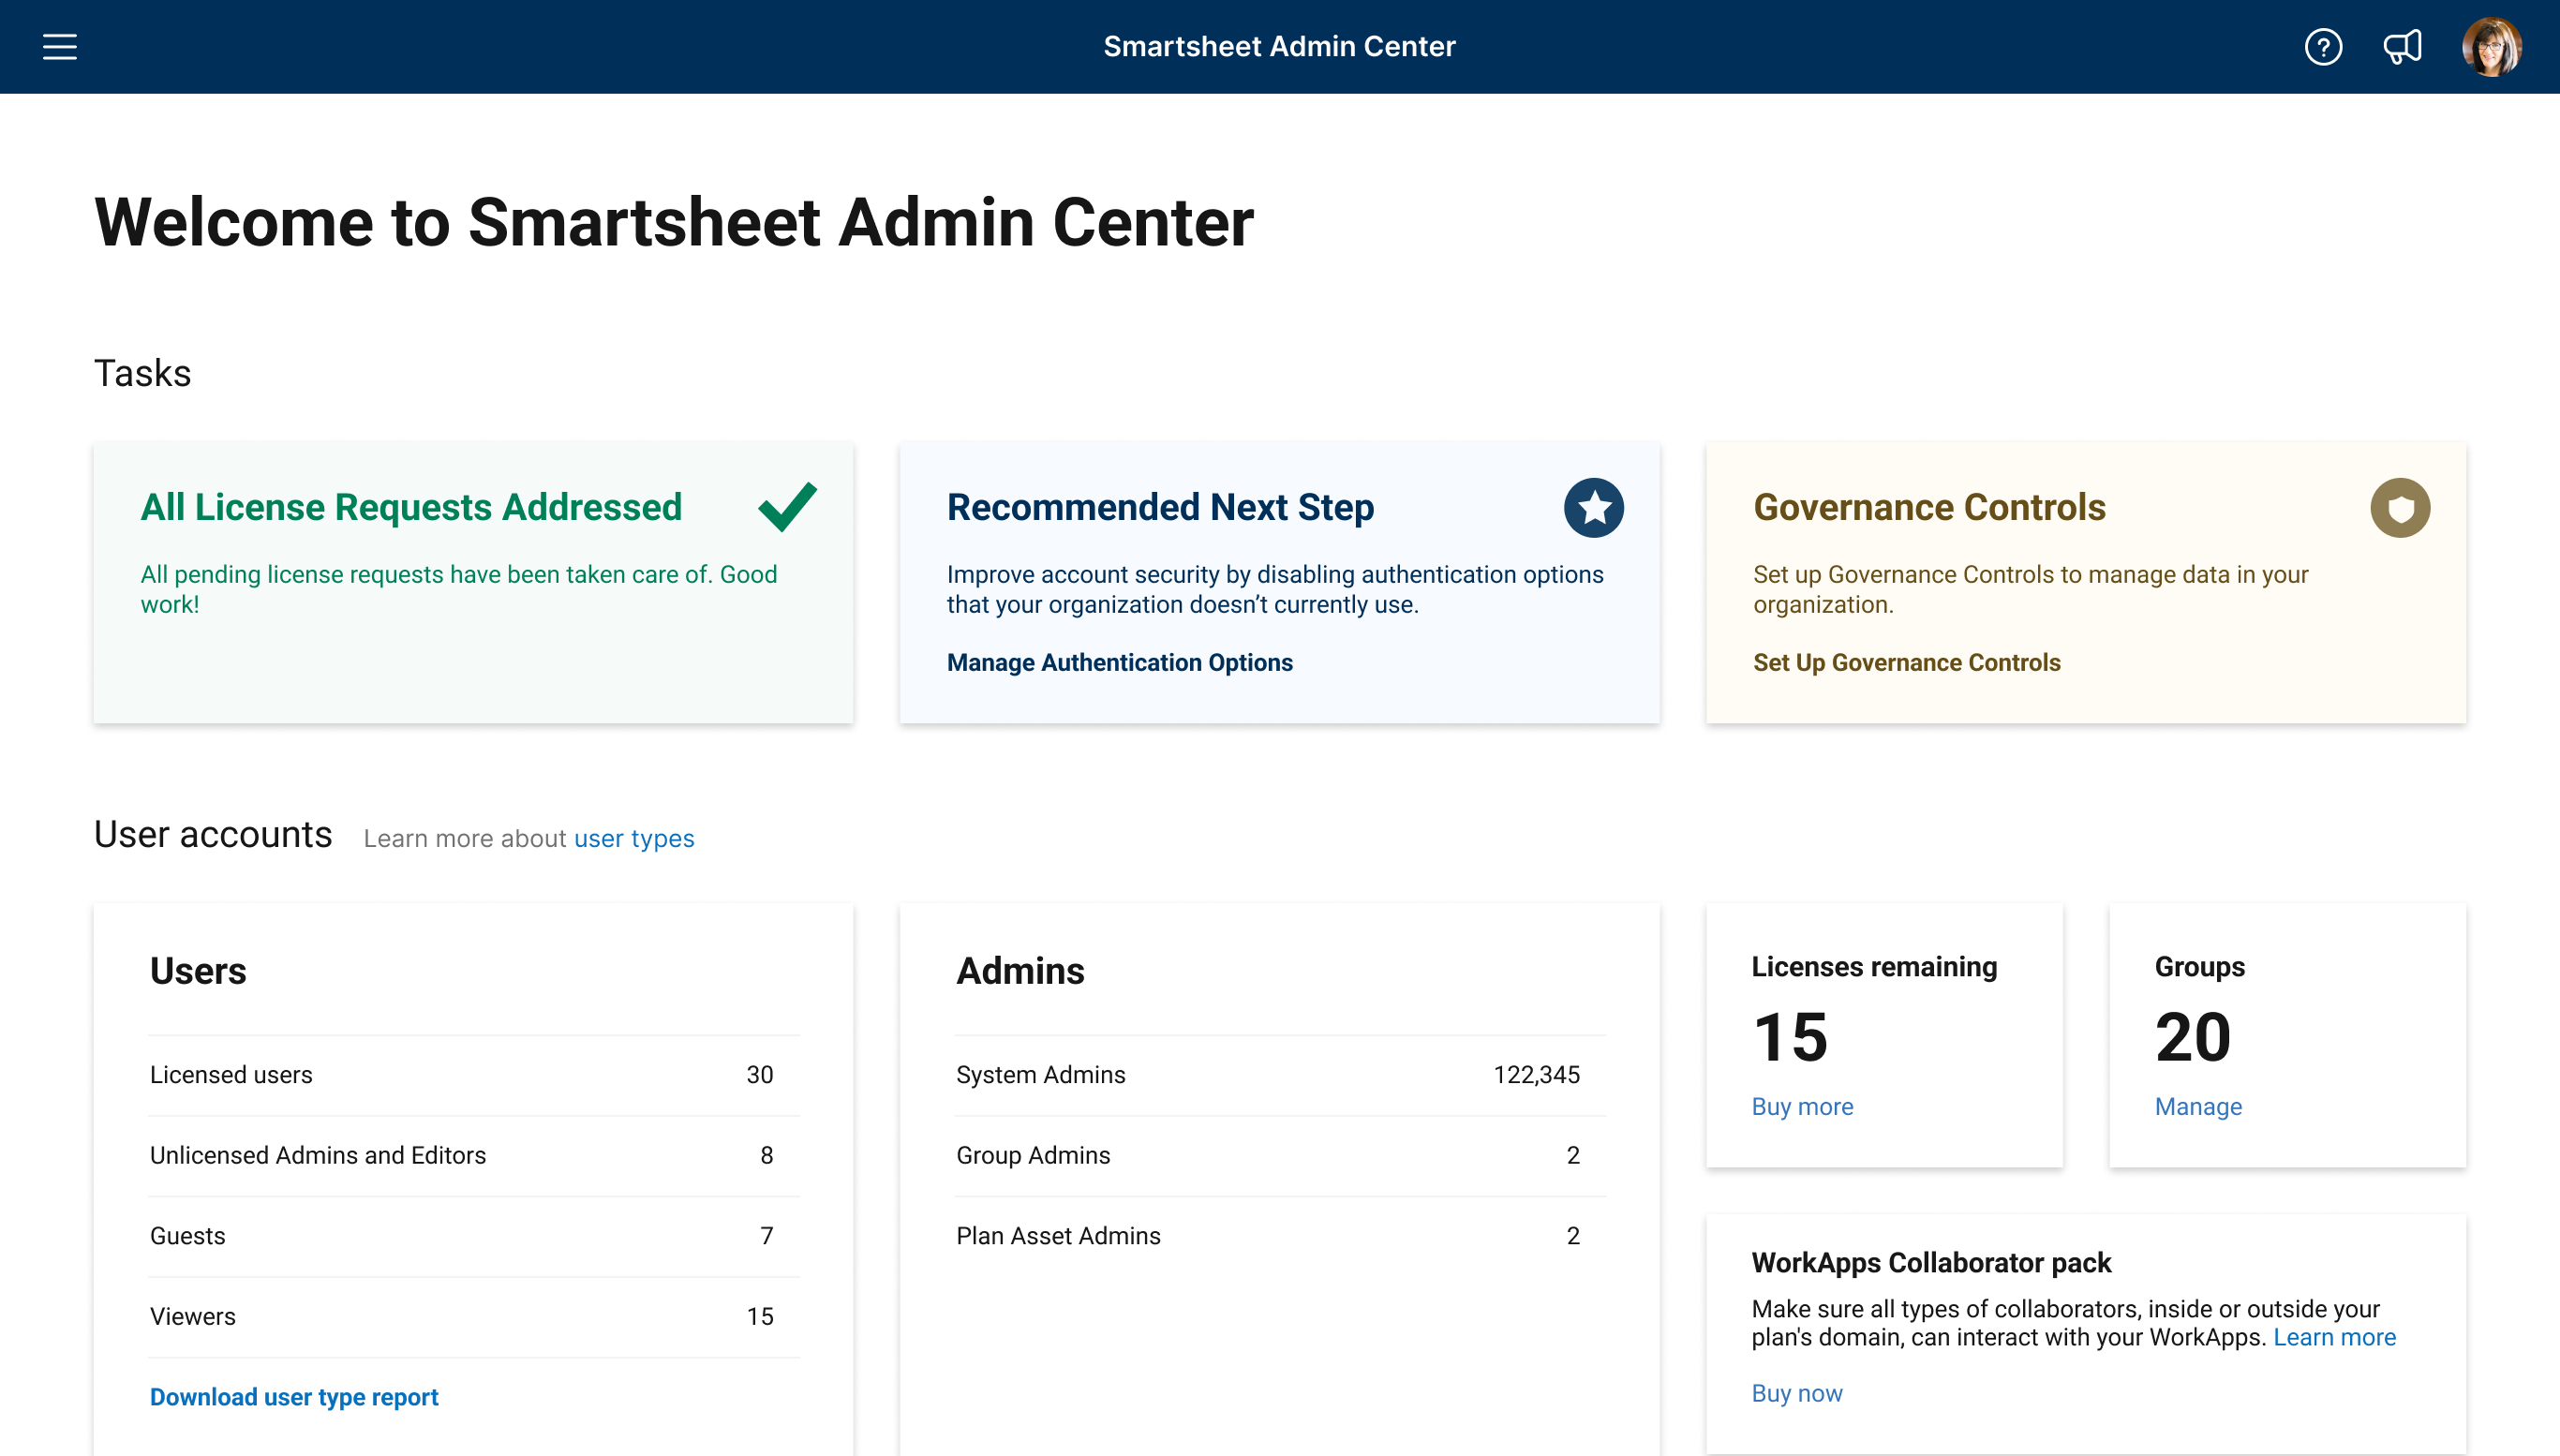
Admin Center homepage: Legacy Collaborator Model
A filled bubble indicates a setting is active. Settings are plan-dependent; an upgrade icon
Brandfolder Image
![]() means you must upgrade to access that setting. Warning icons
Brandfolder Image
means you must upgrade to access that setting. Warning icons
Brandfolder Image
![]() indicate a setting that requires attention; hover over the warning to learn more.
indicate a setting that requires attention; hover over the warning to learn more.
Go to Admin Center and select the Menu icon in the upper-left corner of the screen to navigate to:
- User Management
- Group Management
- License Requests
- Governance Controls
- Plan Insights
- Domain Management
- Settings
- Plan and Billing Info
For information about User Management:
- Admin Center: Bulk actions and more with User Management
- Admin Center: Add, edit, or deactivate users
For information about Group Management:
License Requests page
The License Requests page and Account Discovery are only for plans on the Legacy Collaborator Model.
The license request page displays all free users on your plan who have requested a license. This list displays the requester's name, email address, the age of their request, and a message from the requester if they’ve included one.
You can use the actions on the right to decline or grant license requests.

If you activate Account Discovery, you'll also see requests from Viewers or Team Members on your domain who want to join your plan.
Admin Center: Add, edit, or deactivate users
To access the User Management page:
- Select the Menu icon in the top left.
Navigate to Users and Groups > User Roles and Reports.
You can also access the User Management page from the Smartsheet app by selecting your account icon and then User Management.
While it's advisable to assign more than one System Admin to your account in case the main System Admin isn't available, a single System Admin can serve as the primary System Admin for only one plan at a time. Learn more about user types.
Remove or deactivate users
Learn how to remove, deactivate, or reactivate users in Admin Center.
You're responsible for ensuring your users access and use of the Smartsheet services is within authorized limits. Unauthorized access to and use of the services is invoiceable pursuant to the Limits Policy. Unless otherwise agreed in writing by Smartsheet, the removal or deactivation of users or the cessation of use of the services will not affect Smartsheet's right to invoice for unauthorized access and use.
Add users individually
- Select Add User at the top left of the User Management page.
- Fill out the user details in the Add User panel on the right.
Select Invite to send that user an invitation. The user must accept the invitation to become an active member of your plan.
To find users with a specific status, select Show All Users at the top right and then make your selection.
In User Subscription Model plans, all new non-System Admin users you add are created as provisional Members. If you're unsure about your model type, learn how to determine the model your plan is on.
Errors when adding users
In Legacy Collaborator Model plans, a user can belong to multiple plans but must use a unique email for each plan. If you invite a user to your plan with an email that's already in use for a different plan, you'll receive this error message: This person belongs to another account.
To correct this, the user can provide a different email address so that you can re-invite them with the new address. The user can also ask the System Admin for their other plan to remove them from that plan. Learn how to free up an email address.
Note that Smartsheet doesn't recognize distribution lists as valid email addresses for new accounts or as destinations for automated communications in a workflow.
Edit user properties
- To edit users individually, select a name from your User Management list. Make your changes in the right Edit User panel.
- To access additional actions for the user, select
Brandfolder Image
 at the top right. Learn more.
| Use this page | To do this |
|---|---|
| General Info | Edit the user's name and roles, premium application roles, and view their primary email address. |
| Profile | Edit the user's title, department, company, phone numbers, and job category. |
| Groups | See the groups the user is part of, and view the group details or remove them from the group. |
| Alternate Emails * | Add alternate email addresses to the user's account, or make an alternate email address their primary. Note that users can delete alternate email addresses from User Management. |
* If you add an alternate email address, a confirmation email is sent to that address. The user must confirm the change before the alternate email is successfully added.
Add users in bulk
To add multiple users at a time, you must create a comma-separated values (CSV) file that contains the names and email addresses that you want to use. Each CSV file you upload is limited to 1,000 rows; therefore, you can only add up to 1,000 new users per CSV file.
Once you've done that, you can import the list via the User Management page.
If your CSV file includes the email addresses of anyone that has already been added to your plan, they won't be added again.
- Select More Actions at the top left of the User Management page.
- Select Import Users….
- Follow the steps in the Import Users pop-up window to create a CSV file containing the names, email addresses, and roles that you want to add:
- Download the template file
- Enter users' information and assign roles
Upload the CSV file
Brandfolder Image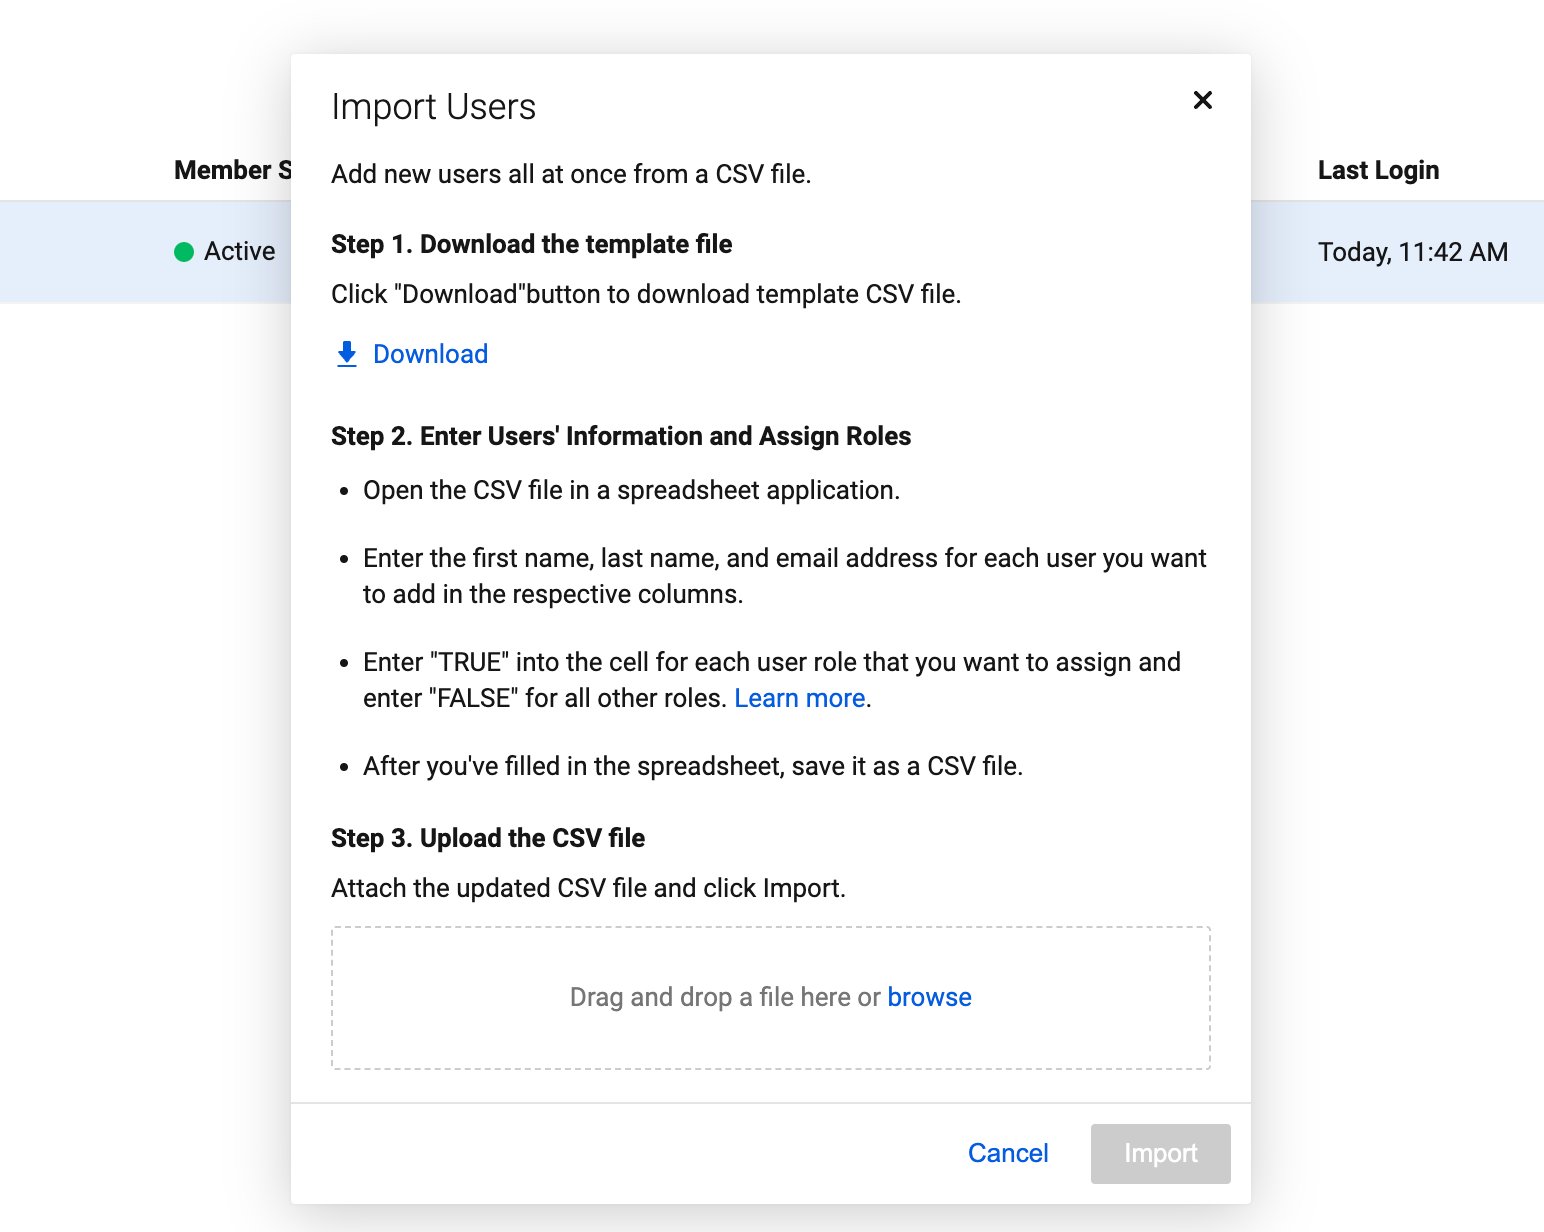
Select Import.
A confirmation email is immediately sent to all the email addresses listed in the CSV file. Recipients must select Accept in the email.
Keep this in mind
- Any sheets created by or shared to the user remain available to them even after they accept the invitation to join your plan.
- In User Subscription Model plans, all new non-System Admin users you add are created as Provisional Members.
- Adding users to the plan enables you and everyone else listed on the User Management screen to assign rows of tasks to the user from a contact list column.
- By default, all users on the team are listed on the screen. You can filter the list by user type via the drop-down list at the top. You can also type into the text field to search for users by name or email address.
Here's an example of how to format your CSV file:
| First name | Last name | |
|---|---|---|
| Sally | Smart | sally.smart@smartsheet.com |
| Ian | Intelligent | ian.intelligent@smartsheet.com |
| Dave | Diligent | dave.diligent@smartsheet.com |
Edit user properties in bulk
Use the Bulk Update Basic Permissions… option to change the user types for multiple users in your plan all at once. You can do this by downloading a user list as a CSV file, making changes to the values in the user list, and then uploading the list back to Smartsheet.
If you change the permissions of a user that owns Smartsheet items, you may need to transfer Owner permissions.
You can’t use the Bulk Update Basic Permissions... option to edit the user type for users that have a status of Invited. You can only edit these properties if the user has accepted the invitation to the plan.
To bulk-update users
- Select More Actions at the top left of the User Management page.
- Select Bulk Update Basic Permissions...
- Follow the steps in the Bulk Update Basic Permissions pop-up window to update user attributes.
- Download the user list
- Update user roles
Upload the CSV file
Brandfolder Image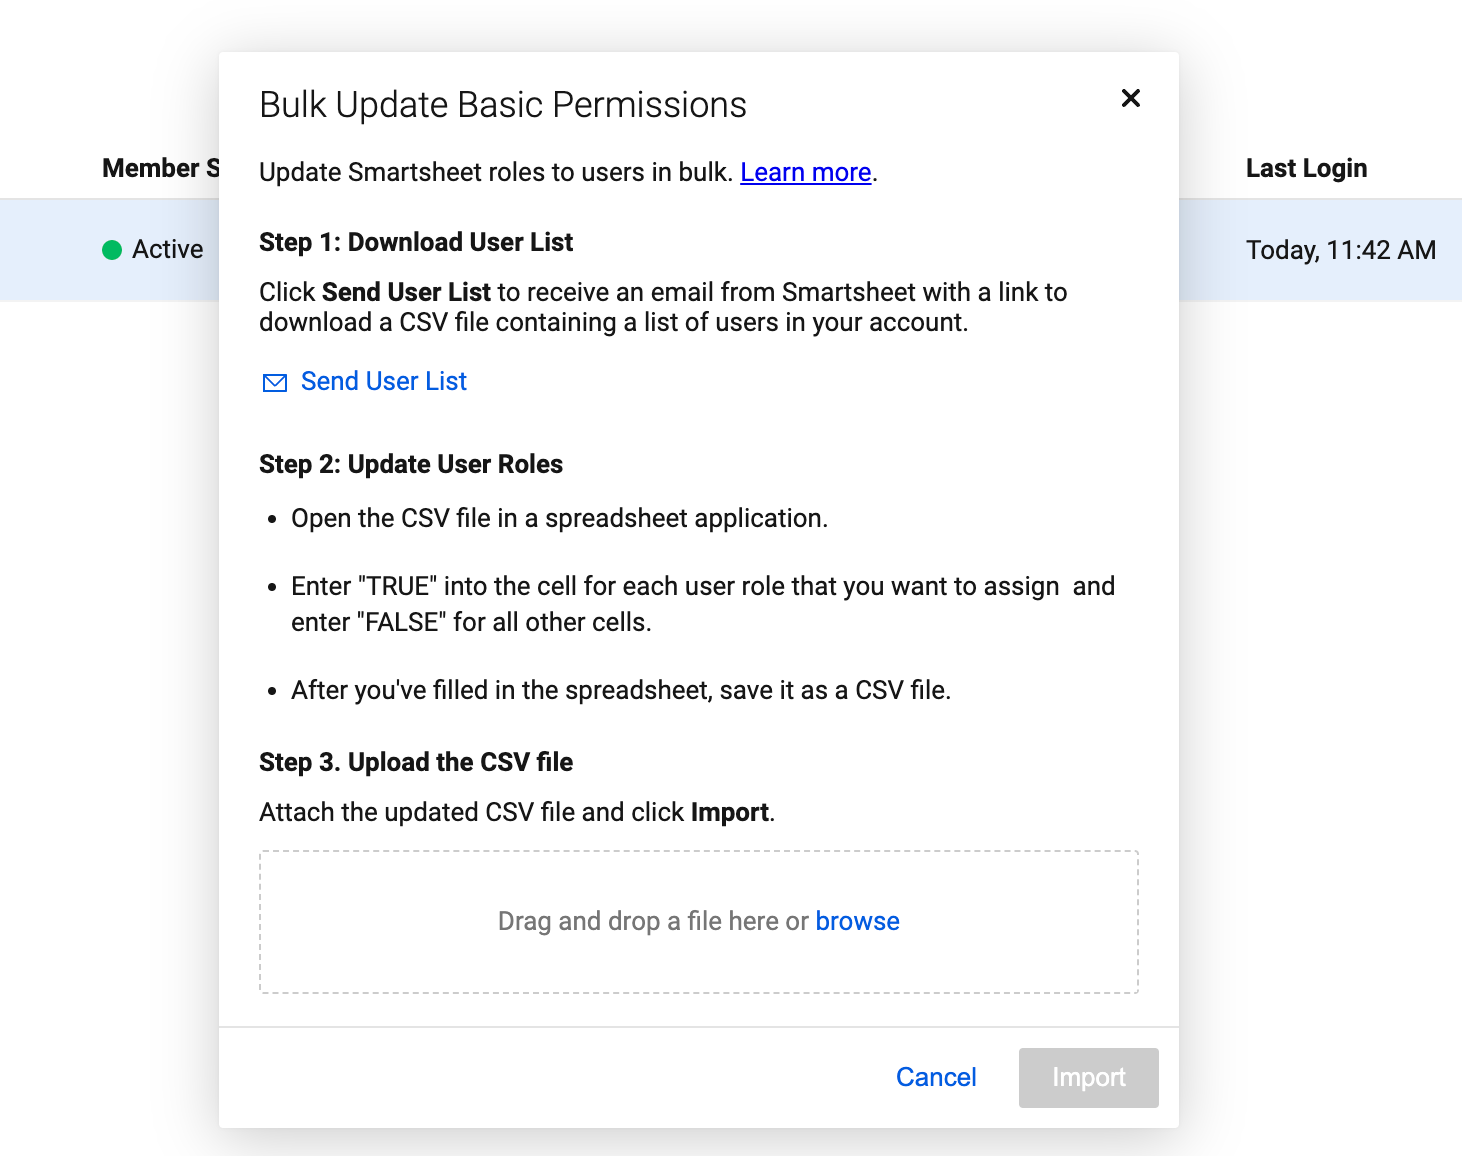
- Select Import.
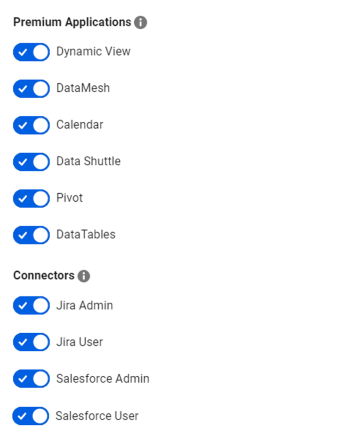
Premium apps and Connectors
You can edit user roles and permissions for Premium Applications and Connectors.
- To enable or revoke access to premium applications and connectors on your account, toggle the sliders for each user.
- To make bulk changes to roles and permissions, select the Bulk Update Premium App Permissions option on the User Management page. Learn more.