You get an error message if you attempt to add an email address that's already in use by a Smartsheet account.
Overview
Each Smartsheet account is associated with one primary email address, and that email address can’t be used for another Smartsheet account. However, you can associate additional email addresses with an account to facilitate sharing. Learn how to Add a secondary email address to your account.
You can also free up the email address if you receive the following message: "[email address] is already associated with another Smartsheet account, so it cannot be added to this account." Doing this requires you to work with a System Admin.
Prerequisites
- All plans: Ensure that all three emails share the same domain— the one you used to sign in to Smartsheet, the one you’re attempting to free up, and the one not yet linked to any Smartsheet account.
- Enterprise plans: If you're on an Enterprise plan and have two email addresses with the same domain as the email address you want to free up, you'll need to involve a System Admin. They can designate one of the existing emails as the new primary for the account you wish to modify. After the email address has been released and added to your desired account, the System Admin can use the User Merge feature to set the released email as the primary address, provided it has a different domain.
Before you get started, make sure you have access to an email address that is not used with any Smartsheet account.
Step 1: Add a third email address to the account from which you want to merge sheets
- Sign in to Smartsheet using the email address you were attempting to associate with an account when you received the error message.
- Go to Account > Personal Settings > Profile and select the Manage Email Addresses link.
- From the Manage Email Addresses dialog box, select Add Email Address and add the third email address, which is the one not currently used anywhere in Smartsheet. You'll receive a message prompting you to check your email inbox.
- Open the email message with the subject “Smartsheet Account Change Request.”
- Select the Confirm Email button in the message to accept the invitation to join that email alias to the Smartsheet account. You’ll receive a message that reads, “Confirmed! The alternate email address [address] has been added to your account.”
Now, you must contact a System Admin to make the third email address the primary for your account.
Step 2: Make the third email address the primary for the account
These instructions are for System Admins only. If you need to update your primary email address, contact a System Admin on your Smartsheet plan. Only System Admins can modify a user's primary email address.
- In Admin Center, select the Menu icon in the upper left corner to open the left sidebar.
- Scroll down to User Management (Legacy Collaborator Model) or User Roles and Reports (User Subscription Model.)
- Locate the user and select the kebab menu on the right to open the Edit User panel.
- In the Alternate Emails tab, select the kebab menu next to the third email address.
Select Make Primary Email Address to make the third address the primary address associated with the account.
Brandfolder Image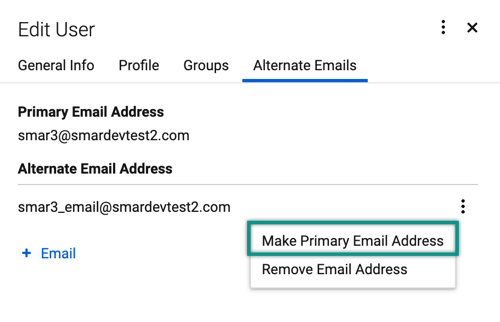
Step 3: Free up the email address you want to use in the other account
Now that a System Admin has changed your primary address, you can remove the email address you'd like to use in the other account— the account you used when you received the error message.
- Sign back into Smartsheet using the third email address as your login.
- Go to Account > Personal Settings > Profile and select Manage Email Addresses.
- Remove the email address you'd like to use in the other account by selecting X to the right of the email address.
- Sign out and then sign back into the account you want to use the email address.
- Navigate to Account > Personal Settings > Profile and select Manage Email Addresses to add the desired email address.
To make that email your primary for the account, involve your System Admin again.
Here’s what you should see when the process is complete
- The desired email address is listed in the Manage Email Addresses box of the desired account.
- All items shared to the email address you added are available from the new (target) account.
Transfer Owner permissions
If you want to transfer Owner permissions of items in the old account so they’re managed by the email address you added, see: