Smartsheet Admin Center provides multiple options to manage a user's access to your plan.
This article discusses information relevant to both the Legacy Collaborator Model and the User Subscription Model. If you're unsure about your model type, learn how to determine the model your plan is on.
Manage user accounts
Deactivate user
Deactivation is recommended to stop your internal users from signing into Smartsheet. This means the corresponding user is no longer a part of your company. If the deactivation happened by mistake, you have 30 consecutive days to correct the error; after that, you must remove the user and re-invite them to re-enable their access.
Users you deactivate can't sign in to Smartsheet, but items they created remain available. Upon deactivation, the user is no longer assigned a license (Legacy Collaborator Model) or Member designation and that license or Member designation is available for you to reassign it.
You can only deactivate users who belong to domains associated with your Smartsheet plan. You can't deactivate users with emails from the following domains because it completely revokes their access to Smartsheet. Instead, remove them from your plan.
- outlook.com
- gmail.com
- hotmail.com
- live.com
- yahoo.com
- aol.com
- verizon.net
- rocketmail.com
- comcast.net
- icloud.com
- charter.net
- web.de
- mail.com
- email.com
- usa.com
- duck.com
- mail.ru
Reactivate user
If a user was mistakenly deactivated, you can reactivate them. Reactivation assigns a license (Legacy Collaborator Model) or Member designation (User Subscription Model) and restores access to shared items or items on which the user holds Owner permissions.
Our reactivation policy
- You can only reactivate a user for 30 consecutive days after deactivating them. You won't be able to reactivate those users on the thirty-first day or thereafter.
- We recommend using the Remove User option in the Admin Center after 30 days. Transfer the user's Owner permissions on items to another user and re-invite the same individual instead of trying to reactivate them. Also, ensure you don't revoke their sharing permissions if you want them to maintain access to their shared items.
Users managed through Directory Integration
The 30-day reactivation policy applies exclusively to users managed in Admin Center. If you manage users through Directory Integration (DI) and are attempting to reactivate a user after the 30-day window, do the following:
- Temporarily deactivate DI in Smartsheet
- Remove the user via Admin Center
- Reactivate DI in Smartsheet
- Add the user to the relevant groups
This process will allow you to re-provision them through DI.
Remove user
Removing a user permanently removes them from your plan and revokes their access to shared Smartsheet items. However, you can also decide to maintain the user's access rights. Removed users can't access your plan and their licenses (Legacy Collaborator Model) or Member designations (User Subscription Model) are released.
When removing a user, ensure you transfer the user's Owner permissions on Smartsheet items to another user.
You can re-invite a previously removed user to your plan using the same email address.
Remove sharing permissions
When removing a user, Admin Center prompts you to decide whether to remove their sharing permissions as well.
You can use the Remove their access from all items owned by your plan option to withdraw a user's access to items in your plan. If you choose not to remove the user's sharing permissions after enabling the Remove User action, the user continues to retain their access to shared items. This action simply removes the user's license (Legacy Collaborator Model) or Member designation (User Subscription Model).
By default, the Remove their access from all items owned by your plan option is enabled.
UAP users
You can remove users if User Auto Provisioning (UAP) is enabled in your plan. However, if a previously removed user logs in and isn't part of another plan, they'll be re-added to the original plan with UAP active for that domain. Note that the user won't display on the User Management page unless they sign back into Smartsheet. Learn more about UAP.
To remove, deactivate, or reactivate users
- Sign in to Admin Center.
Select the Menu icon in the upper left corner and navigate to Users and Groups > User Roles and Reports.
The User Management page displays.
- Hover over the row of the user account you want to manage.
- On the right side of the row, select
Brandfolder Image
 to open the action menu.
 - Select one of the following:
- Remove Sharing
- Deactivate User
- Remove User
- Reactivate User
Find deactivated users
- On the top right of the User Management page, change the filter setting from Show All Users to Deactivated.
Search for the deactivated user account.
Brandfolder Image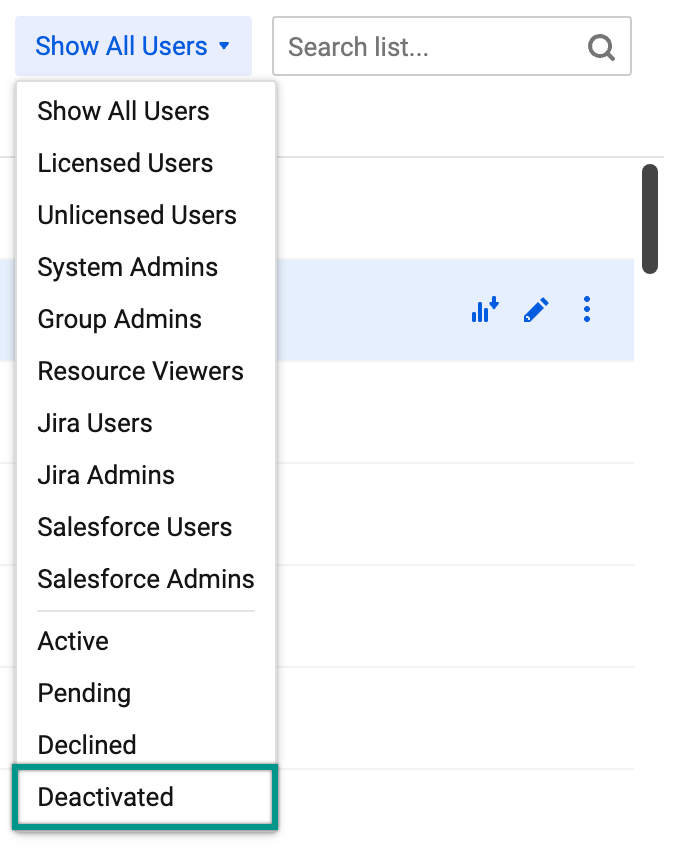
Transfer Owner permissions of items and groups
- Sign in to Admin Center.
Select the Menu icon in the upper left corner and navigate to Users and Groups > User Roles and Reports.
The User Management page displays.
- Hover over the row of the user account you want to manage.
- On the right side of the row, select
Brandfolder Image
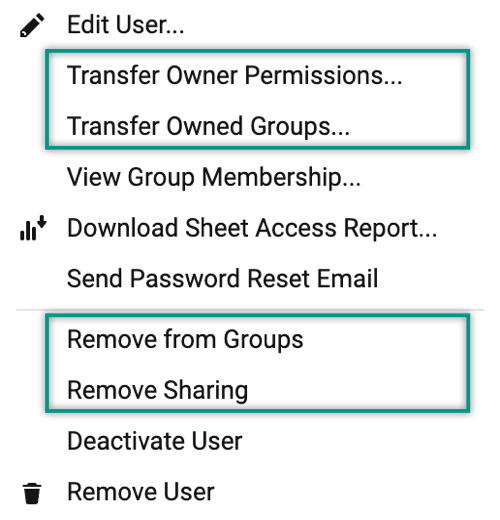
- Select one of the following:
- Transfer Owner Permissions...
- Transfer Owned Groups...
- (Optional) Remove from Groups
- (Optional) Remove Sharing
Other things to know
- You can't remove yourself from a plan even if you're a System Admin. Another System Admin must remove you from the plan.
- You can't revoke access to Smartsheet or deactivate users through external integration.
- Deactivating a user immediately revokes all API access tokens they've generated. The deactivated user can no longer use them.
- Use the filter dropdown in the top right corner to find users by status or type. If you can't find a user, try changing the filter setting.
- If you attempt to reactivate a user after the 30-day period following their deactivation, the Admin Center and API calls will display an error message.
- If a System Admin transfers Owner permissions for an item to another user without removing the previous Owner's sharing permissions, the previous Owner will retain their Admin permissions.
You are responsible for ensuring your users access and use of the Smartsheet services is within authorized limits. Unauthorized access to and use of the services is invoiceable pursuant to the Limits Policy. Unless otherwise agreed in writing by Smartsheet, the removal or deactivation of users or the cessation of use of the services will not affect Smartsheet’s right to invoice for unauthorized access and use.