Learn how to manage your sheet with columns and hierarchies for better organization. The information in this topic applies if you have a brand new sheet, imported sheet data, or are using a template.

Work with the primary column: Overview and best practices
Every sheet has a primary column. This column is mandatory, and you can't delete it from the sheet. The value in this column is frequently the row's primary descriptor.
When you create a new item in Smartsheet, the primary column appears automatically — in Grid View, it is the left-most column. When you create a new sheet by importing data from another program, you can designate the primary column.
Double-click the column name to rename the primary column and type a new name.
Once you've set a primary column, you can’t change it.
If you want to change the contents of the primary column, you can insert a new column in your sheet, cut and paste the data in the cells from the existing primary column to this newly inserted column, and then paste the preferred data into the empty primary column.
Primary column properties
With the exception of the column name, you can't change the properties of the primary column. Here's a list of the properties:
- The column name is in bold text (this is the only column name with this property).
- It's the column where you can see expand and collapse buttons
Brandfolder Image
 /
Brandfolder Image
/
Brandfolder Image
 when you create a hierarchy in your sheet.
 - The primary column type is always Text/Number. Auto-number or other column types aren't available.
- The format for text and numbers in the column is left-justified.
Primary column name: Best practices
When you name the primary column, use a descriptive name: Client Name, Task Name, Order Number, Part Number, and so on.
The primary column identifies the row when you use features such as Send row or Request update.
A descriptive name helps you better communicate about the row or request information from other Smartsheet users.
Primary column name in reports
Because reports can return data from multiple sheets, each having a different primary column name, information from the primary column consolidates into a single column named Primary.
Reports don't display hierarchy.
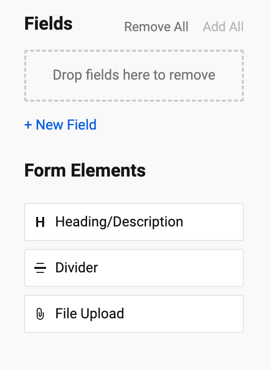
Primary columns in forms
Primary columns in forms have some restrictions when applying changes:
You can rename the primary column from the form but can’t change the Text/Number column type.
When you create a new form, the primary column gets pulled from the intake sheet. You can add a new column with any column type that you need.
- If you don’t want to use the primary column in your form, you can deselect it from the Fields panel or delete it from your form canvas.
Insert, delete, or rename columns
You can insert, rename, delete, and clear columns in a sheet.
You can undo any action until you save changes to the sheet.
A sheet can contain up to 400 columns, 20,000 rows, or 500,000 cells (whichever limit is reached first).
Insert a new column
- In your sheet, hover over a column header.
- Select the Column Menu
Brandfolder Image
 .
. - In the Column Menu, select Insert Column Left or Insert Column Right. The New Column form appears.
- In the New Column form, set the following fields:
Name: Enter a name for the column.
You can enter a column name with up to 50 characters.
- Column Type: Select a column type. See Column types for details on each type.
- Text/Number
- Dropdown list
- Date
- Duration
- Contact list
- Checkbox
- Symbols
- Auto number
- Created by
- Created date
- Latest Comment
- Modified by
- Modified date
- If the column type has additional options, they appear below the Column Type field. Set them as you like.
- Select OK.
The new column appears next to the column you selected.
Insert multiple columns at once
You can insert up to five new columns in a sheet.
- Highlight the number of existing columns (up to five columns) you want to insert by holding the Ctrl key (or command key, if you’re on a Mac) and selecting existing column headers individually.
- Hover over any selected column header.
- Select the Column Menu
Brandfolder Image
.
- In the Column Menu, select Insert x Columns Left or Insert x Columns Right.
The new columns appear. Each new column has the Text/Number column type and is named Column[column number] (e.g., Column12).
To change the column settings:
- Double-click the column header.
- In the Edit Column Properties form, change any of the following fields:
- Name
- Column Type
Change the column width
You can adjust the column width if you're not satisfied with it. Note that you can’t modify the width of default columns, such as the attachments, discussions, or indicators columns.
To change the column width:
- Hover your pointer over the column header's side border.
- When the column border icon appears, press and hold the icon.
- Drag the column border icon to create the desired column width.
Delete a column
You can delete columns or their content.
You cannot, however, delete these default columns:
- Attachments
- Comments
- Proofs
- Row Action Indicators
To delete a single column
- Hover your pointer over the header of the column you want to delete.
- Select the Column Menu
Brandfolder Image
.
- In the Column Menu, select Delete Column.
To delete multiple columns
- Press and hold the Ctrl key (or the command key if you’re on a Mac).
- Select up to five column headers.
- Hover your pointer over any of the highlighted column headers.
- Select the Column Menu
Brandfolder Image
.
- In the Column Menu, select Delete Column.
To clear the content from columns without deleting them
- Select one or more columns.
- Press the Backspace or Delete key on your keyboard.
The content disappears without deleting any columns.
Rename a column
If you rename a column that reports include, the reports no longer include the column. You must reset the column in a report's criteria to restore the renamed column to a report.
To rename a column
- Hover your pointer over the column header.
- Select the Column Menu
Brandfolder Image
.
In the Column Menu, select Rename Column...
Double-click the column header to open the Column Properties form.
- In the Name field, enter a new name.
- Select OK.
Hierarchy: Indent or outdent rows
You can create a hierarchy on your sheet by indenting rows. When you indent a row, it becomes a child of the row above it (the parent row).
Hierarchy creates relationships between rows, it doesn't control row formatting.
Indent a row
Select a cell in the first row you’d like to indent, and then select the Indent
Brandfolder Image
![]() button on the toolbar. The row above it will become the parent row.
button on the toolbar. The row above it will become the parent row.
If the Indent button is unavailable, you may be trying to indent a blank row. In order to create a hierarchy, data needs to exist in both the parent and child rows. Make sure neither row is blank before indenting.
To indent a row, you can also use the keyboard shortcut Ctrl + ] or Command + ] on a Mac.
Indents are displayed only in a sheet's Primary Column; however, the relationship is applied to the entire row.
Remove hierarchy
To remove the parent-child relationship, select a cell in the child row and then select the Outdent
Brandfolder Image
![]() button on the toolbar.
button on the toolbar.
To outdent a row, you can also use the keyboard shortcut Ctrl + [ or Command + [ on a Mac.
Expand or collapse indented rows
When you expand or collapse rows and then save the sheet, this changes the sheet structure for all collaborators who share it. Everyone who uses the sheet sees the same rows collapsed and expanded as you do.
To show or hide the indented items beneath a parent row, select expand/collapse in the parent row’s Primary Column.
Brandfolder Image
To expand or collapse all sub-items on a sheet, right-select on the Primary Column header and select Expand All or Collapse All.
Hierarchy best practices
Keep the following in mind as you work with hierarchy:
- There is no fixed level of indenting; you can continue indenting rows on your sheet to create multiple levels of hierarchy.
- When you select and drag a row that has indented items below it, the child rows move with the selected item.
- You can’t delete a parent row without also deleting its indented child rows. (To delete the row without deleting the child rows, remove the parent-child relationship first).
- When dependencies are enabled on a project sheet, parent rows reflect a roll-up summary of the start date, end date, duration, and % complete values entered for the indented child rows.