Learn to create and manage forms for an efficient project intake process, enabling easy information gathering and initiating workflows in Smartsheet.
Collect information with a form
After you create and share a form, each submission is added to the top or bottom of your sheet as a new row.
Anyone with access to the form can submit information to the sheet, even if they don’t have a Smartsheet account.
Create Automated processes with workflows to receive notifications when a new form is submitted or to allow someone to edit an existing row with an Update Request.
Open the form in the mobile app (iOS or Android) for the best experience when submitting a form from a mobile device.
Create a new form
- Open the sheet to which you want to attach the form.
- On the top left of the sheet, select Forms > Create Form.
Brandfolder Image
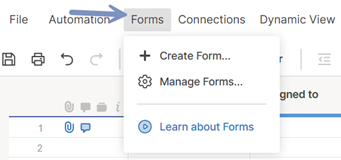
When a new form is created, all columns (except for System columns) from your sheet will automatically be added to your form. Each field will function similarly to its respective column type. You can Add items to a form to customize it.
For Contact Lists and Dropdown Lists, this includes the Restrict to list values only checkbox. When this box is checked, people submitting the form can only select from the values listed in the column.
By default, the form title corresponds to the sheet name, and the fields on the form correspond to the names of their associated sheet columns.
- Select an element from the center form preview to edit its settings, which is displayed in the right panel. For more information, see Edit or remove fields in a form.
- You can adjust any form-level settings using the Settings at the top of the form builder. For more information, see Manage form display and submission options.
- When you’ve finished setting up your form, select Save at the top-right.
Character count limits on form fields
This chart shows the limitations (if any) on the fields you can use in a form.
| Field name | Character count limit |
|---|---|
| Field name Form title | Character count limit 100 |
| Field name Form rich description | Character count limit 100 |
| Field name Form field label | Character count limit 100 |
| Field name Form field rich help text | Character count limit no limit |
| Field name Header | Character count limit 100 |
| Field name Description rich text | Character count limit 4000 |
| Field name Confirmation message | Character count limit 4000 |
| Field name Response field | Character count limit 4000 |
Preview and share your form
- Select Open Form to preview the form and ensure it’s configured correctly.
After you've previewed the form, you can close the browser tab that it opens in. - Select Share Form to email the form directly from Smartsheet, copy the form link, or embed it in a dashboard or webpage.
- Select the back arrow in the top-left corner of the form editor to close it and return to the sheet.
The name of the form you’ve created will appear in the Form Manager, where you can distribute it, view its properties, and more.

Learn how to manage security settings when sharing your form in Manage form display and submission options.
Even if you edit the form, the link to it will remain the same. Changes you make will appear on the form when you save them.
If a sheet ends up in a state where no one in your organization has owner permissions, the form becomes completely inaccessible.
Manage form display and submission options
Hide or make a field visible in your form
You can change your form settings to either hide or show fields in the form.
- Select Forms > Manage Forms.
- In the Forms dialog, select the form you need to edit.
- Select the field you need to check once you’re in the form builder.
- Use the toggles to set your field as Required or Hidden in the Field Settings pane on the right.
To manage your form, follow these steps:
- Select Form > Manage Forms...
- Open the form you want to customize.
- Once you’re in the form builder, go to the Settings tab.
Customize your form layout
- Select Form > Manage Forms...
- Open the form you want to customize.
- Once you’re in the form builder, go to the Settings tab.
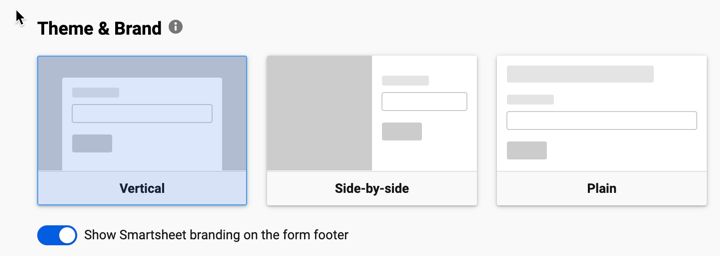
- In the Theme & Brand section, select a layout from these options:
- Vertical: You want your logo, title, description, and form to have a center alignment.
- Side-by-side: You want your description to be visible while scrolling through the form.
- Plain: You want to embed your forms in a website without including any logos, colors, or formatting from the form.
In the Colors Settings & Logo form, edit the color and logo of your form.
Show Smartsheet branding in the form footer
This option appears enabled by default, but you can remove it by turning off the Show Smartsheet branding on the form footer toggle.
This removes Smartsheet branding from:
- Form footer
- Form confirmation footer
- Mobile web form
Only Business and Enterprise plan subscribers can deactivate this option.
Security settings of your form
Your System Admin may have set minimum security settings on your account. Not all users see all the options listed here.
- In the Settings tab of the form builder, go to the Security section.
- Turn on the security settings you want to use for the form.
Security setting details
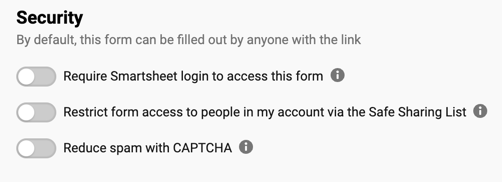
By default, all forms are available to anyone with the link.
When you use Require people to log in to Smartsheet to access this form, anyone accessing your forms needs to log in with their Smartsheet account.
When you use Restrict form access to people in my account via the Safe Sharing List, anyone accessing also needs to log in or create an account, and their user login domain must match an approved domain in your Safe Sharing List in the Admin Center.
Safe Sharing is only available in Enterprise plans.
Reduce spam with CAPTCHA
reCAPTCHA detects any suspicious activity and challenges suspected bots. You can enable reCAPTCHA to prompt users to prove they’re not bots. When a user chooses to receive a copy of their responses, Smartsheet automatically enables reCAPTCHA on all forms.
If you don't want to send copies of your form, turn off that option in the Send Email of Submissions option in the form builder.
China blocked the invisible reCAPTCHA on their internet platforms. Form submitters in China may experience issues if you’ve enabled this option or if they’ve selected Send me a copy of my responses.
Set up what the submitter sees after the form is complete
- In the Settings tab of the form builder, go to the What should happen after the form is submitted section.
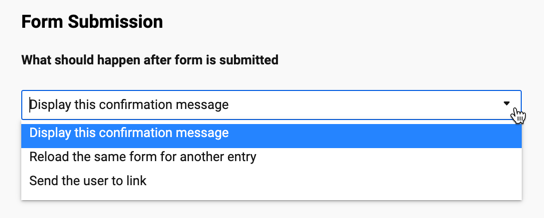
- From the dropdown list, select the action you want to apply.
- Display this confirmation message: You want only those who complete the form to see the default confirmation message: Success! We've captured your response. You can also modify the message.
- Reload the same form for another entry: Choose this option if you anticipate multiple responses.
- Send the user to link: Use this feature if you need the user to go to a website after submitting their form responses. You need to enter the URL where you want the user to land.
Specify where new submissions should appear on the sheet
You can add the new form entries at the top or bottom of the sheet.
- In the Settings tab of the form builder, go to the New Submissions should appear on the... section.
- Select where you want to add the new form responses.
If submissions appear after several blank rows, remove those blank rows.

Smartsheet doesn't add new submissions under a specified parent row or cell.
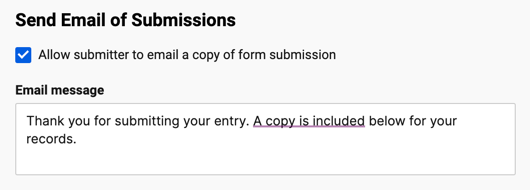
Send the user a copy of their form responses
- In the Settings tab of the form builder, go to the Send Email of Submissions section.
- Select Allow submitter to email a copy of form submission.
- Type over the default text if you want to customize the message.
Anyone with access to the form can use it to submit information to the sheet.
Privacy of a form submitter’s email address
The user’s email address is anonymous. If there's a Created by column, the value form owners see in it is web-form@smartsheet.com. However, if the form allows only Smartsheet users to submit responses, it reflects the submitter’s email address.
Using a URL query string for the Send Email Submissions feature
When you use a URL query string in your unique link, the Send me copy of my responses option is on by default. Submitters still have an option to deselect it if they want to.
With a URL query link, submitters don't have to fill in the Email address field.
However, URL query strings can't help you automate form confirmation emails to sheet owners and collaborators. Instead, you should use automated workflows if you want to receive email alerts when new entries come in.
Manage and distribute a form
If you're using a trial version of Smartsheet, you can create forms, but you can't share them.
To open the Form Manager, select Forms > Manage Forms from the sheet associated to the form.
From the Form Manager, you can either select Create form... to create a new form, or open the three-dot menu
Brandfolder Image
![]() under an existing form to complete any of the actions listed in the table.
under an existing form to complete any of the actions listed in the table.
You can create multiple forms per sheet to collect different information or display a different format to different people.
| Use this option | To do this |
|---|---|
| Use this option Edit | To do this Edit the existing form and its contents. |
| Use this option Open Form | To do this Open your form in a new tab. |
| Use this option Share Form | To do this Access the sharing modal and decide if you want to share your form via email, using a link, or embedding it on your website. |
| Use this option Copy Form URL | To do this Copy the URL of the form to your clipboard and paste it elsewhere, such as into an email or document. |
| Use this option Copy Embed Code | To do this Copy the embed code to your clipboard to embed the form in a dashboard or website. |
| Use this option Duplicate | To do this Create a copy of your form on the same sheet, but with a new URL. |
| Use this option Properties | To do this Show the form status, the number of entries submitted, the form creator's email address, and the creation date. |
| Use this option Deactivate | To do this Deactivate the URL (accessing it displays an error message), but preserve it and the form to use it in the future. |
| Use this option Delete | To do this Remove the form and its associated URL from Smartsheet. You can't recover the URL. Delete forms with caution. |
Access to form options varies by user type and sheet permissions.
If you need multiple people to fill out the same form but want to specify different default values in certain fields, or automatically select the Send me a copy of my form submission checkbox, create a URL that includes unique query string parameters.
If a sheet ends up in a state where no one in your organization has owner permissions, the form becomes completely inaccessible.