Discover how to use Smartsheet’s automation features to minimize manual tasks. Create workflows that trigger based on specific actions, and configure alerts to keep your team informed and efficient.
Automate processes with workflows
Create your workflow
Building an automated workflow is similar to creating a flowchart. You place triggers, conditions, and actions together from a start block to one or more end blocks.
Your permission level defines what you can do and where you can apply workflows. Learn about Automated workflow permissions.
You can build your workflows from scratch or customize existing templates. The Automation Template Gallery includes tips on when to use the workflow and how to customize each template.
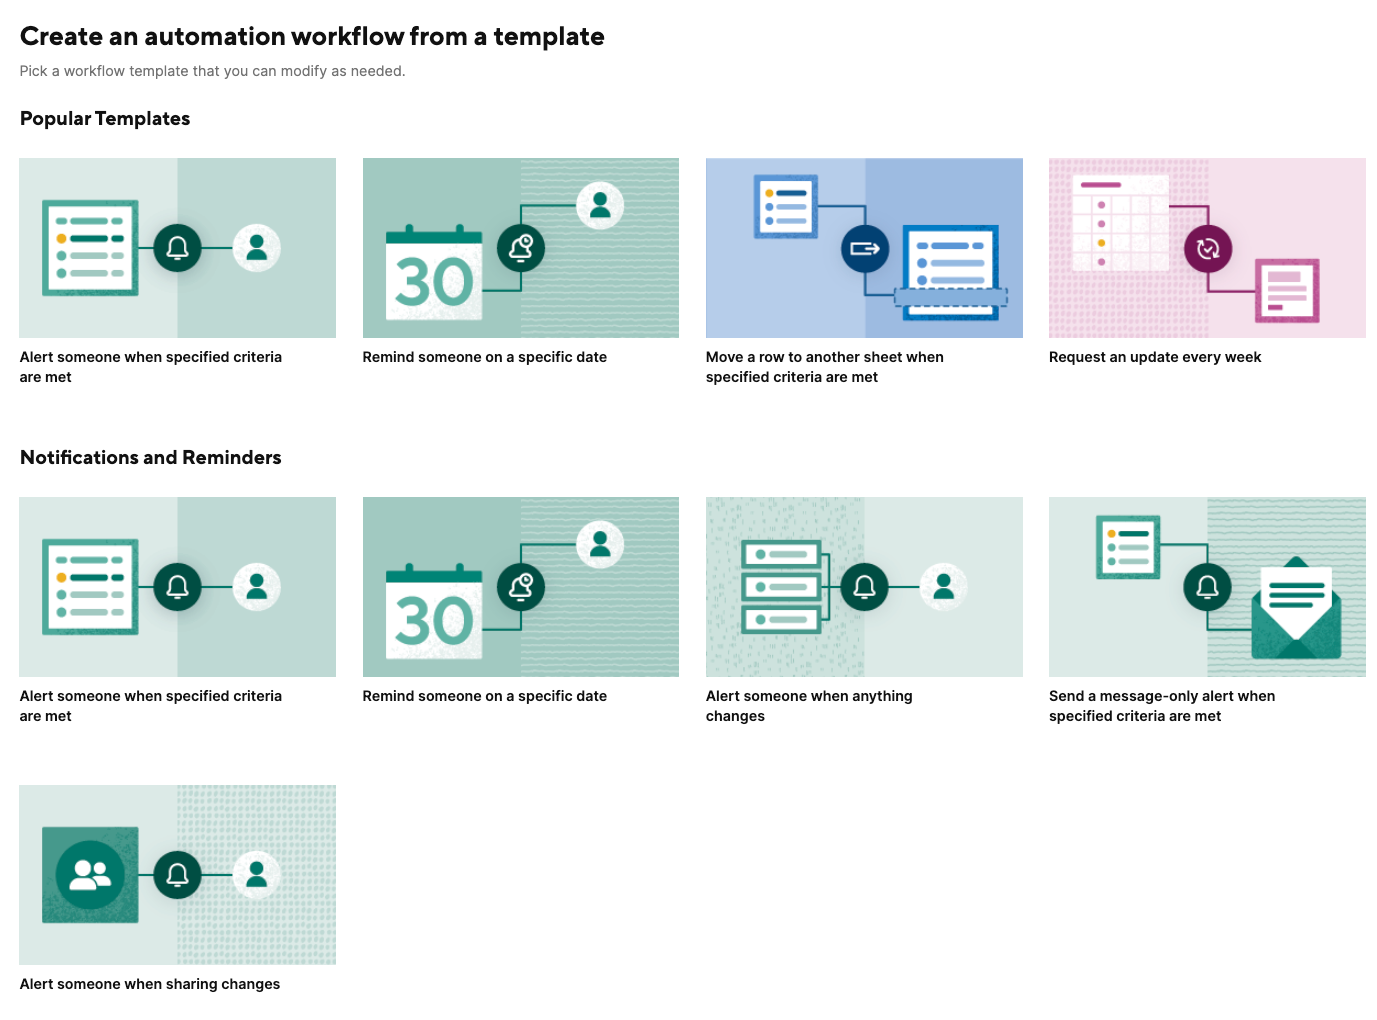
How to add a workflow
- Access the Automation Template Gallery:
- In the upper-left corner of your sheet, select Automation > Create from template…
- Select a template to open the details section.
- Create a workflow from scratch:
- In the upper-left corner of your sheet, select Automation > Create from scratch…
Brandfolder Image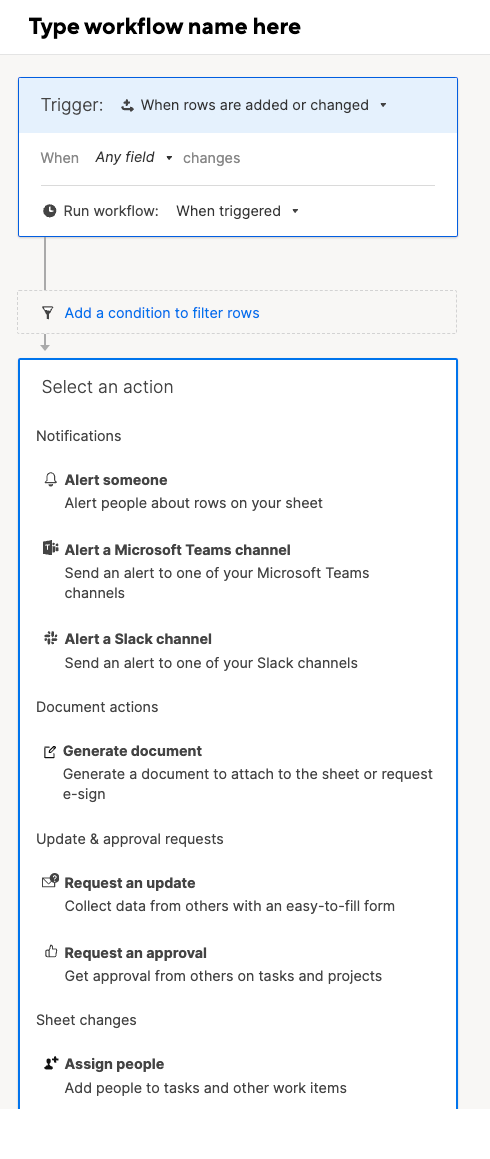
Workflows are formed by:
- Trigger blocks: Define when your workflow is executed.
- Condition paths: A line that connects blocks to display different routes that your workflow may take depending on the conditions you set. Your workflow may have a single or several paths from trigger to action based on preceding conditions.
- Condition blocks: Define conditions to filter which rows to include in an alert or action.
- Action blocks: When triggered, it chooses the type of automation your workflow performs.
Customize your workflow
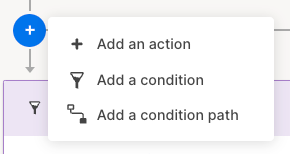
Select the plus icon (+) to insert new paths and blocks to the workflow in order to:
- Add a condition: Filter the rows included in the workflow path.
- Add a condition path: Define an alternate route for your workflow if the first condition isn't met.
- Add an action: Define what you want your workflow to do once it meets your conditions.
Brandfolder Image
Things to know about workflows
- With multiple paths, the workflow evaluates each condition block in sequence from left to right. The leftmost condition block that the row meets defines the path the row takes through the workflow.
- Add at least one action block at the end of each path. After an action block, you can define additional conditions and paths as long as another action block follows.
- Older workflows such as emails, update/approval requests, and move row automation on large sheets may take a few minutes to complete.
- Cells that contain cross-sheet formulas or cell links won’t trigger a workflow that automatically changes the sheet (Move Row, Copy Row, Lock Row, Unlock Row, Approval Request). To work around this, consider using time-based automation or recurrence workflows.
Workflow limitations
- Each sheet can have up to 150 workflows.
- Each workflow can have up to 100 blocks. This includes the trigger, condition, and action blocks.
- Each workflow can have up to 30 action blocks.
- Condition blocks can have up to 20 condition statements (20 lines within the block).
- Attachment links included in automated workflow emails expire after 14 days.
Best practices for workflows
- Type a name for your workflow in the upper-left corner of the workflow builder.
- Save your workflow after setting it up or after any change.
- Set your trigger to occur an hour before the action should occur. This ensures that technical issues don't prevent the action from occurring on time.
- To improve performance, combine workflows that are triggered together and deactivate older workflows.
- In the Manage Automation Workflows window, you can deactivate, activate, edit, duplicate, or remove a workflow.
- When you duplicate a workflow, modify the approval requests or use new values. Otherwise, the approvals in your original workflow may trigger approval requests in the new workflow.
View and manage automation workflows
Access your saved workflows
At the top left of the sheet, select Automation > Manage automation workflows. In the top right corner of the workflow manager, you can:
- Filter by status: All, Active, Inactive, Unable to run
- Sort by: Name, Date modified, Date created, Last run
Users with Editor-level permissions can only create, edit, or delete alerts or reminders with themselves as the recipient.
Manage your workflows
- At the top left of the sheet, select Automation > Manage automation workflows.
- Hover over the workflow and select the More icon. The following table contains what you can do here.
| Use this command | To do this | Tips and notes |
|---|---|---|
| Use this command Deactivate | To do this Temporarily turn off the rule | Tips and notes Use this command to use the rule in the future. |
| Use this command Run now... | To do this Run the workflow manually | Tips and notes Use this command to run the workflow whenever you want manually. |
| Use this command Test now... | To do this Test the workflow | Tips and notes Use this command to test your workflow on a test row or use to preview how notifications will look by sending them to yourself. |
| Use this command Edit | To do this Rename or change the criteria for the rule | Tips and notes Use this to modify the alert message. |
| Use this command Duplicate | To do this Create a copy of the rule | Tips and notes Use this command to create the same workflow type for a different purpose. This allows you to create another workflow faster. |
| Use this command Subscribe or Unsubscribe | To do this Stop receiving the alert | Tips and notes You can unsubscribe directly from the alert or action you receive, by selecting Unsubscribe in the Don't want to receive these emails? section in the email message. To subscribe, access the workflow menu, and select Subscribe if you want to receive alerts or automated actions. |
| Use this command Delete | To do this Delete the rule completely | Tips and notes You can’t undo this. |
| Use this command Workflow Properties | To do this View workflow properties. | Tips and notes You can see here the workflow ID, workflow creation details, and who has unsubscribed. |
Workflow issues and notifications
You may receive email notifications if there are issues with your workflow. Follow the instructions in the email to fix any issues.
Duplicate a workflow
As described previously, select Duplicate in the workflow menu. You can then edit the workflow to address any new scenarios.
Keep these tips in mind:
- Edit any approval requests: Store them in a new field or use new values. If you don't change them, approvals in your original workflow may cause approval requests in the duplicated workflow to run.
- Check your subscriber list: Make sure all the correct people receive notifications.
Check workflow properties
Open the Workflow Properties dialog to review the following details:
- Workflow ID: 16-digit value that you can use for interactions with Smartsheet Support.
- Created by: User who created the workflow.
- People who unsubscribed from the workflow: Total number and list of unsubscribed users.