This section describes how you can manage access to your account, who counts towards your subscription plan size, and the different permission levels people can have.
Additionally, you can find out what you should do when someone leaves your company or no longer needs access to the account.
Resourcing Administrators in your account have the ability to control access and cost through the number of people you are managing in your account.
Administer and add people
Resourcing Administrators can add, remove, and update people on the account.
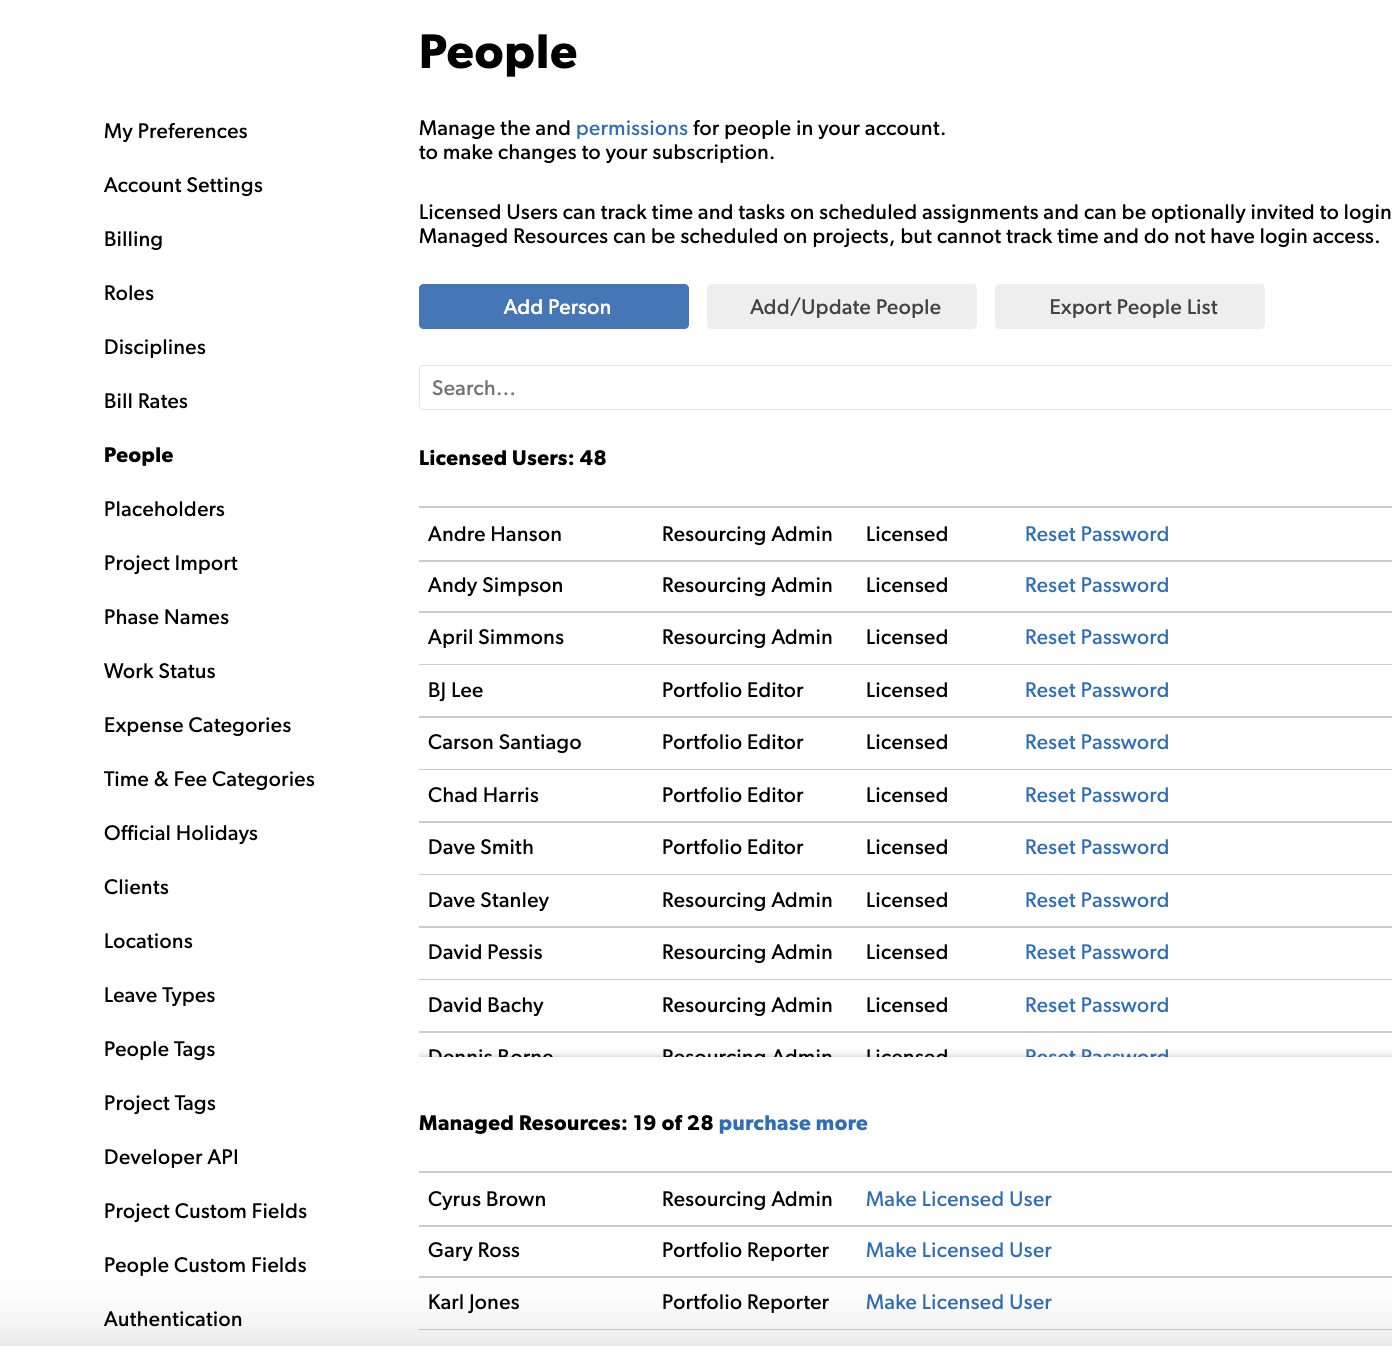
To add a person, you must include their first name, last name, and permission level. Other attributes are optional. You can invite them to the account immediately or later by going to their Profile > Edit Profile > Send Invitation.
To notify the recipient, you must include the recipient’s email address and select Invite this user. By selecting the Invite this user check box, you will enable login access for that team member.
People who have received or accepted an invitation count toward the number of Licensed Users in your subscription.
You can also add team members who don't have access to your account as Managed Resources. These people count toward the number of Managed Resources in your subscription.
Add multiple people at once
You can add multiple people by preparing a list in a spreadsheet program and importing that information into Resource Management. In the spreadsheet, fill out first and last names, email addresses, permission levels, disciplines, and roles for each person you want to add.
The permission levels, disciplines, and roles in this list must match your account settings for people.
Learn how to import multiple people here.
Manage freelancers or contractors
If you want freelancers to track their time on projects, you can invite them and give them a login, like other people in your account. You pay for Licensed Users with logins, so once the job is complete, you can archive that freelancer and use their license for someone else. Some customers have a few rotating seats designated for freelancer use.
If you don't need to account for freelancers' time and want to track their cost to the project, add them as expenses against the project budget.
To restrict freelancer access to company-wide information, set their permission level to Contractor.
Managed Resources
You can create resources to represent meeting rooms or equipment. This way, you know when certain meeting rooms are booked and when certain pieces of equipment will be unavailable.
If you use the Smartsheet integration, each Managed Resource needs a legitimate email address associated with it.
If you are not using the Smartsheet integration, then you can create a placeholder email address such as truck1@yourcompany.com, truck2@yourcompany.com, etc. for your Managed Resources.
You cannot track expenses for Managed Resources.
Archive, modify, or delete people
Resourcing Administrators manage the paid users on an account.
About archiving people
You can archive paid users and managed resources. Archiving users:
- Prevents them from accessing Resource Management
- Removes them from teams on your organization page
- Removes them from the schedule
Assignments for the archived person remain on the project page so that a project manager can reassign any remaining work to another person or placeholder.
Resource Management saves all data for the archived person.
The People section of Account Settings contains a list of archived people. When you archive someone, they no longer count toward the number of Paid Users or Managed Resources in your account.
If you regularly have contractors or temporary workers working for your organization, invite them at the Contractor permission level. Set their start and end dates in the Availability section of their personal profile. When they finish the project, archive them in Account Settings to revoke their access to Resource Management.
Archived users without a defined first and last day of work will continue appearing in reports. To exclude an archived user from reports, unarchive them, add a first and last day of work in the past, and then archive them again.
Change a person's role
When you change a person's role, you lose all the data associated with their prior role. It's best to archive them first to keep their data, then reinvite them to Resource Management using the same email address.
- Archive the person first (see below). The archive gives you historical reporting for that role and any reporting fields.
- Add the person again, using the same email from the previous role and the new role and fields.
Archive a person
- Go to their page. In the top right corner, select Edit Profile.
- At the bottom of the Update Profile page, select Archive.
Change a paid user to a managed resource
To change a paid user to a managed resource:
- Open Account Settings.
- If you are working in Resource Management in Smartsheet, select the kebab menu in the top right corner, then select Account Settings.
- If you work in standalone Resource Management, select Settings > Account Settings.
- Select People from the menu on the left.
- Select the name for which you want to change the status, and then select Change to Managed Resource.
Deleting people
Once a person’s profile is deleted, all data associated with that person will be deleted from Resource Management and cannot be restored.
You can't undo a deletion.
Delete a person
Archive the person in their profile or from the Account Settings page.
- Go to the People section in Account Settings.
- Select the name of the person you want to delete, and then go to their profile (the green text indicates a link)
- Once in their profile settings, you'll see the button to delete their profile at the bottom of the page.
Resource Management: User licenses and subscriptions
Licensed users
Licensed Users can log in and access Resource Management.
Depending on their permission level, licensed users can have varying levels of access to track and/or approve time, plan projects, manage staffing and schedule, add or modify user profiles, and report on resource management data.
Only Licensed Users can track time on projects.
Managed Resources
Managed Resources are the people (or other assets, like conference rooms or equipment) you assign to projects and manage their overall schedule. Managed Resources can be assigned skills, roles, disciplines, and be fully tracked in the same way licensed users are. However, Managed Resources cannot access Resource Management.
Unmanaged Resources
Unmanaged Resources are user accounts created for users assigned work via Smartsheet's Workload Tracking feature who are not already licensed users or Managed Resources. Unmanaged Resources do not have access to log into Resource Management. These profiles are free, and they are created for:
- The creator of the project plan sheet
- Smartsheet users assigned work in the sheet
- Licensed users shared to the sheet at Editor or above when they open the Resource Management Panel
Once Unmanaged Resource profiles are created, each person's availability and allocation can be tracked on the Workload Schedule and Workload Heatmap. Learn more about Unmanaged Resources.
Change your subscription
Licensed users and Managed Resources are sold in separate amounts. Your current subscription levels appear on the People tab of Account Settings.
To make a change to your current subscription:
- Open Account Settings.
- If you are working in Resource Management in Smartsheet, select the kebab menu in the top right corner, then select Account Settings.
- If you are working in standalone Resource Management, select Settings > Account Settings.
- Select Billing
- Select Modify Plan
- Complete the form