Learn about the areas in account settings that impact key settings for your people such as setting up default roles and disciplines, a bill rates matrix for your organization, and locations.
When Resourcing Administrators create a person’s profile, they have the ability to edit and set key information.
Set permission levels for people
Only Resourcing Administrators can set permission levels for people. By default, new people have Portfolio Viewer permission.
Change permission levels
- Open Account Settings.
- If you are working in Resource Management in Smartsheet, select the kebab menu in the top right corner, then select Account Settings.
- If you are working in standalone Resource Management, select Settings > Account Settings.
- Select People from the left menu options.
- Choose the role column, and then, from the dropdown, select a new role for the person.
- Select Save.
Project members
Project members need access to specific projects. They don't have assignments but can run reports, schedule people, or update project settings with Editor access. When you make someone a project member, the project will appear in their portfolio.
When you make a Portfolio Viewer, Portfolio Reporter, or People Scheduler, a project member, they become editors on those projects.
Contractors cannot be project members.
If a project is connected to a Smartsheet project plan, sheet collaborators shared at Editor - Cannot Share or above can access the project in Resource Management if they have a Resource Management license. They can view the project page, schedule, and worklist. They can also edit assignments related to the project. They cannot run reports or see budget details for the project.
Resource management roles
Resourcing Administrator
People with Resourcing Administrator level access can change company account settings, alter schedules, adjust bill rates, add/remove people and projects, reset passwords, and confirm others' time.
Portfolio Editor
People at the Portfolio Editor level can create or modify new projects in the system. They can also adjust project schedules and allocate people to different projects.
People Scheduler
The People Scheduler permission level is meant for people who make day-to-day changes to the Schedule but should not have access to the project's settings. They have all the permissions of the Portfolio Editor, except the ability to create/edit projects, add/invite people, edit account settings, edit people's profiles, and confirm others' time.
Portfolio Reporter
The Portfolio Reporter permission level allows the person to see information on all projects and people within the organization, including budgets and other financial details. However, Portfolio Reporters cannot edit projects or assignments.
Portfolio Viewer
People with the Portfolio Viewer permission level (previously named Restricted Team Member) have the same access as Portfolio Reporters, except they can only see financial details for projects if they are added as members. Portfolio Viewers can see financials and run reports only for projects they're members of.
Project Editor
People with the Project Editor permission level can create and manage projects but cannot access or modify the sensitive details of projects owned by others. They can assign people to their projects but cannot edit the assignments on projects owned by others. When assigned to someone else's project, Project Editors have the same access to that project as a Portfolio Viewer.
Contractor
These people can only view their time-tracking page and their projects. Contractors can account for time only on projects that they've been assigned to by a Resourcing Administrator or Portfolio Editor.
Permission levels and capabilities
The following table lists which capabilities each permission type allows a person to access.
| Capability | Resourcing Administrator | Portfolio Editor | People Scheduler | Portfolio Reporter | Portfolio Viewer | Project Editor | Contractor |
|---|---|---|---|---|---|---|---|
| Edit account settings | Yes | No | No | No | No | No | No |
| Add and invite users | Yes | No | No | No | No | No | No |
| Create new projects | Yes | Yes | No | No | No | Yes** | No |
| Approve time and expenses | Yes | Yes | Yes* | Yes* | Yes* | Yes* | Yes* |
| Edit projects | Yes | Yes | No | No | No | Yes** | No |
| Create assignments | Yes | Yes | Yes | No | No | Yes** | No |
| Edit schedule | Yes | Yes | Yes | No | No | Yes** | No |
| Reports | Yes | Yes | Yes | Yes | Yes | Yes** | No |
| See financials | Yes | Yes | Yes | Yes | No | Yes** | No |
| View all projects | Yes | Yes | Yes | Yes | Yes | No | No |
| View schedule | Yes | Yes | Yes | Yes | Yes | Yes | No |
| View assigned projects | Yes | Yes | Yes | Yes | Yes | Yes | Yes |
| Track time | Yes | Yes | Yes | Yes | Yes | Yes | Yes |
| Enter expenses | Yes | Yes | Yes | Yes | Yes | Yes | Yes |
| Add tasks | Yes | Yes | Yes | Yes | Yes | Yes | Yes |
| Update status | Yes | Yes | Yes | Yes | Yes | Yes | Yes |
*When mapped as another person's approver
**Only projects owned by the person
There is one account Owner for each plan. This person has Resourcing Admin permissions. They're the user who registers for the free trial or signs the contract for the paid plan. Learn how to change the account Owner.
Assign roles and disciplines
While individuals may have different roles or disciplines for projects, you can only assign one primary role and discipline per person.
Create roles or disciplines
- Open Account Settings.
- If you're working in Resource Management in Smartsheet, select the kebab menu in the top right corner, then select Account Settings.
- If you are working in standalone Resource Management, select Settings > Account Settings.
- On the left menu, select Roles or Disciplines.
- Enter the new Role or Discipline and select Add.
To edit or delete existing roles and disciplines, select the role or discipline row and either Delete or make edits then select Save.
Sample roles
Role indicates the level or title of the person within the organization. For example:
- Junior
- Senior
- Director
- Associate
Sample disciplines
Discipline indicates the type of work a person does within the organization, most often what department they’re in. For example:
- Design
- Strategy
- Research
- Development
- Account Management
Set up bill rates
Create the default bill rate matrix
The default bill rate applies to everyone in your organization. You can add exceptions for specific roles or disciplines. Roles or disciplines with no set bill rate use the default rate. When the discipline and role are assigned to a person, the system will automatically apply the corresponding bill rate.
First, you need to assign roles and disciplines.
- Open Account Settings.
- If you are working in Resource Management in Smartsheet, select the kebab menu in the top right corner, then select Account Settings.
- If you are working in standalone Resource Management, select Settings > Account Settings.
- Select Bill Rates.
- Use the + Add Discipline and the + Add Role option to create the rows and columns for the bill rate matrix.
- Select the field where the role and discipline intersect to enter the appropriate bill rate amount.
- Select Save.
If an entire discipline or group of roles uses the same rate, you can specify that by building out only one row or column.
Project specific bill rates
When you create a project, you can create custom bill rates for that project that override the default bill rates. Open the project settings page to create or modify bill rates for that specific project. You can choose to apply increased rates to the whole project or to specific phases.
Person specific bill rates
Rates from the bill rate matrix can be overridden by a rate specified within a person’s profile.
- On the People page, select the person's name who you want to edit.
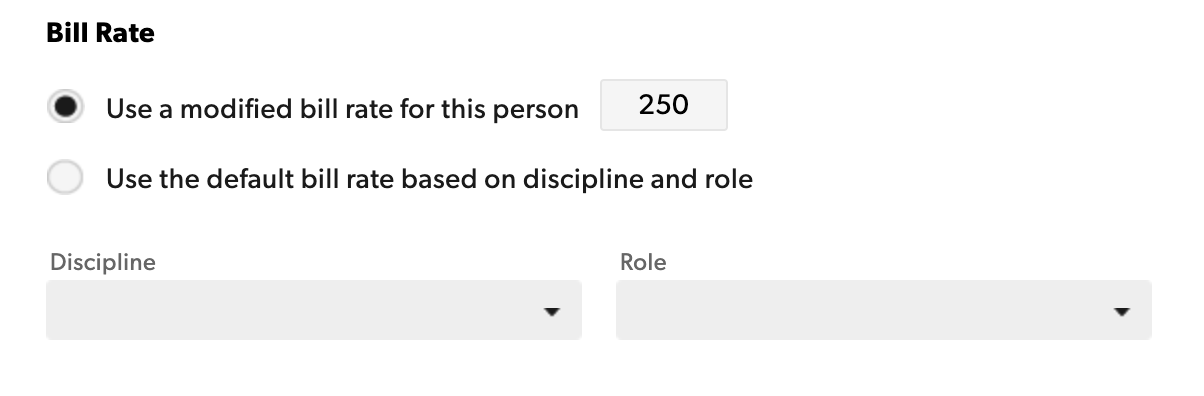
- Select Edit Profile.
- In the bill rate section, select the option for a modified bill rate and enter the appropriate amount.
When someone changes a role or bill rate, change their profile settings. Their rates will update on all new projects; existing projects stay the same.
Because bill rates are typically tied to contracts, rates are not automatically updated for existing projects when someone is promoted. Resource Management assumes you will still bill them out at the old rate for the remainder of the project.
Import or update multiple people at once
Prepare your data
To add new people
- Open Account Settings.
- If you are working in Resource Management in Smartsheet, select the kebab menu in the top right corner, and select Account Settings.
- If you are working in standalone Resource Management, select Settings > Account Settings.
- Select People from the left menu.
- Select Add/Update People.
- Select Download Template.
- Using a spreadsheet program, add new people by filling their information into blank rows.
- Save the file as a CSV UTF-8.
To make updates to people already in Resource Management
- Open Account Settings.
- Select People from the left menu.
- Select Add/Update People.
- Select Export People List.
- Use a spreadsheet program to change the attributes of the people you want to update. Be sure to fill in people’s custom fields where applicable.
- Save the file as a CSV UTF-8.
Tips and tricks
- Ensure to encode CSV files in UTF-8 to prevent errors on rows with special characters.
- Each person must have a first name or email, permission level, and license type. All other fields are optional.
- The first and last day of work dates must be in YYYY-MM-DD format.
- The permission level and license type must match the settings in Resource Management exactly.
- You can create new roles, disciplines, and locations in this spreadsheet.
- Custom field values in this sheet must match available options in Account Settings > People Custom Fields.
- Combine new people and profile updates in the same file to save time.
- Ensure your device's regional settings use a comma as the default for list separators.
Upload your list
- Open Account Settings.
- If you are working in Resource Management in Smartsheet, select the kebab menu in the top right corner, then select Account Settings.
- If you are working in standalone Resource Management, select Settings > Account Settings.
- Select People from the left menu.
- Select Add/Update People.
- From the Add/Update People page in Account Settings, select Choose file and select your updated CSV file.
- Check the box to invite all newly added and/or updated licensed users.
- Click Upload.
You can navigate away from the page once the upload starts (the import will run in the background), and you'll receive an email when it's complete.
The email includes a link to the status page if there are errors during the import. Click the link to download a list of errors with directions on fixing them.
Column inputs and formatting
This table provides details for each column in your spreadsheet.
| Fields | Required field | Description | Formatting requirements |
|---|---|---|---|
| user_id | Yes* (for editing users) | The User ID stores all of the user attributes assigned to them. Exporting the people list will include User IDs for existing users. | Must be a valid User ID in the organization
To create new users, leave the User ID column blank
To update attributes for existing users, leave their User ID intact |
| first_name | Yes | Add the first name of a user. | 0-255 characters |
| last_name | Optional | Add the last name of a user. | 0-255 characters |
| Yes | Add the email address for the user. Note that a user's profile email differs from their login email. | user@domain.com | |
| permission_type | Yes | Set the permission level for the user. Note that users can change their permission type using Add/Update People. | Resourcing Administrator Portfolio Editor People Scheduler Portfolio Reporter Portfolio Viewer Project Editor Contractor |
| license_type | Yes | Set the license type for the user. Note that users can change their license type using Add/Update People. | licensed managed_resource |
| discipline | Optional | Add the team/group for the user. A new discipline will be created if it doesn't already exist. | 0-255 characters |
| role | Optional | Add the type of work for the user. A new role will be created if it doesn't already exist. | 0-255 characters |
| location | Optional | Add the location where the user is based. A new location will be created if it doesn't already exist. | 0-255 characters |
| first_day_of_work | Optional | Add the user's first day of work. This value affects the user's starting availability. | Date format: YYYY-MM-DD |
| last_day_of_work | Optional | Add the user's last day of work. This value affects a user's ending availability. | Date format: YYYY-MM-DD |
| mobile_phone | Optional | Add the user's mobile phone number. This value is visible on a user's profile page. | 0-255 characters |
| office_phone | Optional | Add the user's office phone number. This value is visible on a user's profile page. | 0-255 characters |
| employee_number | Optional | Add an internal employee identification number. This value appears in report exports. | 0-255 characters |
| utilization_target | Optional | Add a fixed number for the user's utilization target. The target is visible in utilization reports and does not impact a user's availability. | It must be a number
If this value is blank, 100 will be applied |
| bill_rate | Optional | Add a modified bill rate for the user or use the default bill rate based on their discipline and role. | The modified bill rate must be a number
[default] applies the default bill rate based on discipline and role
If this field is blank, [default] will be applied |
| people_tags | Optional | Add tags to identify skills or other unique characteristics. | 0-255 characters
Separate multiple entries with a semicolon |
| approvers | Optional |
If project owners are enabled as approvers, they don't need to be included in this list.
| Must be a valid User ID in the organization Separate multiple entries with a semicolon |
| CF_## “name” (text field) | Optional | Add a string of text to the custom field. | 0-255 characters |
| CF_## “name” (dropdown) | Optional | Set an existing custom field value for the user. | Ensure that any values entered in this column are saved as options for this field in the Account Settings > People Custom Fields page |
| CF_## “name” (multi-select dropdown) | Optional | Set existing custom field values for the user. | Ensure that any values entered in this column are saved as options for this field in the Account Settings > People Custom Fields page
Separate multiple entries with a semicolon |
Use placeholders in projects
With placeholders, you can:
- Budget a project: Create assignments for specific roles and disciplines, without impacting anyone's actual schedule or utilization. The placeholder can be set up with any bill rate you choose for improved budgeting accuracy.
- Resource Manager workflow: Managers can use placeholders to request a team member from a Resource Manager. An assignment for a placeholder lets the Resource Manager know someone needs to be assigned to that project.
- Projecting staffing needs: Use placeholders to schedule future projects. Once they’re scheduled, utilization reports will show you what disciplines can handle the workload and where you may need to hire help. You can estimate how future hires will impact estimates. When you hire, you can reassign those assignments to the new person on your team.
Create placeholders
- Open Account Settings.
- If you're working in Resource Management in Smartsheet, select the kebab menu in the top right corner, then select Account Settings.
- If you are working in standalone Resource Management, select Settings > Account Settings.
- Select Placeholders.
- Select Add.
- Configure your Placeholder, including Discipline, Role, Placeholder title, Abbreviation, and Color. Discipline and Role are recommended for filters and assignments, but not required.
- Select Show More to review additional settings for Bill Rate, Location, and other custom fields for Language, Travel Locations, Skills, and Project Management.
- Once you have completed your settings, select Save.
That’s it! You have created a placeholder.
Placeholders have an auto-generated image based on an abbreviation and a color. The image, abbreviation, and color can be changed in the account settings.
Add placeholders on the project page
Add placeholder assignments from either the project schedule or the project worklist.
On the schedule:
- Click on a phase or any white space on the schedule.
- Select Add Team Member to apply filters or to search for the name of the appropriate placeholder.
On the worklist:
- Hover or click on the name of the project or phase.
- Select Add Team Member.
- Search for the name of the appropriate placeholder.
Add and filter placeholders on the schedule
You can add placeholder assignments to the schedule, just like an assignment for any person.
To create a new assignment, click on any white space on the schedule and select New Assignment.
Use filters to find the placeholders and people you’re looking for. Placeholder assignments appear semi-opaque, indicating that those assignments belong to a placeholder.
Use the assignment status filter to view assignments for the staff or for placeholders. Confirmed assignments are staffed to people in the account, while placeholder assignments are specifically for placeholder team members.
Find placeholders in reports
- Group your reports by team member type to separate placeholder assignments from confirmed team member assignments.
- Change your filter criteria to find the placeholders, people, and projects you’re looking for.
Configure profile settings
You must have Resourcing Administrator permissions to add or update user profile information.
Basic profile details:
- Profile image: It's nice to see your team's faces; plus, they'll appear on the organization page and the schedule. A 200 x 200-pixel crop, 300K max, works best.
- First and last name: enter the first and last name of the person.
- Email: where a person will receive marketing emails from Resource Management.
- Cell phone and office phone: add these details if applicable, so your team knows how to get in touch with this person. This information is visible on the profile page to your entire team.
- Location: select where the person is based.
- Employee number: populate this field if you have internal identifiers for the person and would like this information available on report exports.
- People custom fields: additional information that adds further business logic to your organization's account.
Administrator fields:
Availability: Enter details such as a person's first and last day of work. When people work hours that differ from the regular work days and hours you've set in account settings, create a part-time availability for them. This will impact the person's availability on the schedule.
Utilization: This is a fixed number used to compare how the actual utilization compares to the target for this person. The utilization target is shown in its column in utilization reports and does not impact a person's availability.
Bill rate: You can choose to use a modified bill rate for this person or use the default bill rate for the person based on their discipline & role. This bill rate comes from the bill rates matrix you built out in account settings. Enter $0 if you want this person to appear as Non-Billable
Discipline + role: This is the team/group (discipline) and the type of work (role) this person does in your organization.
Approval workflow: Select who will approve this person's time and/or expenses.
If enabled, project owners can also approve time and expenses related to projects they own.
- People tags: Populate tags you create in account settings here, or create new tags for people.
Contractors cannot edit profiles.
Unmanaged Resource profiles
Unmanaged Resources can use or be tracked using the Workload features in Smartsheet but cannot login to Resource Management. They do have profiles created that fully licensed users can see. Their profile shows:
- The today tab
- Their contact information
- Any work they are assigned via workload tracking
Profile updates when your account uses Smartsheet Authentication
When your account uses Smartsheet Authentication, basic identity fields such as profile picture, name, email, and office/cell phone numbers are managed in Smartsheet and locked in Resource Management. Any updates you make to contact information in Smartsheet will automatically reflect in Resource Management.
If you don’t have a profile image in Smartsheet but do in Resource Management, the Resource Management image will continue to be used in Resource Management.
Resource Management respects the visibility settings for your profile image in Smartsheet. To adjust these settings in Smartsheet, select your profile image or the avatar icon, then select Personal Settings. Next to Visibility, select Customize. Now you can set your visibility settings settings.
Learn more about updating contact information for others or yourself in Smartsheet.
Configure availability for an individual
The default work week for your organization is set on the Account Settings page. This default work week informs the allocation % target on the schedule so you can schedule your team for 100% of their available time. For example, 40 hours a week would be 100% allocation.
Set availability for a specific person:
- Open Account Settings.
- If you're working in Resource Management in Smartsheet, select the kebab menu in the top right corner, then select Account Settings.
- If you work in standalone Resource Management, select Settings > Account Settings.
- Select People.
- Select the individual's name and make adjustments in the Availability section.
Only assignments created or modified after you set the part-time availability setting are affected; you may need to modify existing assignments to reflect updated availability . Prior assignments will still show full-time availability.
If a person has zero hours available on any given day, that day is considered a non-working day. Assignments that overlap with a non-working day are removed from timesheet suggestions and do not count towards the project budget in reports
Time suggestions (unconfirmed hours) will not be scheduled if someone is unavailable.
Set first and last days of work
Team members are considered unavailable before their first day of work and after their last day of work.
- Go to the People page and select Edit Profile.
- In the Availability section, enter the first and last day of work.
Set permanent part-time availability
For people who have availability that differs from the default settings:
- Open the profile of the person whose availability needs adjustment by navigating to Account Settings > People.
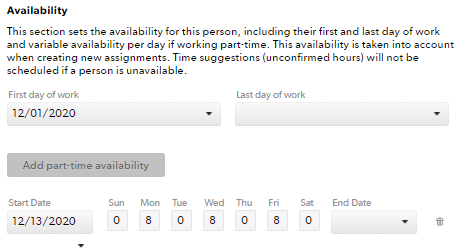
- Select Add part-time availability in the person’s profile.
- In the Start Date and End Date boxes, set the dates: enter the start and end dates to indicate when the working duration will differ from the default work week for your organization.
If the individual will have part-time availability for an indefinite amount of time, leave the End Date box empty.
Set temporal part-time availability
If a person is temporarily unavailable during a specific period, set a part-time availability block in their profile:
- Navigate to Account Settings > People.
- Select Add part-time availability in the person’s profile.
- In the Start Date box, select the first day you want them to show as unavailable, and in the End Date box, select the last day they will be unavailable.
- In the Monday – Sunday boxes for this part-time block, type 0.
Resource Management will show this person is no longer available.
Create and manage locations
Locations can be used to sort or filter people on your organization page. Additionally, you can use them as search criteria to reassign items on the schedule.
To manage locations:
- Open Account Settings.
- If you are working in Resource Management in Smartsheet, select the kebab menu in the top right corner, then select Account Settings.
- If you are working in standalone Resource Management, select Settings > Account Settings.
- On the left side, select Locations.
- Enter new locations in the location field then select Add.
You can edit the existing locations by selecting the name and editing it or deleting it by selecting Delete.
Manage bill rates for multiple disciplines and roles
People can only have one discipline and role in Resource Management. This is set in their personal profiles.
However, you can change bill rates for a person using project phases.
For example, Joe could be working on the QA phase of a project with a one bill rate, then work as Technical Adviser for another phase of the project at a different bill rate.
To account for the different bill rates, edit the phases and change the rates.
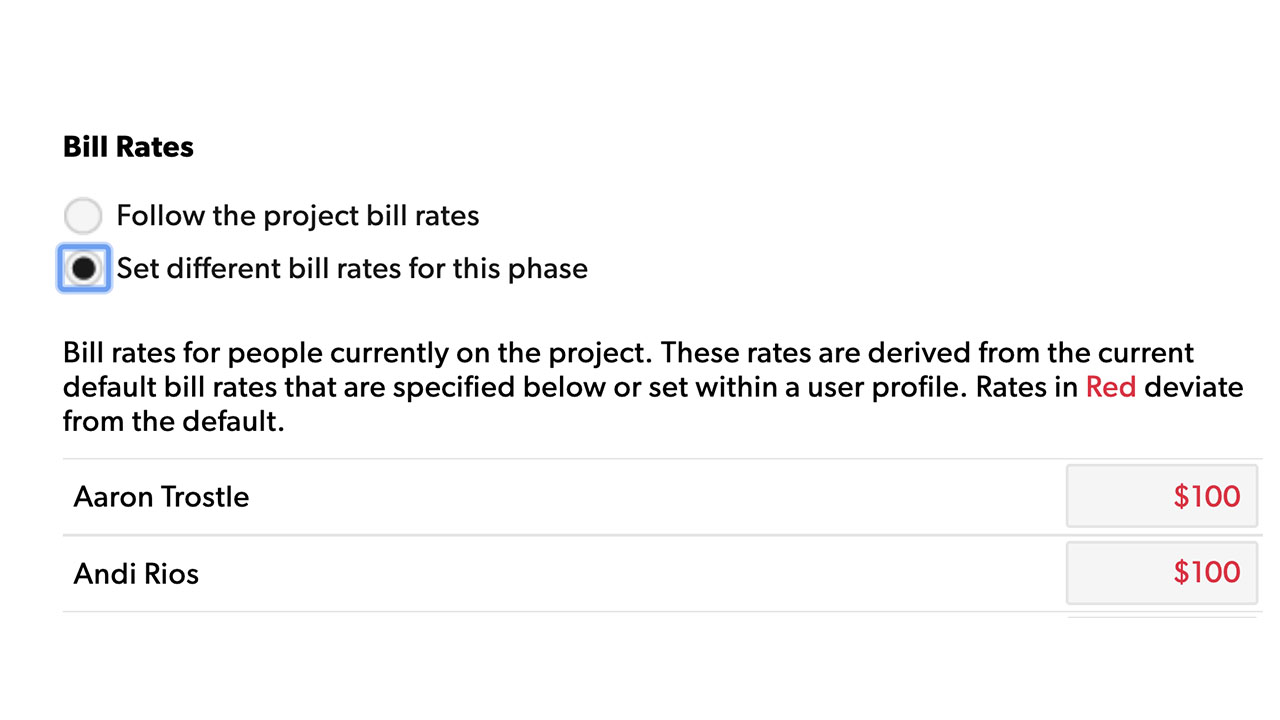
- In project settings, click the phase you want to work with.
- Under bill rates, select Set different bill rates for this phase.
- Enter any new bill rates and then, at the bottom of the page, click Save.