Use the workload heatmap and workload schedule directly in sheets to view who is available and address resource over-allocations.
Workload tracking is available to users with a Smartsheet Business or Enterprise plan. You must be a licensed user (Legacy Collaborator Model) or a Member (User Subscription Model). Sheet Owners and Admins can enable workload tracking. Sheet Owners, Admin, and Editors on the plan can view the workload heatmap and edit the workload schedule. Sheet Commenters and Viewers can view the workload heatmap and schedule.
If you see a login button in the RM Panel, you must activate Smartsheet Authentication for your Resource Management account to use the Workload Tracking features.
If you have a Resource Management plan and use workload tracking, your project data is visible in Resource Management to admins and other users with plan-wide access.
On sheets, you can enable workload tracking, which calculates the availability of the resources assigned to work on projects. You can calculate availability from all the assignments on sheets where workload tracking is on. It is best practice to turn on workload tracking for all committed work so project managers can have the most accurate picture of a person's availability. A project sheet typically includes a start date, end date, duration, % complete, and predecessors column.
Set up workload tracking
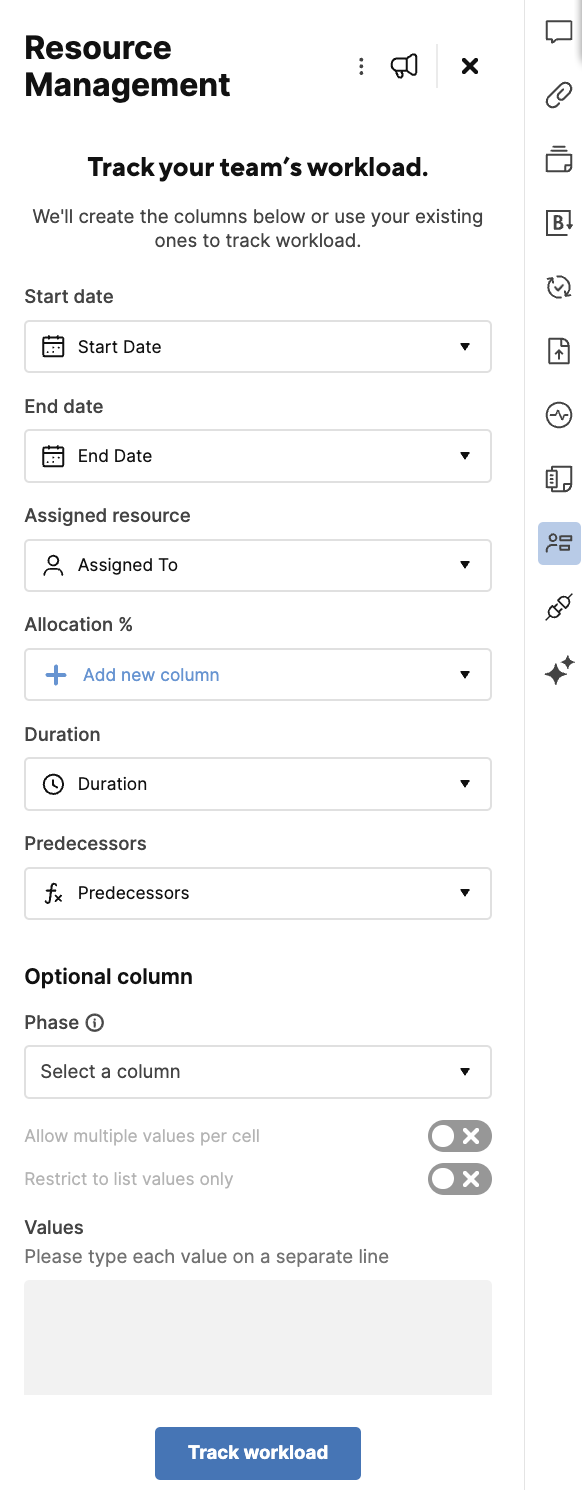
- Open the Resource Management panel
Brandfolder Image

- Select the columns for mapping.
- Select Track Workload.
Project columns
- You can use columns already in your sheet if they are the necessary column type, or you can create new columns in the panel.
- Start date, end date, assigned resource, allocation %, duration, and predecessors are required. Phases are optional.
- Start date and end date must be date column types.
- Duration must be a duration column type.
- Allocation % and predecessors must be text/number type columns.
- Assigned resource must be a contact column.
- Phases must be a single select drop-down type column.
You have the option to add phases to your projects. Learn more about integrating project phases between Smartsheet and Resource Management.
An allocation % column is on each sheet with workload tracking activated. This column specifies how much of a person's (or placeholder’s) time can be allotted to the project assignment. The allocation column defaults to 100% on rows with a start date, end date, and assigned to contact. You can update the allocation as needed on the sheet or in the workload schedule.
- Allocation can range from 0% to beyond 100%.
- Parent rows do not have default allocation applied, but you can still fill in the allocation.
- If you delete the allocation amount, the task does not appear on the workload heatmap or schedule.
Default allocation is not applied to rows that have a column formula in the allocation column.
Workload heatmap
After you turn on workload tracking for your project in the Resource Management panel, the panel shows a workload heatmap that highlights over-allocation. The workload heatmap allows you to identify staffing issues. A red bar indicates when resources are over-allocated, prompting you to take action to resolve any staffing issues.
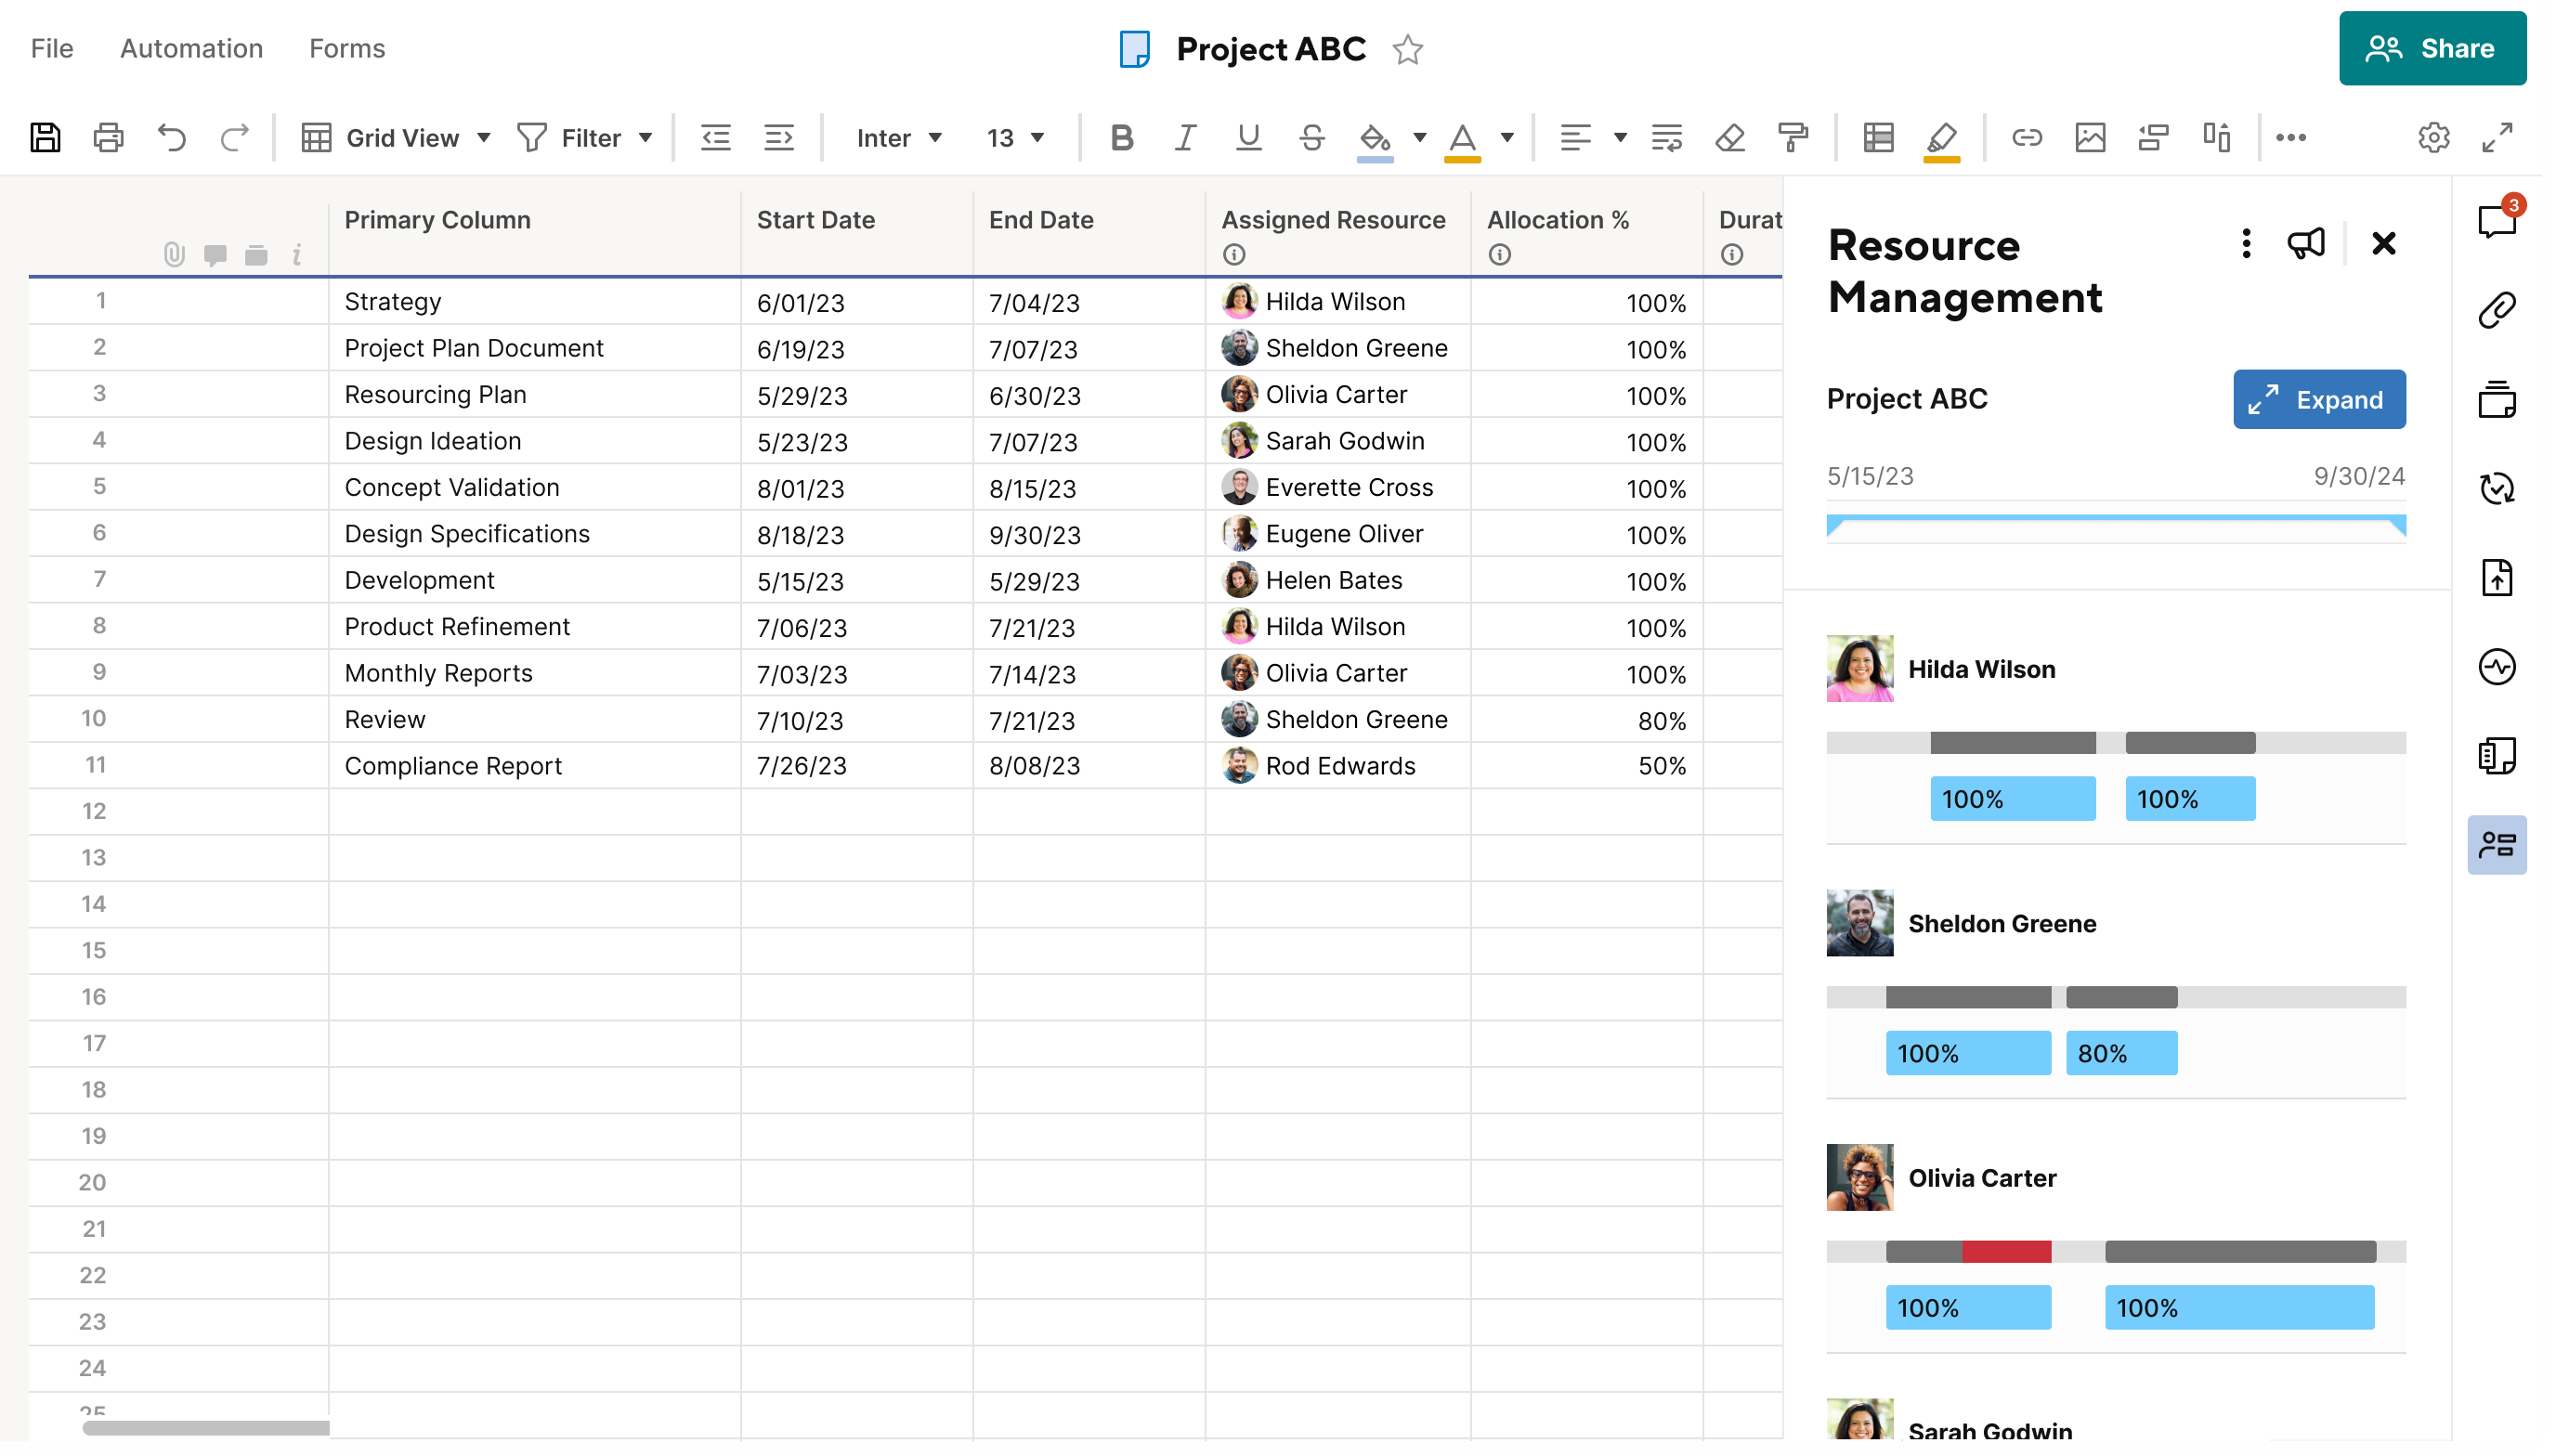
Workload heatmap colors
| Color | Meaning |
|---|---|
Red | Over allocated |
Dark Gray | Fully allocated (100%) |
Medium Gray | Partially allocated (1-99%) |
Light Gray | Available, 0% allocated |
Blue | Assignments related to the current project sheet |
Workload schedule
You can expand the workload heatmap into a full-screen workload schedule to see over-allocation conditions in detail. Here, you’ll see which other projects are contributing to over-allocation and can either modify project assignments to resolve the issue or collaborate with other project owners to change assignments for their projects. You can only edit assignments on the workload schedule that pertain to the sheet you have open. You can use the expand/collapse button next to each resource name to visualize the allocation heatmap for resources.
You must save the sheet before assignment changes in the grid are reflected in the workload schedule. However, when you make assignment changes on the workload schedule, the changes will automatically sync to the grid without being saved.
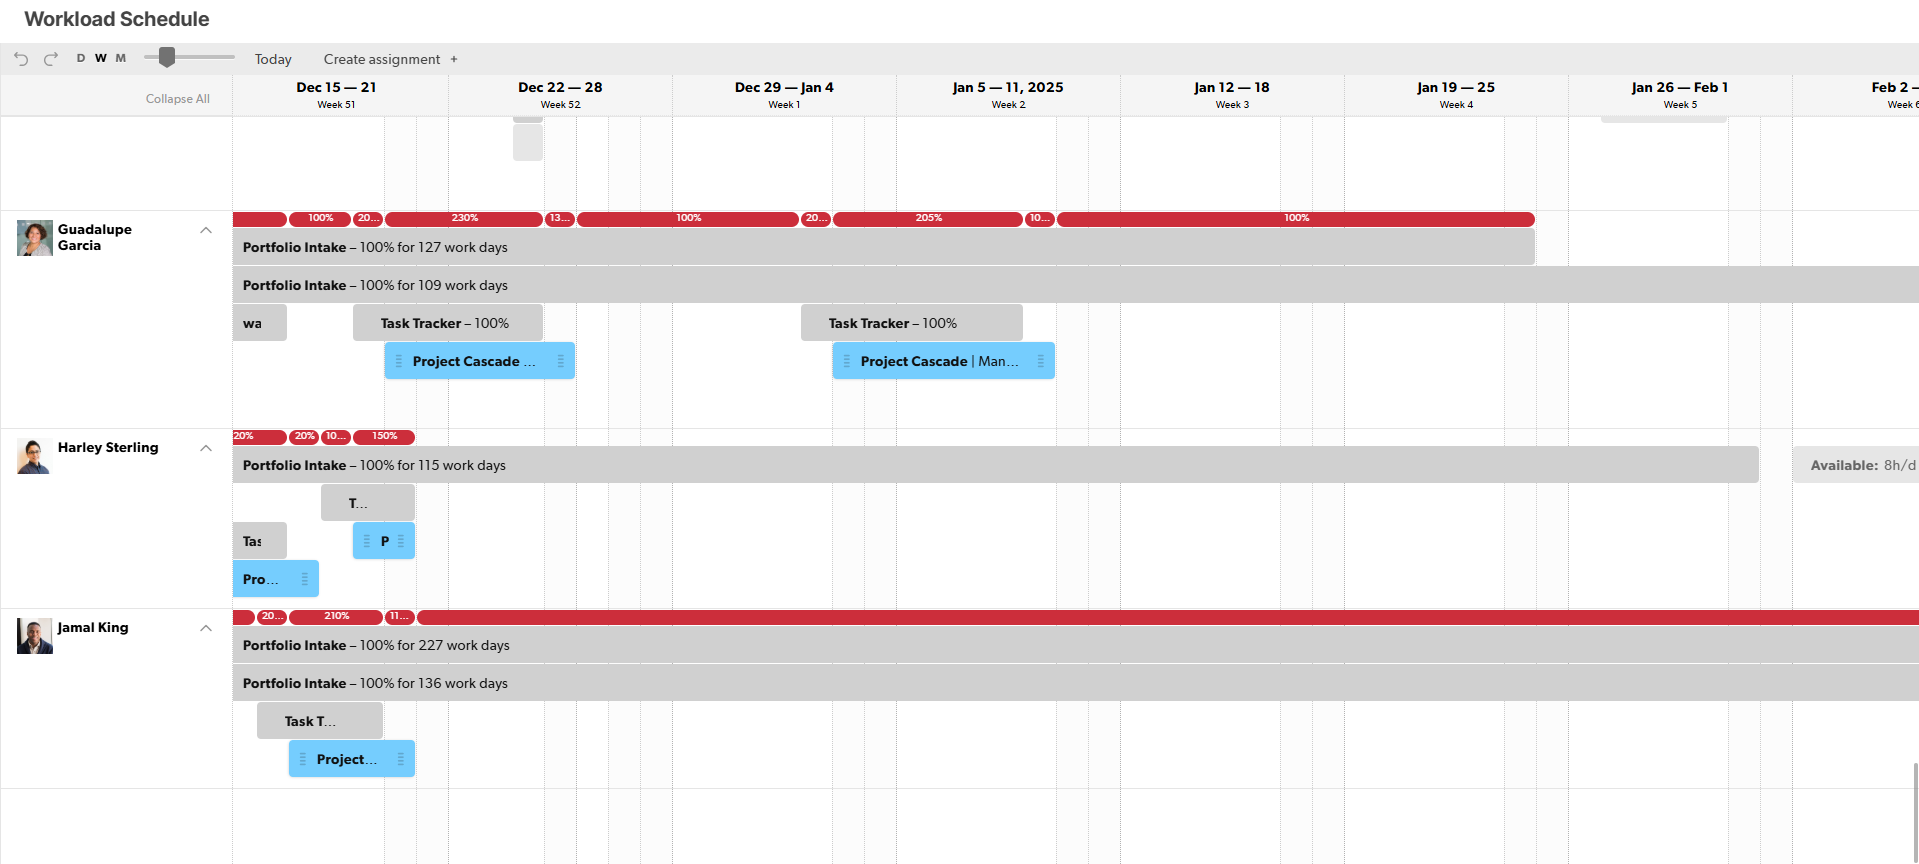
Use the caret to expand the assignment details for an individual person, or use Expand all to see additional assignment details for everyone.
The workload schedule view consolidates assignments across all sheets where workload tracking is enabled and the resources assigned on your sheet also have assignments on other sheets.
Workload schedule colors
| Color | Meaning |
|---|---|
Red | Over allocated |
Medium Gray | Assignments related to other projects |
Light Gray | Available |
Blue | Assignments related to the current project sheet |
Set up the workload heatmap and workload schedule
- Open your sheet
- Select the Resource Management panel icon
Brandfolder Image
- Enable workload tracking on the sheet
- Review the workload heatmap to see people assigned to work in the project plan and to ensure nobody is over-allocated.
Over-allocation indicators are more likely to show up when workload tracking is turned on for other projects resources are working on. Other project managers should turn on workload tracking for their projects. This improves the visibility into all the work resources have on their plates.
- Expand the workload heatmap into the full screen workload schedule to see which other projects are taking up time and contributing to over-allocation.
- Adjust project assignments on the workload schedule or in the project sheet to resolve over-allocation. Be sure to work with other project managers to adjust assignments on their projects when necessary.
- Routinely review the workload heatmap to identify other staffing issues throughout the project’s lifecycle.
You can only track workload for users who are on your plan.
If you change the name of the sheet in Smartsheet, the name of the connected project in Resource Management automatically updates to match.
Turn off workload tracking
In the Resource Management Panel, select the ellipses menu, then select Turn off workload tracking. The workload tracking data will be archived and no longer visible.
Archived projects are hidden from the workload schedule. If you have a Resource Management account, login to your Resource Management account to view archived projects on the Resource Management schedule.
Delete a sheet with workload tracking
When you delete a sheet in Smartsheet that is connected to a Resource Management project, then the project in Resource Management is either deleted or archived.
- If there are no associated time entries, then the project is deleted.
- If there are associated time entries, then the project is archived.
If you delete the project in Resource Management, no changes happen in the sheet.
Switch Resource Management accounts
If you have multiple Resource Management accounts, you can switch the project to a different account if needed.
- Select the kebab menu
Brandfolder Image
 .
. - Select Turn off workload tracking.
- In the Resource Management Panel, select Track workload.
- Select the account you want to use for the project.
View your project in Resource Management
This applies to users with a Resource Management account. See below for information about upgrading your account to include Resource Management.
Users who are shared to the sheet that have a Resource Management license can view the project in Resource Management. In the workload heatmap, select the name of the project to open the project in Resource Management. You can see additional information about budgets, timeline, location, and more.
Your Resource Management permission level dictates how much information you can see on the project in Resource Management. Learn more about what users can do and see with their permission levels.
Upgrade to Resource Management capabilities
Smartsheet's Resource Management capabilities provide enhanced and expanded profiles for capturing a person's skills, role, discipline, part-time availability, and more. This information enables Resource Management to surface skill-based staffing recommendations, plan around people's schedules, and more.
For more information about how to purchase Resource Management by Smartsheet, reach out to your account team or contact support.
Resource Management automatically creates user profiles (Unmanaged Resources) when they are assigned to a project that utilizes workload tracking. Resource Management is working behind the scenes to power workload tracking. If you choose to upgrade to the Resource Management capabilities, this data will be available for you. Learn more about Unmanaged Resource profiles.
If you are already using Resource Management by Smartsheet, then the data from the workload tracking will automatically sync to your Resource Management instance.
Activate workload tracking during your Smartsheet free trial
If you don’t have a Smartsheet account but want to explore workload tracking, you can start a Smartsheet free trial. To activate workload tracking once the trial is started:
Select your profile icon, then select User Management (Legacy Collaborator Model) / User Roles and Reports (User Subscription Model).
The User Management option is only available to the person who started the free trial.
- Select Add User.
- In the Account Setup window, fill in the account name.
- Save your changes.
- Now the Resource Management icon appears in the right rail. Select the icon to begin workload tracking.
If you're unsure about your model type, learn how to determine the model your plan is on.