O Legacy Resource Management (RM) não está mais disponível para novos usuários. Se você já usa o Legacy RM, seus dados não serão alterados e você poderá continuar acessando suas exibições de recursos.
O Resource Management by Smartsheet está disponível a todos os novos clientes. Saiba mais aqui.
Com o Legacy Resource Management, você pode monitorar e revisar o modo como as pessoas são alocadas em todos os projetos em que estão trabalhando para ajustar e tomar decisões mais adequadas em relação às cargas de trabalho. Proprietários e administradores podem modificar as configurações de projeto da planilha.
Este artigo é sobre como habilitar o Legacy Resource Management no nível da planilha. Se você deseja habilitar o Legacy Resource Management no nível do plano, consulte o artigo Configurações globais de plano.
Esta é uma visão geral de como funciona o gerenciamento de recursos legado (observe que os marcadores abaixo oferecem links para outros artigos de ajuda):
- Administradores de sistema: configure recursos e visualizadores de recursos em seu plano com o Gerenciamento de usuários (modelo de colaborador legado) ou Funções de usuário e relatórios (modelo de assinatura de usuário).
- Habilite o gerenciamento de recursos nas configurações de dependência da planilha do seu projeto.
- Use as exibições de recursos específicas de cada projeto e entre projetos para uma visualização em alto nível da alocação de recursos.
- À medida que você atribuir tarefas aos usuários do seu plano, o Smartsheet alertará quando um recurso estiver sobrecarregado, e você poderá gerenciar o percentual de alocação dos recursos por tarefa para que eles possam trabalhar em várias frentes simultaneamente.
- As pessoas designadas como visualizadores de recursos também podem acessar exibições de recursos para ver como todos os membros da equipe do Smartsheet estão alocados entre as tarefas de uma planilha, ou mesmo entre as tarefas de todas as planilhas do projeto.
Esse recurso não está disponível nos planos Pro. Não sabe qual é o seu tipo de plano? Confira Identificar seu plano e tipo de usuário do Smartsheet.
Se você não tiver certeza sobre o tipo de modelo, saiba como determinar o modelo do seu plano.
Configurar pessoas como recursos no seu plano
Apenas as pessoas que foram adicionadas ao seu plano podem ser monitoradas pelo gerenciamento de recursos. Para garantir que as pessoas certas sejam incluídas no plano, o administrador de sistema pode usar a janela “Gerenciamento de usuários” (modelo de colaborador legado)/“Funções de usuário e relatórios” (modelo de assinatura de usuário) para revisar, adicionar e gerenciar usuários.
Configurar visualizadores de recursos
Para ver como as pessoas são alocadas nos projetos, você deve ser um visualizador de recursos designado. Qualquer administrador de sistema pode configurar isso em Conta > Gerenciamento de usuários (modelo de colaborador legado)/Funções de usuário e relatórios (modelo de assinatura de usuário). Observe que você precisa ser um usuário em um plano para atuar como visualizador de recursos.
Se desejar exibir os recursos, entre em contato com seu administrador de sistema do Smartsheet. Para obter mais informações, consulte Centro de administração: adicionar, editar ou desativar usuários.
Habilitar o Legacy Resource Management para tomar decisões sobre cargas de trabalho
Os proprietários de planilhas e os membros da equipe do mesmo plano que são compartilhados na planilha com permissões em nível de administrador podem ativar o gerenciamento de recursos na planilha para que os visualizadores de recursos possam monitorar e tomar decisões sobre cargas de trabalho.
Para ativar o Legacy Resource Management em uma planilha de projeto existente:
- Sua planilha deve ter uma coluna Lista de contatos para que você possa atribuir recursos às tarefas. (Consulte mais informações sobre isso em Atribuir pessoas a uma tarefa.)
- Digite os contatos na coluna “Lista de contatos” para atribuir os membros da equipe a cada tarefa.
- Clique na seta suspensa abaixo do cabeçalho de qualquer coluna e selecione Editar configurações de projeto. Verifique se a caixa de seleção Dependências ativadas está marcada.
Selecione a guia Gerenciamento de recursos. O formulário Gerenciamento de recursos será exibido.
Nota: você está usando o Resource Management para gerenciar recursos? Saiba mais sobre como monitorar a alocação de recurso no Resource Management aqui.
- Marque a caixa Legacy RM e designe a coluna do “Recurso atribuído” selecionando uma coluna na “Lista de contatos” no menu suspenso.
- Clique em OK.
As tarefas atribuídas aos membros de equipe nesta planilha agora serão exibidas nas exibições de recursos. Revise Atribuir pessoas a uma tarefa para obter instruções, dicas e melhores práticas.
Notas
- As tarefas pai atribuídas aos seus recursos não serão incluídas nas visualizações de recursos porque elas resumem as tarefas filho. Para obter mais informações, consulte nossos artigos sobre Hierarquia: aumentar ou diminuir o recuo de linhas e Funcionalidade de vinculação pai.
- As fórmulas não podem ser inseridas na coluna Lista de contatos usada para o gerenciamento de recursos. Você pode, no entanto, fazer referência a campos de gerenciamento de recursos em fórmulas colocadas em campos que não estão sendo usados para o gerenciamento de recursos.
Monitorar e alocar recursos
Os visualizadores de recursos podem usufruir de exibições de recursos utilizados entre projetos em Explorar no painel à esquerda e nas exibições específicas de projetos nas planilhas.
Consultar exibições de recursos em Explorar (menu de navegação)
- Clique no ícone de Menu (canto superior esquerdo da janela do Smartsheet) > Explorar.
- Clique em Exibições de recursos.
- Selecione a exibição de recurso que deseja visualizar.
Aqui, você poderá fazer o seguinte:
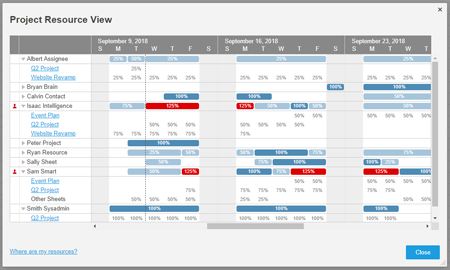
- Ver um ícone vermelho nas pessoas com superalocação e barras vermelhas nos dias superalocados.
- Expandir cada recurso para ver todos os projetos aos quais cada um está atribuído.
- Clicar para abrir um projeto e resolver problemas de alocação.
- Clicar em Editar para exibir os recursos por projeto, usuário ou grupo.
- Salvar uma nova exibição para ter uma exibição personalizada de pessoas ou projetos selecionados.
NOTA: se você não estiver compartilhado em uma planilha de projeto à qual um recurso está atribuído, verá “Outro” em vez do nome do projeto.
Consultar exibições de recursos de uma planilha de projeto
Para abrir a Exibição de recursos do projeto em uma planilha, alterne para a exibição de Gantt e selecione o ícone Exibição de recursos![]() no canto superior direito da exibição de Gantt.
no canto superior direito da exibição de Gantt.
NOTA: se o ícone Exibição de recursos não estiver aparecendo, entre em contato com o administrador de sistema do Smartsheet para se tornar um visualizador de recursos.
Um ícone vermelho de alerta de alocação ![]() avisará você quando as pessoas forem superalocadas no projeto. Como visualizador de recursos, você poderá clicar no ícone de alerta de alocação para abrir a Exibição de recursos do projeto, que lista as planilhas em que os recursos do projeto têm tarefas atribuídas.
avisará você quando as pessoas forem superalocadas no projeto. Como visualizador de recursos, você poderá clicar no ícone de alerta de alocação para abrir a Exibição de recursos do projeto, que lista as planilhas em que os recursos do projeto têm tarefas atribuídas.

DICA: se um recurso estiver superalocado, selecione o nome para revisar a alocação desse recurso por projeto. Clique no nome de uma planilha para abrir as planilhas nas quais há compartilhamento com você. Se um usuário estiver superalocado, considere reatribuir algumas tarefas a outro recurso ou ajustar a alocação da tarefa.
Alocar recursos
Alocação é a porcentagem de cada dia que os recursos devem dedicar a uma tarefa específica. Por padrão, o Smartsheet assume que as tarefas exigem 100% do dia dos recursos designados quando você atribui uma tarefa a eles, e você pode ajustar essa porcentagem inserindo um novo valor na célula.
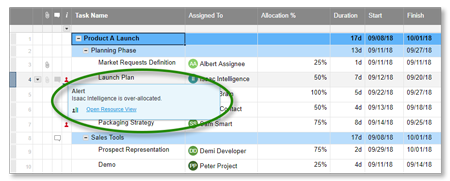
Quando um recurso recebe várias tarefas no mesmo dia, o que faz com que sua alocação total exceda 100%, o Smartsheet mostrará o ícone vermelho de alerta de alocação na coluna Indicadores de ação da linha. Passe o ponteiro do mouse sobre o ícone para ver os detalhes do alerta e navegue até a exibição de recursos.

Especifique uma coluna de %Alocação nas Configurações de projeto se desejar especificar as porcentagens de alocação inferiores a 100% para que seus recursos possam trabalhar em várias tarefas por dia. Para cada tarefa, os recursos que você atribuir serão alocados na porcentagem que você especificar.
Para alocar um recurso em duas ou mais tarefas, você precisará criar uma coluna de %Alocação:
- Insira uma coluna de texto/número em seu projeto. Dê a ela um nome significativo, de modo que você saiba que será usada como a coluna %Alocação.
- Formate as propriedades da coluna em porcentagem (%). Consulte Opções de formatação para obter mais detalhes.
- Acesse Editar configurações de projeto > Gerenciamento de recursos e escolha a nova coluna como a coluna %Alocação. Para editar as configurações de projeto, você pode clicar com o botão direito do mouse no cabeçalho de qualquer coluna para selecionar Editar configurações de projeto no menu.
- Altere a alocação para tarefas sobrepostas: por exemplo, altere a alocação para 50% para duas tarefas simultâneas.

O ícone de alerta de alocação não aparecerá em linhas superalocadas se a data de término da tarefa já tiver passado, mas aparecerá nas exibições de recursos.
Se você estiver permitindo que vários contatos sejam atribuídos a uma tarefa, a porcentagem de alocação da tarefa será aplicada a todos os recursos atribuídos. Se quiser atribuir cada recurso à mesma tarefa com diferentes alocações, você poderá listar a mesma tarefa em várias linhas em sua planilha e atribuir cada tarefa duplicada a uma pessoa diferente. Consulte Inserir ou excluir linhas ou tarefas para obter mais informações.