Follow the step-by-step instructions on how to set up a group in Smartsheet.
USM Content
Create groups in Smartsheet to quickly and easily control access to sheets and workspaces. Add new employees and team members to groups to get them up and running, and remove people from groups to ensure they no longer have access after they leave your organization.
Manage Smartsheet contact groups
USM Content
Group Admins can create and manage contact groups. System Admins can edit and manage existing groups, but can’t create them unless they also hold the Group Admin role.
For example, a Group Admin can create a specific group for all employees in the marketing team. Once the group is created, anyone on the plan can share and send information to that group.
Create a group
- In Admin Center, select the Menu icon in the upper left corner.
- Go to Users and Groups > Group Management.
- Select Create Group in the top right.
Enter the group details in the Create Group right pane.
To add group members in bulk, copy and paste up to 1,000 email addresses from an Excel or CSV file into the Add Members field.
- Select Create.
The group appears on your contact list, and you automatically be a member. Learn more about working with Smartsheet contacts.
Who can manage groups?
- Any System Admin or the group's Owner can make changes to an existing group.
- Group Admins can only add or remove users from the groups they own.
- You must be the group's owner or a System Admin to add or remove users.
- You must be a System Admin or the group's owner to transfer group ownership.
System Admins on Enterprise plans can set up safe sharing to restrict group membership to only those in your organization's plan.
Edit an existing group
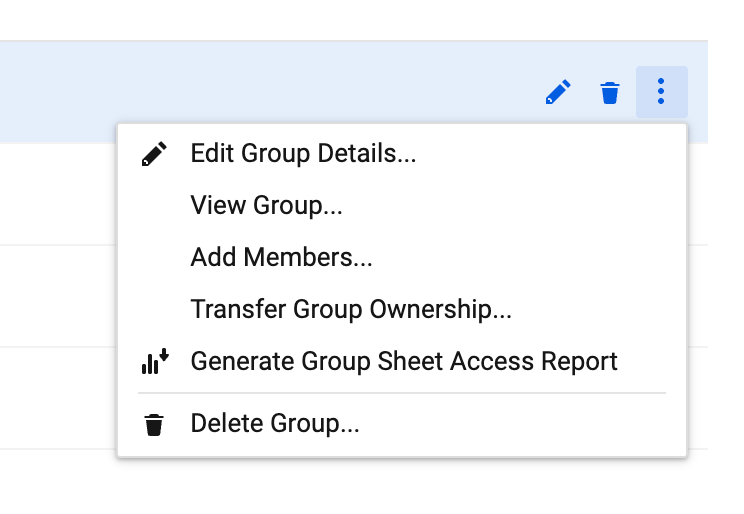
Select the group row or select
 on the right side of the row to make changes to an existing group. Use the table below to learn more about each available option.
Brandfolder Image
| Use this option | To do this |
|---|---|
| Edit Group Details | Open the Edit Group pane to modify the group name and the group description. |
| View Group | See a list of all the group members and their current seat types (user types in the legacy model), such as Contributor or System Admin. You can also manage group membership by adding or removing users. |
| Add Members | Add new people to the group. Once you add new people to the group, they'll have access to files the group is shared to. |
| Transfer Group Ownership | Transfer ownership of the group to another Group Admin or System Admin in the plan. |
| Generate Group Sheet Access Report (System Admins only) | Generate a CSV report of all sheets shared to the group. Smartsheet sends the report to your email address. See Generate a group sheet access report for details. |
| Delete Group... | Delete the group. See Delete a group for details. |
Remove group members
- On the Group Management page, select
on the right side of the group you want to manage.
- Select View Group…
Locate and check the box next to the user you want to remove from the group.
Instead of checking the box, you can directly remove the user by selecting
 .
.Select Remove from Group in the top left corner.
Brandfolder Image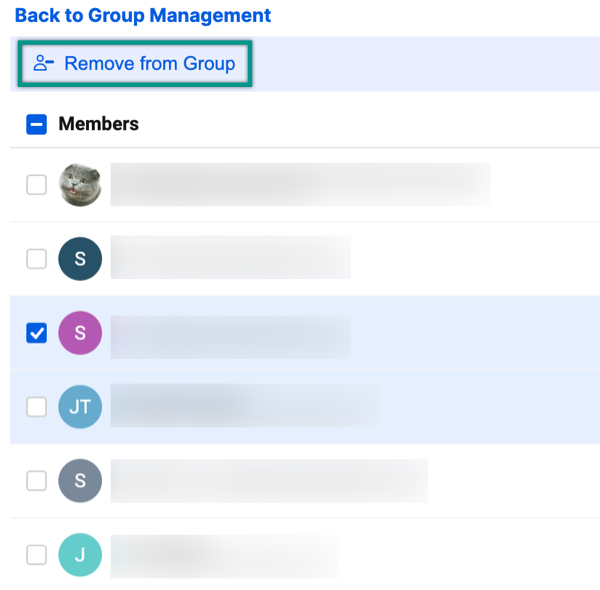
Remove a user from all plan groups
Use this option to remove a user from every group in your plan in a single step, without removing them from the plan entirely. Groups outside your plan aren't affected.
Only available to user model plans. Learn how to determine the model your plan is on.
- Sign in to Admin Center.
Select the Menu icon to open the left panel and navigate to Users and Groups > Seat Types and True-up.
The Seat types and true-up page displays.
- In the user's row, select ⋮ to open the action menu.
- Select Remove from Groups.
If the user isn't a member of any plan groups, an informational message confirms there are no groups to remove them from.
Generate a group sheet access report
The group sheet access report is a CSV file that lists every sheet shared to a group in your plan, along with sharing details for each item. System Admins can use it to audit group access across the account.
You must be a System Admin to generate the report.
- Select the kebab
menu icon on the right side of the group row
- Select Generate Group Sheet Access Report.
Smartsheet emails the report to your email address. Depending on the size of the file, delivery may take a few minutes.
The group sheet access report is available in two versions: standard and alternate. The version your plan receives is automatically determined by plan size.
Standard version
The standard version of the group sheet access report includes the following data:
- Key: The unique key for each sheet in your team's Smartsheet account. Users don't see this key. It can be helpful when you have multiple sheets with the same name.
- Name: Sheet names seen in your Smartsheet session.
- Workspace Name: Workspace names in your Smartsheet session.
- Type: Indicates whether the item is a sheet, report, or dashboard.
- Shared To: All email addresses for those who have sheets shared to them, whether paid, unpaid, or external collaborators.
- Shared To Permission: Shows permissions of who it was shared to (Owner, Admin, Editor (can share), Editor - (cannot share), Viewer, Commenter.
- Asset Last Modified Date/Time (UTC): Last date/time when the sheet was updated.
- Item ID: Unique identification number for the shared item.
- Workspace ID: The unique identifier for the workspace that contains the item.
Alternate version
The alternate version of the group sheet access report includes the following columns:
Column | Description |
|---|---|
Item API URL | API endpoint URL for the shared item |
Subject API URL | API endpoint URL for the group |
Type | The type of sharing relationship |
Item ID | Unique identifier for the shared item |
Subject type | The type of subject the item is shared to (for example, group) |
Subject ID | Unique identifier for the group |
Shared to Email address | Email address associated with the group share |
Permission Set Name | Permission level granted to the group (for example, Viewer, Editor) |
Workspace ID | Unique identifier for the workspace containing the item, if applicable |
Created Date/Time (UTC) | Date and time the share was created |
Last Modified Date/Time (UTC) | Date and time the share was last modified |
Item Name | Name of the shared item |
Delete a group
Select the kebab
menu icon on the right side of the group rowSelect Delete Group.
Deleting a group also removes it from any sheets it's currently shared to and any recurring emails being sent to its members. You can't undo this action.