Before you begin
Before you create a Dynamic View, ensure you:
- Create the source sheet or report to store the data in Smartsheet.
- Create the shared filters you want available in the view. An additional filter is available based on one contact column in the view configuration.
- You can access Dynamic View by following the link https://app.smartsheet.com/dynamicview, via the Smartsheet Launcher, or from the top menu of a sheet.
If you launch Dynamic View from within a sheet, that sheet is automatically set as the source.
Once a view is created, the report or source sheet cannot be updated, and a new view must be made.
Create your view
The view creation process involves four steps, each with required and optional configurations. Here are best practices and key considerations for each:
Step 1: General
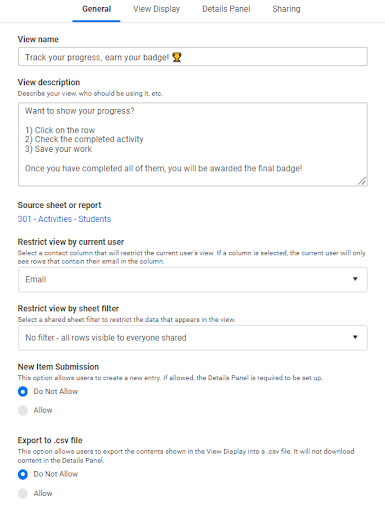
View name
- Choose a name that clearly describes the view’s purpose.
- You can use a consistent prefix that reflects the use case, such as PMO_Charter Intake. This makes it easier to find later.
- View names are limited to 50 characters.
View description
- Use the description field to communicate the purpose and intended use of the view.
- View descriptions are limited to 4000 characters.
Source sheet or report
- Before creating a Dynamic View, ensure the source sheet or report already exists and that you, as the view creator, have appropriate access to it.
- Note that once you select your source, you can’t modify it. If necessary, you must create a new view.
Restrict view by current user
- Select a Contact column only if you want each user to see only the rows where they are listed in that column.
- If the source sheet or report has Contact columns, either multiple or single-choice, they appear in the drop-down list.
Restrict view by sheet filter
- Select a filter when you want all end users to view only a specific subset of data.
- You can combine this filter with the current user filter for more granular control.
- Dynamic View displays only the filters that are shared in the underlying sheet. A filter won’t appear in the drop-down if it isn't shared.
New item submission
- Select Allow if you want users to create new entries from the view rather than requiring them to navigate to a separate form.
- If the source is a report, Dynamic View adds new submissions through the form to only one underlying sheet included in the report.
- Smartsheet adds new item submissions to only one sheet.
- If the target sheet for new submissions is removed from the report, Smartsheet shows an error in the Dynamic View configuration. Still, there’s no in-app alert to let Admins know the configuration is broken.
- When an end user tries to submit a new item through the view, they see the error New submissions are not available since the owner no longer has access to the source sheet or report.
Export to .csv file
- This option lets users download the data visible in the Display view (rows only, not forms).
- Confirm data access and security permissions before enabling export. Ensure only authorized users can access sensitive information and that they already have access to the source sheet or report.
Enabling this option isn’t controlled by the Egress policy defined by the Admins.
Step 2: View Display
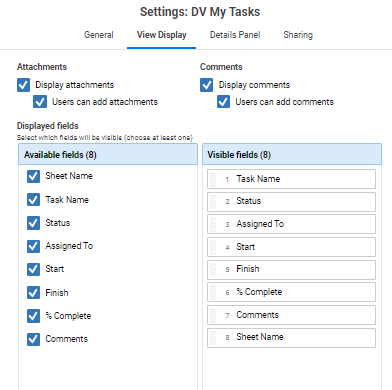
Attachments
- Allow Display attachments if you want users to see the files attached to the rows visible in the view.
- Enable Add attachments to allow users to upload files directly to rows.
- Attachments may cause loading performance issues, so always be mindful of allowing attachment submissions.
Comments
- Enable Display comments only if you want users to see existing comments of the rows shown in the view.
- Enable Add comments if you want viewers to be able to contribute comments to the rows.
- Once Add comments is enabled, set Notifications will direct tagged users to to control where an @mentioned user lands: The source sheet (default), This Dynamic View, or Neither. If you manage multiple Dynamic Views for the same collaborators, such as role-based or multi-step workflows, test this setting carefully. The notification link always opens the Dynamic View the comment originated from, not necessarily the view a recipient normally uses.
Displayed fields
- Limit the number of columns to only those the end user needs to see at a glance.
- Consider exposing long-text columns through the form.
- Consider the end user's job when choosing which columns to display.
- Use the Details Panel to show certain fields only when specific conditions apply.
- Since the conditional formatting is only available through the source sheet, and hierarchies don’t appear in the Display View, consider using conditional formatting and helper rows in the sheet if users need to see data in a grouped format.
Step 3: Detail Panel
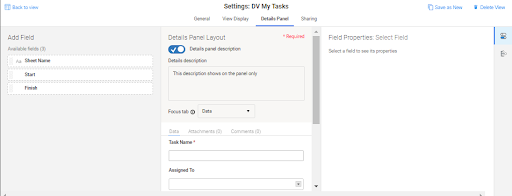
Add Field
- Drag and drop the fields you want to expose into the Details Panel Layout. These fields appear when you select a row to view more information.
- This section displays all columns from the source, even if those columns aren’t selected in the Display View.
Details Panel
- Details panel Layout
- Toggle on the Details panel description to display instructions to the end user.
- Use the Details description to explain how to fill out the form or provide additional information.
- Use the Focus tab to choose which component of the panel opens first.
- Include all relevant columns to give users context for data input.
- The Details description box has a character limit of 500.
- Field properties: Select Field
- Set each field’s behavior based on the use case. For example, mark fields as Required, Read-Only, or Hidden. If none are selected, the field is optional and editable.
- For long text columns, select Display as Multiple Line.
- Adjust the column name label to improve clarity. This doesn’t affect the column name in the source sheet.
- Include a description text to guide the end user.
Set an initial value if needed. For example, the default value can be New for requests. - Long text fields set to display as multiple lines are limited to 4,000 characters and three visible rows.
- You can’t export the configuration of the Details Panel.
- Field Logic
- Use field logic to define when and how columns appear or are hidden in the panel layout.
- Name your rules clearly, using no more than 50 characters.
- For the actions, select the condition that best fits your process.
- Choose the action type before selecting columns in the rule.
- Create rules in an order that matches your process flow.
Rules without actions or fields prevent saving the view. You must delete any incomplete rules.
Always test the View before sharing it with the end users.
Step 4: Sharing
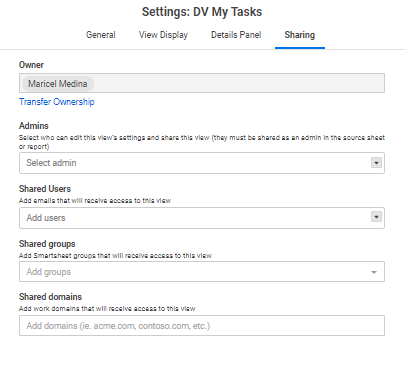
Owner
- You can transfer ownership to any other Smartsheet user, regardless of domain.
- Ensure the new owner accepts the transfer; they’ll receive a notification and must confirm it.
Only one owner can be assigned to the view at a time.
Admins
- Assign multiple Smartsheet users as Admins to help manage the view.
- Admins don’t need to be from the same domain, but must have access to the underlying sheets or reports.
- Allow admins to share the view with any users or domains included in the organization’s safe sharing list, as defined by a System Admin.
Admins must have access to the underlying sheets or reports to configure or manage the view.
Shared Users
- Any Admin can add shared users to the view.
- Admins can share the view with any Smartsheet user with a valid domain.
Shared groups
- An Admin can share the view through the groups created in their Smartsheet instance.
Shared domains
- Any Admin can share the view with domains approved by the Smartsheet Admin.
Keep in mind
Source sheet and report setup
- Limit conditional logic rules in the source sheet or report to fewer than 30 to ensure performance and reliability.
- Use Alerts & Actions in the source sheet to notify users of row or field changes; Dynamic View doesn't generate notifications for these. Include the Dynamic View URL in the message so users can select it to access the view.
- @mention comment notifications work differently because they're native to Dynamic View. When you @mention a collaborator in a row-level comment, they receive an email notification, and the Dynamic View admin controls where that notification is sent.
- Use Shared Filters on the source sheet. Only shared filters are visible in the view.
- Postfix your source sheet or report name. An example is _DV, which indicates it’s part of a Dynamic View workflow. This helps others recognize it, as Dynamic View doesn’t provide an indicator.
Column configuration
- Save and refresh the view after applying column formulas in the source sheet to prompt proper calculation.
- Enable Restrict to list values only in multi-select dropdown contact lists if you want all viewers to see only those listed options.
- Leave it unchecked if you want viewers within your organization to see all org users in the contact columns.
Field logic and maintenance
- Ensure a dropdown or symbol column is in the source sheet to support field logic conditions.
- If your source is a report with multiple sheets, the dropdown values in a given column must be consistent across all sheets.
- Take screenshots of the view configuration before making changes, especially for complex workflows, since Dynamic View doesn’t provide a version history.
Safe Sharing considerations
Best Practice
- View Admins can share views only with users and domains included in the organization’s safe sharing list.
Admins must exercise caution when adding users or domains to the sharing settings. Dynamic View automatically blocks the addition if the user or domain isn’t on the safe sharing list.
Limitations
- Safe sharing enforcement depends on Admin Center settings—it isn’t configured within Dynamic View.
- If safe sharing is enabled, Dynamic View blocks any user or domain not on the approved list.
- If safe sharing isn’t enabled, any user or domain can be added to the view.
- When attempting to add specific non-compliant users, Dynamic View doesn’t allow them. Admins receive a generic message stating that some users aren’t allowed, as it doesn’t specify which, and they are automatically removed from the Shared users field.
- When attempting to add specific non-compliant domains, Dynamic View doesn’t allow them. The domains are automatically removed from the Shared domains field, and the message to the Admins includes which domains are non-compliant.
Safe sharing only impacts whether or not a user or domain can be added if enabled.