Dynamic View allows you to save time by creating views that contain large data sets and shared filters rather than having to create multiple, separate views to give people access to subsets of data. People who view the data can use the shared filters provided by the administrator or create their own filters to easily find and view the items they care about.
People with Owner or Admin permissions can create, share, and edit filters (they can also edit filters created by others). Anyone shared to the view can create and edit their own filters.
You can access the Dynamic View app with your Smartsheet account after someone shares a view with you or if an Admin gives you access to the app. The first time you access the view, you can also set up a free trial account.
Use filters in Dynamic View to find data that matches your specified criteria and quickly sort the results the way you want.
With filters, you can:
- Quickly find subsets of data
- Easily get to the data you want each time you come back to the view
You can access the Dynamic View app from here or the Launcher in your screen's lower-left corner.
Turn a filter on or off
- To apply a filter to a view, start from the view and select the desired filter from the Filter menu.
- To clear a filter (stop applying it to the view), select Filter Off.
You need to wait for all pages of the Dynamic View to load before applying a filter.
Create a new filter
From the Dynamic View app, start from the view for which you want to create a filter:
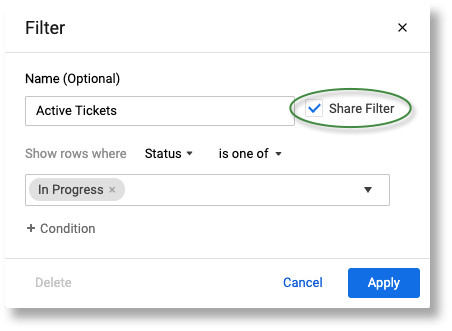
- Select the Filter icon in the upper-left corner of the view and select New Filter to display the Filter window.
- In the Name box, type a name for the filter. The filter is saved as Unnamed Filter if you don't provide a name.
- Select the conditions that you want to use to filter the data, and select Apply.
If you're the view Owner or have Admin permissions to the view, you can specify to share a named filter so that anyone who is shared with the view can use it. To do this, select the Share Filter checkbox.
Brandfolder Image
That’s it! Your view will be filtered with the criteria you specify. If you give your filter a name, you can use it whenever you visit the view. If you opted to share the filter (Owner or Admin only), anyone with access to the view can now use it.
For information on creating views and selecting columns, see Dynamic View: Create and manage views of your data.
Clone an existing filter
If you want to create a new filter that produces results similar to those of an existing one on the view, save time by cloning that filter.
- From the Filter menu, hover over the name of the existing filter and select Clone.
Brandfolder Image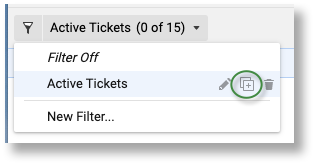
This will create a copy of the filter and open the Filter window. - Make any changes you want and select Apply to save the new filter.
Modify an existing filter
You must have Owner or Admin permissions to change a filter created by someone else.
From the Filter menu, hover over the filter name you want to modify and select Edit.
Brandfolder Image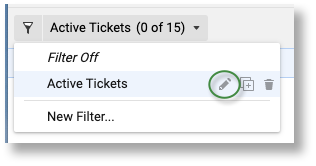
Verify that the Filter window's name matches the filter's name that you want to edit to ensure that you’re modifying the correct filter.
- In the Filter window, update the conditions as desired and select Apply.
Delete a filter
From the Filter menu, hover over the filter's name and select Delete. The filter is removed from the view too.