Create and share forms to gather and organize information within Smartsheet. Use forms to collect survey responses, intake project requests, or gather product orders in a sheet.
After you create and share a form, each submission is added to the top or bottom of your sheet as a new row.
Anyone with access to the form can submit information to the sheet, even if they don’t have a Smartsheet account.
Create Automated processes with workflows to receive notifications when a new form is submitted or to allow someone to edit an existing row with an Update Request.
Open the form in the mobile app (iOS or Android) for the best experience when submitting a form from a mobile device.
Create a new form
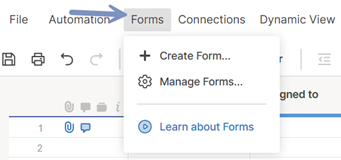
- Open the sheet to which you want to attach the form.
- On the top left of the sheet, select Forms > Create Form.
Brandfolder Image
When a new form is created, all columns (except for System columns) from your sheet will automatically be added to your form. Each field will function similarly to its respective column type. You can Add items to a form to customize it.
For Contact Lists and Dropdown Lists, this includes the Restrict to list values only checkbox. When this box is checked, people submitting the form can only select from the values listed in the column.
By default, the form title corresponds to the sheet name, and the fields on the form correspond to the names of their associated sheet columns.
- Select an element from the center form preview to edit its settings, which is displayed in the right panel. For more information, see Edit or remove fields in a form.
- You can adjust any form-level settings using the Settings at the top of the form builder. For more information, see Manage form display and submission options.
- When you’ve finished setting up your form, select Save at the top-right.
Character count limits on form fields
This chart shows the limitations (if any) on the fields you can use in a form.
| Field name | Character count limit |
|---|---|
| Field name Form title | Character count limit 100 |
| Field name Form rich description | Character count limit 100 |
| Field name Form field label | Character count limit 100 |
| Field name Form field rich help text | Character count limit no limit |
| Field name Header | Character count limit 100 |
| Field name Description rich text | Character count limit 4000 |
| Field name Confirmation message | Character count limit 4000 |
| Field name Response field | Character count limit 4000 |
Preview and share your form
- Select Open Form to preview the form and ensure it’s configured correctly.
After you've previewed the form, you can close the browser tab that it opens in. - Select Share Form to email the form directly from Smartsheet, copy the form link, or embed it in a dashboard or webpage.
- Select the back arrow in the top-left corner of the form editor to close it and return to the sheet.
The name of the form you’ve created will appear in the Form Manager, where you can distribute it, view its properties, and more.

Learn how to manage security settings when sharing your form in Manage form display and submission options.
Even if you edit the form, the link to it will remain the same. Changes you make will appear on the form when you save them.

