With conditional logic in forms, you can ensure that people using the form only answer relevant questions to their submission by showing specific fields based on their answers to other questions.
For example, you create a form to manage IT Help Desk requests.
- The person using the form chooses IT Equipment as their Request Type.
- Several fields related to IT Equipment requests appear in the form, while the unrelated IT Support request fields don’t.
You can also conditionally show other form elements, such as headers, dividers, and attachments to better align those elements with associated questions.
Conditionally display fields
- Create a form or open an existing form.
- Select the field that determines which other fields and form elements appear based on its value. This is considered the source field for your rule.
- Select the Logic tab in the Field Settings on the right, and then select Add Logic.
- In your rule’s condition, which always begins with When, define the operator (varies based on field type) and the source field values that determine when the target fields and elements should appear.
- To set up your rule’s action (beginning with Then), select the fields and form elements you want to display when the condition is met. These are considered targets for your rule.
- Select Add at the bottom-right of your rule to add it to the source field.
- If you want to add another rule to this source field, select the +Add rule link.
- Once you’ve added all of the fields and rules to your form, save and preview the form by selecting Open Form in the top-right corner of the Form Builder.
View logic on your form
Fields with conditional logic are indicated by logic icons next to the field name.
Source fields are indicated by the 
Target fields and elements are indicated by the 
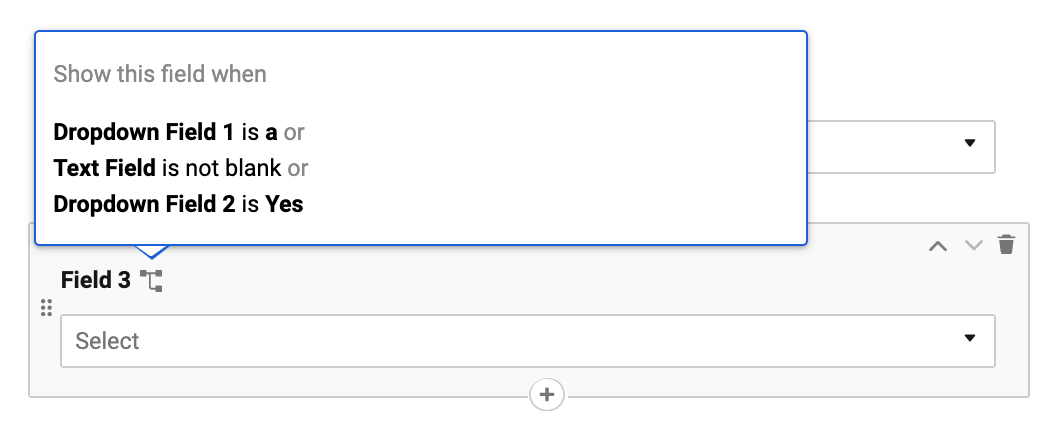
Conditional logic behavior
- Target fields and elements don’t appear by default. They are displayed when at least one of the source conditions is met.
- Target fields only submit data to the sheet if they are displayed when the form is submitted.
- Required target fields are only required if displayed when the form is submitted.
- Editing the Column Type or Values of fields used in your conditional logic may affect existing rules.
- If you remove a field from the form, you also remove the associated logic.
- When more than one logic rule affects a target field or element, it appears when any of the rules is satisfied.
- If you hide a field with the Hidden toggle in the Field Settings, it overrides any rules associated with that field.
Tips to use conditional logic
- There is a limit to the size and number of logic rules you can add to a single source field. This limit depends on the number of individual logic rules you built and the size of each rule (number of fields selected).
- If you hit the limit, an error appears within the logic builder that reads: Sorry, there was a problem saving this logic. Logic statement is too large. Try reducing the conditions for the affected fields.
- A target field can also be a source field, allowing you to create nested logic. For example, the answer to Question 1 can cause the form to display Question 2, and the answer to Question 2 can cause the form to display Question 3. If the answer to Question 1 changes such that Question 2 is not displayed, then Question 3 will not appear either.
- Choosing an appropriate operator from the blue dropdown for your rule’s condition can help you shorten your rule and reduce the need for multiple rules.
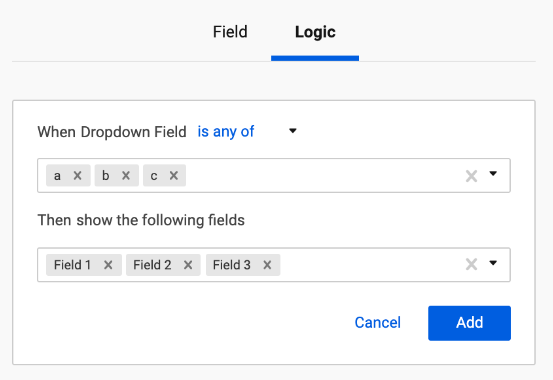
Example 1: If multiple responses in a dropdown source field can result in the same target field(s) being displayed on the form, there’s no need to create a separate rule for each source field response. Instead, use a single rule with the is any of operator in the condition.
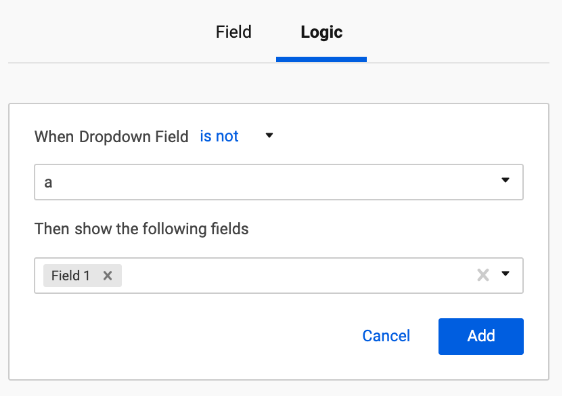
Example 2: If you want to display a target field in more cases than not, listing all of those cases can be inefficient. Instead, accomplish the same result with a shorter condition than using inverse operators such as is not. For instance, if you want to display Field 2 in all cases except when [Value A] is selected in [Field 1], you can use the following rule:
- You can standardize the submissions on your form by using dropdown lists to mimic numeric conditions. For example, instead of entering a budget value into a text field, make a budget dropdown field with value options such as Over $10,000.”Then, add conditional logic rules to display specific fields when someone chooses one or more value options.