You can remove a license from a user. When you remove a license, you must transfer the user’s Owner permissions on items to another user in your plan. You can't transfer a Smartsheet plan, but you can change user roles, contact information, or billing information for that plan.
This article is only for the Legacy Collaborator Model. If you're unsure about your model type, learn how to determine the model your plan is on.
Assign licenses to users when you transfer items
If you haven't reached the license limit in your plan, you can assign a license to your target user and then transfer Owner permissions to them upon removing the user you're replacing. If you've reached your license limit, then you must free up a license to complete the transfer:
- Sign in to Admin Center.
- Select the Menu icon in the upper-left corner and navigate to Users and Groups > User Roles and Reports.
To open the Edit User panel, select the licensed user whose access you want to transfer and toggle the Licensed User switch to off.
Brandfolder Image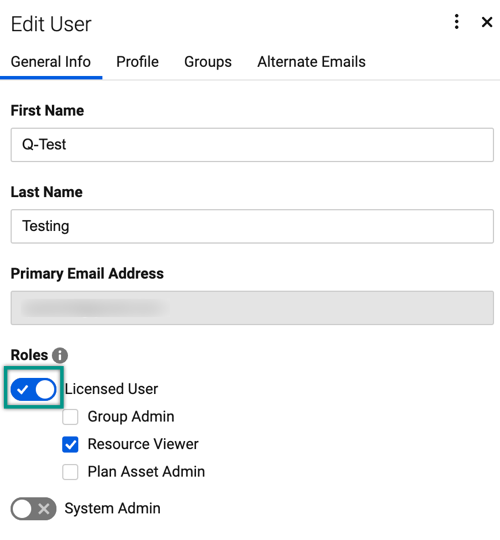
In the Transfer Owner Permissions and Remove License window, select Remove without transferring items. This will free up the license so that it can be reassigned.
All the sheets on which the user holds Owner permissions remain accessible to any shared users. If the user was a Group Admin, you must transfer their Owner permissions on groups to an active Group Admin or System Admin. This doesn’t affect any sharing access at the group level.
Brandfolder Image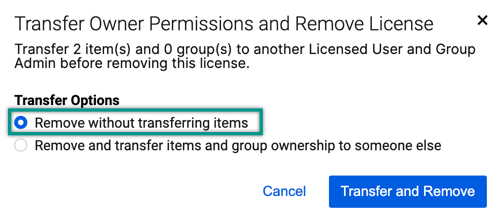
- If the new user has already been added to your plan as a free user, assign them a license. If they haven't been added to your plan yet, select Add User at the top left of the User Management page to send them an invitation with the Licensed User role. When the new user accepts the invitation, their member status in User Management will change from Invited to Accepted.
- Once the new user has accepted the invitation, find the previous user in User Management and open the Edit User panel.
Select Brandfolder Image
 in the upper right and then Transfer Owner Permissions...
Only Owner permissions are transferred. Sheets on which other users have Owner permissions or sheets that were shared with the previous user must be re-shared with the new user.
Things to keep in mind
- Sheets in the previous user’s sheets directory will be placed in a Transferred from (username) folder in the new owner's browse directory (accessible from the left panel).
- Sheets in workspaces remain in established workspaces. All sheets retain their sharing permissions and sheet data. The previous user with Owner permissions can now be removed from sharing.
- If the previous user holds Owner permissions for sheets in a workspace that is owned by someone else, and the target Owner doesn’t have Owner or Admin permissions on the workspace, the sheets will be moved to the Transferred from (username) folder in the new Owner's sheets directory. The sharing permissions from the workspace will be retained at the sheet level, but the sheets will no longer be in the workspace.
- Optionally, you can remove the user whose access was transferred from the account. Learn more about Admin Center.

