If all the licenses in your account are allocated, you need to take a few extra steps to remove someone with a license and transfer Owner permissions of their items to a new member.
This article applies only to plans using the Legacy Collaborator Model. If you're unsure about your model type, learn how to determine the model your plan is on.
Transition your new user
Take the following steps to ensure that your new user has access to everything they need.
Step 1: Add the new user without a license
In the the Menu icon in the upper-left corner of the screen.
Navigate to User Management > Add User.
In the Add User window that displays, type the email address of the new person.
Ensure that the Licensed User toggle is off. We’ll grant this person a license later.
Select Invite.
They’ll receive an email invitation to join your account. Once they accept the invite, you can proceed with Step 2.
Step 2: Remove the prior license but not the user
After the new user has accepted their invitation as an unlicensed user, remove the license from the person being replaced.
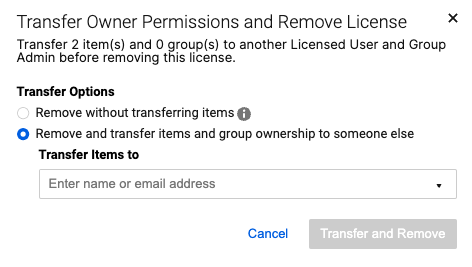
During the license removal process, you’re prompted to transfer Owner permissions of sheets from this user to someone else.
In the User Management window:
Hover over the row of the user account that you want to remove.
On the right side of the row, select
Turn off the Licensed User toggle. The Transfer Owner Permissions and Remove License dialog box displays.
If the user didn't create any sheets or doesn't hold Owner permissions on Smartsheet items, the dialog box won't show up. Continue to Step 5.
Select the Remove without transferring items option.
Select Transfer and Remove.
If the person was a Group Admin, you need to transfer their owned groups. Groups can be transferred to any System Admin or Group Admin during this step.
Step 3: Grant a license to the new user
Now that you’ve made a license available, you can grant it to the new person in the plan. In the User Management window:
Locate the new user that you’ve added to the plan.
Hover over the row of the user account and select
Turn on the Licensed User toggle and select Save.
With a license, the new user can accept Owner permissions of the sheets from the user transitioning out of the plan.
Step 4: Transfer Owner permissions of all Smartsheet items to the new user
If the old user holds Owner permissions on items in a workspace that they manage but don't own, those items are automatically removed from the workspace and shared to the workspace collaborators at the item level. To avoid this, ensure that the new user is shared to the workspaces with Admin-level permissions before proceeding.
In the User Management window:
Hover over the row of the user who is transitioning out of the plan.
Select
Select Transfer Owner Permissions...
Enter the user email address of the new owner and select Transfer.
You’ve now transferred the Owner permissions to the new user.
Step 5: Share other items with the new user and complete the transition
Download a Sheet Access Report and make sure that the new user is shared on the same items as the user you’re removing from the plan.
In the User Management window:
Select More Actions > Sheet Access. You’ll get an email with a link to the Sheet Access Report. Note that it may take a few minutes for you to receive the email depending on the size of your report.
Open the Sheet Access Report in Excel and filter on the email address of the person you're removing.
The Sheet Access Report also provides you with the email addresses of the sheet owners. Contact each of them and request that they share their sheets with the email address of the new person in your plan.
Your new user is now up and running! You can now remove the prior user from your plan if desired. Learn more about managing users.
