Follow the step-by-step instructions to learn how to sort information on your sheet.
Sorting and filtering offer two different ways to customize the view of data in your sheet. You can't do both at the same time so it's best to determine in advance which option will help more.
Sorting lets you organize all or part of your data in ascending or descending order. Note that you cannot undo a sort after it has been saved so you'll want to make sure that all of your rows in your sheet, including parent rows in a hierarchy, are ordered the way you want before saving.
Filters allow you to show or hide information on your sheet based on selected criteria. They're useful because they don't change the overall layout of your sheet. You can also save filters and share them with anyone who is shared to the sheet. You can even set default filters on your sheet so that when shared users open that sheet, they see the the same view.
Sort rows to organize your data
When you sort, you have two choices about the amount of data you want to work with: you can sort all rows in your sheet or only a selection of them.
Here are some things to keep in mind as you sort:
- Applying a sort will impact the existing rows in the sheet. When new rows are added, you'll need to sort again to incorporate the newly added rows.
- You cannot undo a sort after the sheet has been saved. Make sure the rows in your sheet are ordered as desired before you save it.
- Although Editors can sort a sheet, they can't sort locked rows. If the Sort Rows option appears unavailable, and you're shared to the sheet with Editor permissions (learn more about sharing permission levels), deselect any locked rows before attempting to sort.
- The Sort Rows command is unavailable if a filter is applied to your sheet. Before you sort, you'll first need to ensure that filters are not applied. To clear a filter (stop applying it to the sheet), select Filter Off from the Filter menu. Learn more about using filters to show or hide sheet data.
Sort all rows
- Right-click on a column header and select Sort Rows. The Sort form appears.
Brandfolder Image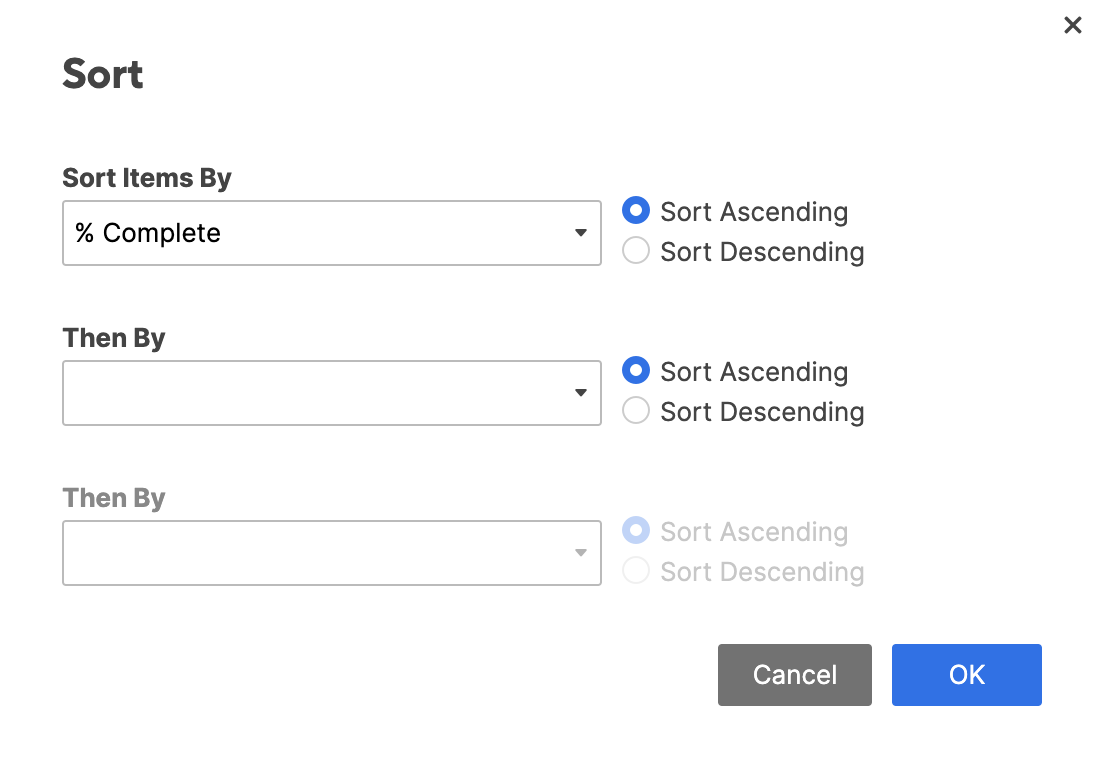
- Enter sort criteria and then click OK.
Sort a selection of rows
- Highlight the rows by holding down the Shift key and clicking on the row numbers you want to sort.
- Right-click on the selected area and select Sort Rows.
- In the Sort form, enter your sort criteria and click OK.
How different data types are sorted
The type of data you sort will influence the result. Here are a few examples:
- Hierarchy: If you’ve created sub-items, the sub-items will be sorted but kept beneath their parent row. The parent rows will also be sorted but their sub-items will move with them.
- Data created with a Dropdown list: If you sort on a column that is a Dropdown List type, items will be sorted using the order of the drop-down list values. Double-click on a column header and select Edit Column Properties to view/edit these values or to change their order.
- Harvey Ball values: When sorted in ascending order, the values will be ordered as Empty > Quarter > Half >Three-Quarters > Full > Blank.
- Red-Yellow-Green values: When sorted in ascending order, the values will be ordered as Red > Yellow > Green > Blank.
Mixed letters and numbers: Values that start with a letter and include a number will be sorted first in alphabetical order then in numerical order starting from the leftmost digit. For example, the values Q1, Q2, Q3, Q12, will be sorted as Q1, Q12, Q2, Q3.
When sorting in ascending or descending order, blank rows will be sorted below rows with values.
Sort behavior in reports
When you sort a report, items will be sorted in ascending or descending order. If you sort on a column that is a Dropdown List type in the source sheet, items won’t sort based on the predetermined dropdown values in the included source sheets.
A report can pull from multiple sheets and will consolidate columns with the same name and column type. If the dropdown list columns have different values across sheets (for example: a,b,c,d in one sheet and 1,2,3,4 in another), the report will be unable to determine which sort to honor in the consolidated column.
Follow the step-by-step instructions to learn how to create and share sheet filters.
Create a filter to show or hide data
With the appropriate permissions, you can create filters for your own use or to share with others.
Create a shared Current User filter, for example, for all collaborators on your sheet to be able to quickly see tasks assigned to them. For details on creating a shared Current User filter, see View your assigned tasks.
The Shared Filters functionality covered in this article is included with Business and Enterprise plans. For more information about plans and pricing, see our Pricing page.
Required permissions
What you can do with filters in a sheet depends on the sharing permissions you have for that sheet.
| Filter Activity | Viewer | Editor | Owner or Admin |
|---|---|---|---|
| Create an Unnamed Filter | Yes | Yes | Yes |
| Apply an already created filter | Yes | Yes | Yes |
| Create a Named filter so it can be reused | No | Yes | Yes |
| Specify that a filter should be shared to all sheet collaborators (Only available on Business and Enterprise plans) | No | No | Yes |
Create and use filters
If you have access to a sheet, you can create an Unnamed Filter to view the sheet data in the way that's most useful to you. The configuration of the Unnamed Filter is unique to you.
If you have Editor or higher permissions to a sheet, you can name a filter to save it for later use. If you have Admin permissions to the sheet, you can specify to share the named filter so that anyone on your team with access to the sheet can apply the filter as well.
- On the toolbar, go to Filter > New Filter.
To create a named filter, fill the Name field.
Or,
To create an unnamed filter, leave the Name field blank.
Under Show rows that match, select the conditions that you want to apply to the data in the sheet.
The criteria you can select depends on the data type. For example: contains can only be used with text strings and contacts, and is between can only be used with dates and numbers.
- Select Apply to see the filtering results.
Unnamed Filters appear in the Filter menu to indicate that your data is being filtered according to the conditions you specified.

To identify a filter that a sheet Admin has saved to be shared with others, look for the sharing indicator ![]() next to the name of the filter.
next to the name of the filter.
Modify a filter
You can always go back and change the conditions of an existing filter:
From the Filter menu, hover over the name of the filter and select
 Edit.
Edit.
The title of the form displays the name of the filter that you’re about to modify. Verify the title to ensure that you’re modifying the correct filter.
- In the Edit Filter form, update the conditions as desired
- Select Apply.
The updated filter is applied to the sheet.
If you don’t have Editor permissions or higher, you can only modify Unnamed Filters.
Remove a filter
To stop applying a filter to the sheet, select Filter Off.
Delete a filter
To delete a filter from the sheet and the menu:
- From the Filter menu, hover over the name of the filter and select Delete.
- Select Delete.
Tips for working with conditions
As you specify conditions for your filters, you might get a feeling for how to set up the criteria that you find the most useful. Here are a few ideas to get you started:
- To specify that a filter uses all the specified criteria or just one of the criteria, select the link next to Show rows that match to switch between all conditions and at least one condition.
- Find rows where data might be missing with the is blank condition.
- If your sheet uses hierarchy, you can choose to have your filter include parent rows by selecting the Include parent rows checkbox.
- Create a Current User filter to allow collaborators to see only the tasks they're assigned to.
- Use the Row filter criteria to narrow in on critical path, attachments, comments, and locked rows.
To find the rows containing a pure number value using a filter, you need to convert the number to text. You can do that by creating a new column and the formula:
=[NumberColumn]1 + ""
where [NumberColumn] is the name of the column and row number is 1. Copy that formula to the rest of the new column.
Filters don’t find pure numeric values.
Filter on critical path, attachments, comments, and locked rows
Use the Row filter criteria to narrow down critical path tasks, attachments and comments that you need to action on, and rows that are locked to prevent editing to certain people.
Select Row in the first dropdown field to see these options.
Isolate your critical path
If you’ve set up your sheet to highlight critical path rows, you can apply a filter with is on critical path or is not on critical path as the criteria to display or hide critical path rows. Steps on how to enable critical path in your sheet are available in Tracking a project’s critical path.
Quickly find rows with attachments and comments
You can create a filter with the Row criteria that shows or hides rows that contain attachments or comments. Use has attachments or has comments to isolate only the rows to download attachments or reply to comment threads quickly. The does not have attachments or does not have comments criteria hide rows with attachments or comments.
Find locked and unlocked Rows
Use Row is locked or Row is not locked to show or hide rows that can only be edited by people with Admin sharing permissions on a sheet. This can help people with Editor permissions narrow down on the rows that they’re allowed to edit.