While a project is underway, you can easily make changes to high-level project properties as well as take actions that impact all time entries for that project.
Edit multiple projects
When project priorities or details change, it’s important to update this information, so the project data remains accurate.
To edit multiple projects:
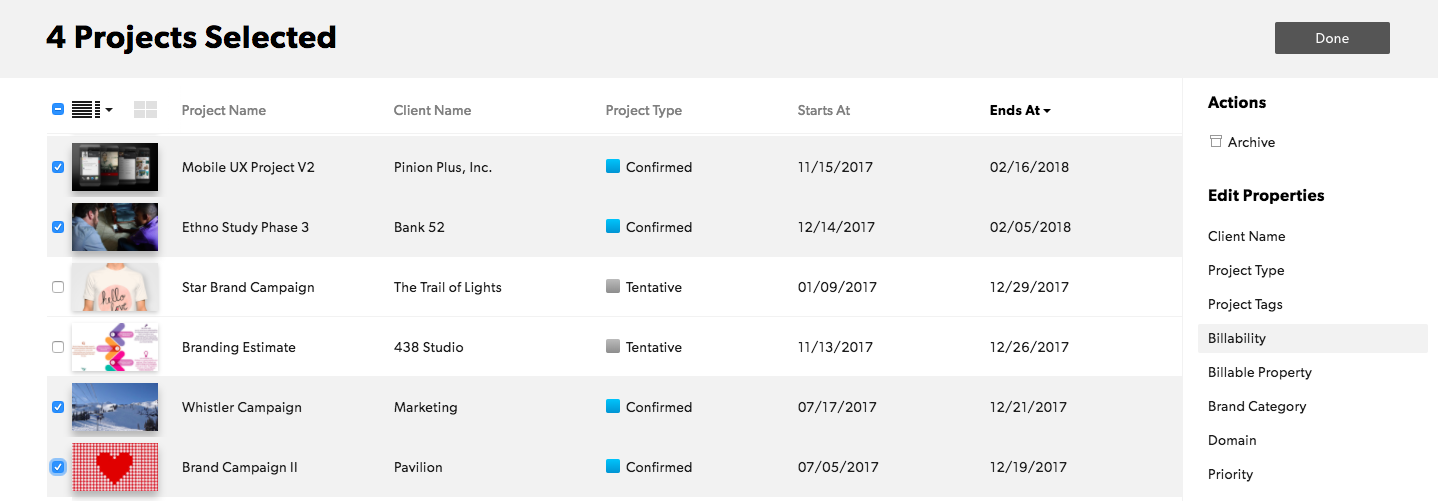
- Go to List View on the project portfolio.
- Filter to the projects you want to edit. You can use saved views or shared views as your filters if they apply. If you only want to edit projects you own, set the project owner project filter to yourself.
- For project state, select Active. You can't update archived projects, so you need to filter them out before making your changes.
- In the top right, select Edit Project.
- First, make the Project Editor the Project Owner.
- Ensure that the Project Owner project filter reflects the Project Editor's name.
- The project state project filter needs to be Active
- In the top right, select Edit Project.
- Select the checkbox for projects you want to edit.
- In the right column, select the changes you want to make, and then, at the top of the screen, choose Done.
Changing project properties
You can change client name, project owner, project type, and edit project tags.
You can also bulk edit project custom fields as follows:
- If the custom field is a text field, you can change this value.
- If the custom field is a drop-down menu, you can change this value.
- If the custom field is a multiple-choice drop-down menu, you can add or remove values.
Navigate to Account Settings to create new client names or project tags.
Archiving projects
You can bulk archive completed historical projects. Archiving projects ends ongoing assignments and removes future assignments. Project Editors must own a project to archive it.
- On the right sidebar under Actions, click Archive.
Once you've archived a project, you can't restore it.
Lock time or expense entries
In Resource Management, you can do the following:
- Lock all time or expense entries for a project
- Automatically lock time or expense entries after a set number of days
- Lock all time or expense entries upon approval
You have to review and approve time entries before you lock them, especially when you choose to automatically lock them after a certain period.
Set hours to lock automatically
- Go to the project page and select Project Settings in the time entry locking section.
- Select the option you want to use.
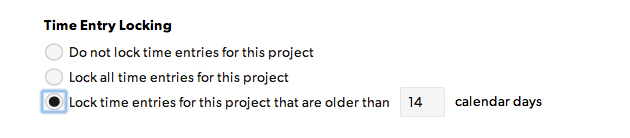
Communicate with your team when you plan to lock hours for projects so they can confirm their time beforehand. Once a time report is locked, only a Resourcing Admin or Portfolio Editor can unlock it.
Set time or expenses to lock automatically
- Open Account Settings.
- If you are working in Resource Management in Smartsheet, select the kebab menu in the top right corner, then select Account Settings.
- If you are working in standalone Resource Management, select Settings > Account Settings.
- Navigate to the Approvals Workflow section.
- Select the option to Lock time and expense entries upon approval
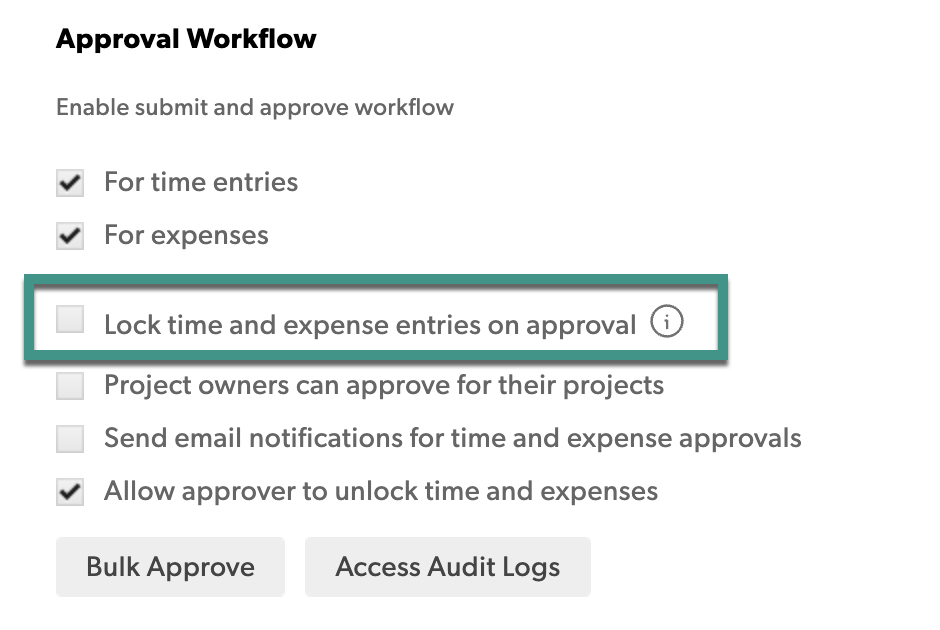
Activating this setting means that users cannot edit their approved time or expense entries in any way.
If this setting is not enabled, then users can add additional time or expenses to approved and locked entries.
Delete a project or phase in Resource Management
If you’re working on a connected project in Smartsheet, you can only add, edit, and delete phases in Smartsheet. Learn more about integrating phases with Smartsheet.
When you delete a project or phase, you delete all assignments and time and expense entries. For projects, you also delete any phases associated with the project.
You can't undo this action.
Delete a project
Resourcing Administrators and Portfolio Editors can delete any project. Project Editors can delete projects they own. Project Members can delete projects they're a part of.
- Open a project. Select the Project Settings button in the to go to the Project Settings page.
- On the left sidebar select Delete Project.
- Select the check box, and then select the Delete forever button.
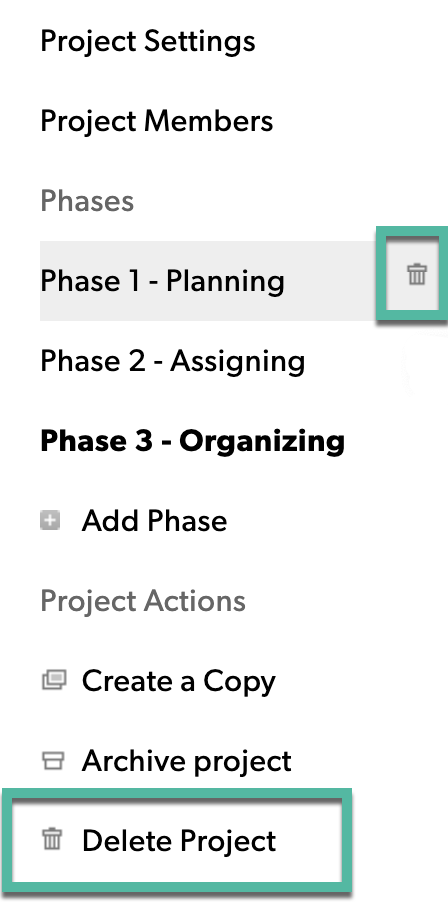
Delete a phase
- Go to the Project Settings page.
- On the left sidebar, hover your cursor over the phase name you want to delete.
- Select the trash can icon to delete the phase.
- Select the check box, and then select the Delete forever button.