Filters are a great way to show the data you want from a sheet.
USM Content
Filter sheet rows with columns matching specific conditions that interest you. Here are some of the conditions you can check for a column:
- Matches a specific value or a value contained in a list.
- Matches none of the values contained in a list.
- Greater than, less than, or equal to a value.
- Blank or empty
- Not a number
- Not a date
If you set multiple conditions, you can select whether to show rows that match
- all conditions
- at least one condition
With the appropriate permissions, you can create filters for yourself or share them with others.
The Shared Filters functionality covered in this article is included with Business and Enterprise plans. For more information about plans and pricing, see our Pricing page.
Required permissions
What you can do with filters in a sheet depends on the sharing permissions you have for that sheet.
| Filter Activity | Viewer | Editor | Owner or Admin |
|---|---|---|---|
| Use an existing filter | Yes | Yes | Yes |
| Create an *unnamed filter | Yes | Yes | Yes |
| Create a filter and name it | No | Yes | Yes |
| Share a filter with all sheet collaborators (Only available on Business and Enterprise plans) | No | No | Yes |
A sheet's unnamed filter is unique to you. You can configure it however you like.
Create a filter in grid, card, Gantt, or calendar view
Learn how to create a filter in a table, board, or timeline view.
On the toolbar, go to Filter > New Filter. The filter editor appears.
Brandfolder Image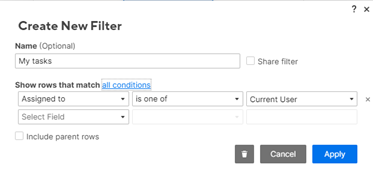
To create a named filter, fill in the Name field. (requires Editor permissions or higher, to the sheet)
Or,
To create an unnamed filter, leave the Name field blank.
Under Show rows that match, set one or more conditions for filtering the data you want.
A column's data type determines the conditional operators available for it. For example, contains can only be used with text strings and contacts, and is between can only be used with dates and numbers.
- Toggle the link next to Show rows that match to switch between matching all conditions or at least one condition.
- To share the filter with other sheet collaborators (requires sheet Admin permissions or higher), select the Share filter checkbox.
- If your sheet uses hierarchy, you can filter on parent rows by selecting the Include parent rows checkbox.
- Select Apply to see the filtering results.
The rows that match your filter appear, while the others are hidden.
In the Filter menu, your filter's name appears. It shows as Unnamed Filter if the filter is unnamed. If you shared the filter, the share icon
![]() appears next to the filter name.
appears next to the filter name.
Modify a filter
You can always go back and change the conditions of an existing filter:
From the Filter menu, hover over the name of the filter and select the Edit icon
 .
.
The form title displays the name of the filter you’re modifying. Verify the title to ensure that you’re modifying the correct filter.
- In the Edit Filter form, update the conditions as desired
- Select Apply.
The updated filter is applied to the sheet.
If you don’t have Editor permissions or higher, you can only modify unnamed filters.
Turn off a filter
To stop applying a sheet's current filter, select the filter name in the top bar. The menu item name changes to Filter Off.
Delete a filter
Here is how to remove a filter from the sheet:
- From the filter menu, hover over the name of the filter and select the delete icon
 .
. - Select Delete.
Tips for working with conditions
As you specify conditions for your filters, you might get a sense of how to set up the criteria you find most useful. Here are a few ideas to get you started:
- To specify that a filter uses all the specified criteria or just one of the criteria, select the link next to Show rows that match to switch between all conditions and at least one condition.
- Find rows where data might be missing with the is blank condition.
- If your sheet uses hierarchy, you can choose to have your filter include parent rows by selecting the Include parent rows checkbox.
- Focus collaborators on assigned tasks by creating a Current User filter. For details, see View your assigned tasks.
- Use the Row filter criteria to narrow in on critical path data, attachments, comments, and locked rows.
To find the rows containing a pure number value using a filter, you need to convert the number to text. You can do that by creating a new column and the formula:
=[NumberColumn]1 + ""
where [NumberColumn] is the name of the column and row number is 1. Copy that formula to the rest of the new column.
Filters don’t find pure numeric values.
Filter on critical path data, attachments, comments, and locked rows
Use the Row filter criteria to narrow down critical path tasks, attachments and comments that you need to action on, and rows that are locked to prevent editing to certain people.
Select Row in the first dropdown field to see these options.
Isolate your critical path data
If you’ve set up your sheet to highlight critical path rows, you can apply a filter with is on critical path or is not on critical path as the criteria to display or hide critical path rows. Steps on how to enable critical path in your sheet are available in Tracking a project’s critical path.
Quickly find rows with attachments and comments
You can create a filter with the Row criteria that shows or hides rows that contain attachments or comments. Use has attachments or has comments to isolate only the rows to download attachments or reply to comment threads quickly. The does not have attachments or does not have comments criteria hide rows with attachments or comments.
Find locked and unlocked Rows
Use Row is locked or Row is not locked to show or hide rows that can only be edited by people with Admin sharing permissions on a sheet. This can help people with Editor permissions narrow down on the rows that they’re allowed to edit.