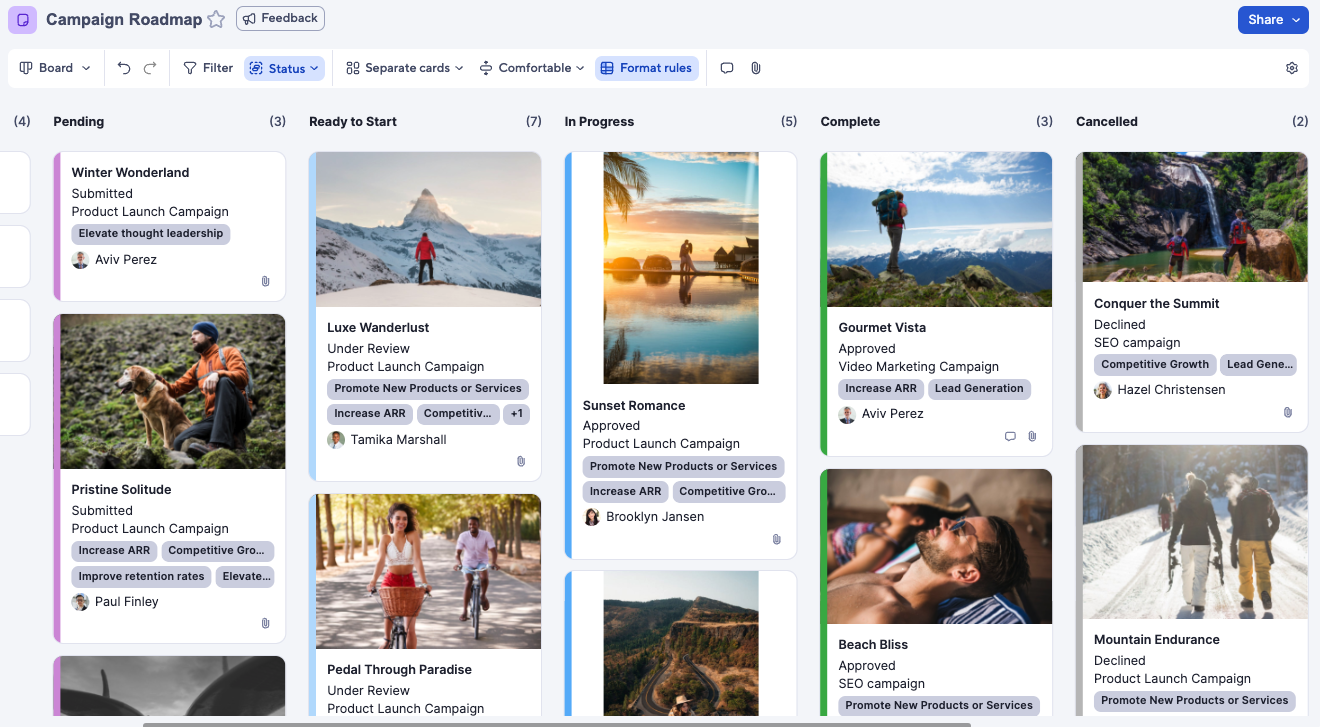
Board view allows users to track projects, manage tasks, and prioritize work on a visual board.

Board view has an all-new, modern look and feel and includes key new functionality to make working on a board faster, easier, and more collaborative than ever. Board view facilitates collaboration by displaying changes made by other users in real-time. Currently, real-time changes include newly added or deleted cards and any updates to card titles or their fields.
Board view allows you to:
- See projects, tasks, or cards grouped into vertical lanes (such as by status, phase, assignee, or team).
- Drag and track cards as they move across lanes.
- Add cards and view and update their details directly from the board view.
- See real-time changes from collaborators in board view, such as newly added, updated, or deleted cards.
Access board view
On a sheet, navigate to the top toolbar, switch views, and select Board. What you can do in board view depends on the sharing permission level you have in the sheet. For details about specific actions you can take, review this table.
Configure your sheet for board view
Board view is available in any sheet that includes at least one:
- Dropdown list (single-select)
- Contact list (single-select)
- Symbol column
Edit cards and lanes
View and edit card details
Board view displays data as cards in their corresponding lanes. Open a card to view or edit its details by double-clicking on it or right-clicking and then selecting Edit details. Your changes are saved automatically while you edit.
Edit fields visible on the card
Cards display data captured in fields. Each card always displays a title, which is the same as the value of the primary column.
By default, the first four fields appear on the card. To change the fields that appear in board view, sheet Admins can select the settings icon and toggle on the necessary fields. Up to 14 fields can be displayed.
Cards can display a cover image if there is a cell image in the primary column. If there is no cell image in the primary column, then the cover image comes from the leftmost column containing a cell image.
Columns that are hidden in grid view don't show up in the details panel.
Modify lanes
You can group cards into vertical lanes using the dropdown (single-select), contact (single-select), or symbol columns. You can only group cards by one level.
To add a new lane, select + Add lane to the right of the existing lanes. You can also hover over a lane and select the three dots to access the lane menu, then select Add lane. To rename a lane, select the lane title and edit it. To delete a lane, select the three dots to access the lane menu, then select Delete lane.
Edit card colors
Board view displays task bar colors from Gantt, card, or calendar view. To edit these task bar colors, switch to Gantt, card, or calendar view and either:
- Manually apply a task bar color by right-clicking the color bar
- Apply conditional formatting rules, specifically setting the task bar color
Edit card titles
Card titles are pulled from the sheet’s primary column by default.
Assign cards to contacts
You can use the details panel to assign contacts to cards. Or, if your board view is grouped by a single select contact column, you can drag cards across lanes to assign them to different people.
You can also return to grid view, select Edit Column Properties for the contact column, and add the contacts to the contact list. For more instructions, see Specify preferred contacts in a contact list column.
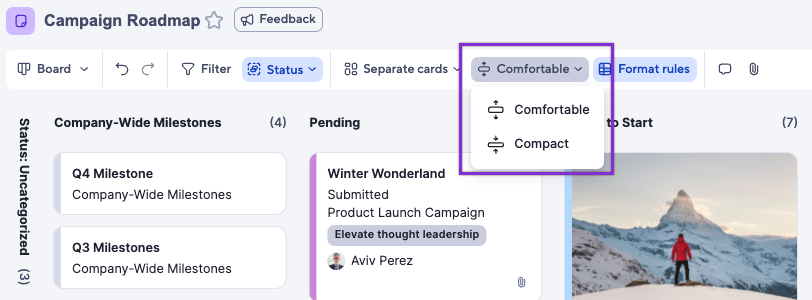
Use board view
You can choose whether to display fields on your cards by selecting Comfortable or Compact in the toolbar.
Move or add cards
To move a card, select and drag it either across lanes or within a lane. Or, in the card details, change the value of the column that determines the grouping.
To add a card:
- Select the plus symbol at the top or bottom of any lane.
- Click between two cards and select Add card above or Add card below in the card menu.
- Select + Add card in the lane menu.
When adding a card, use the ENTER keyboard shortcut to quickly add another card beneath it.
Group cards in lanes
Grouping organizes cards on the board into vertical lanes. You can group your board view by any dropdown list (single-select), contact list (single-select) column, or symbol column.
The lane order matches the order of the values in the column’s properties. Grouping is a user-specific, board-specific preference. Smartsheet remembers the applied grouping for each user for each board.
To change grouping:
- On the toolbar, select Group by.
- In the dropdown, select the column you want to group by.
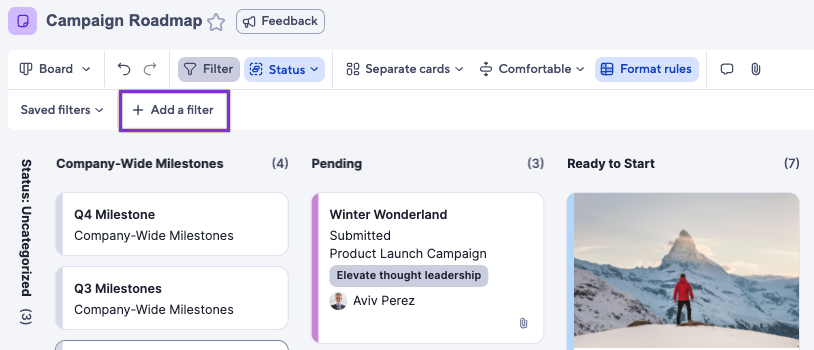
Filters in board view
Applying and managing filters in board view allows you to focus on specific tasks or team members, helping you to streamline discussions and keep attention on high-priority items. Filters applied in grid, card, Gantt, or calendar view are automatically applied when you switch to board view, and vice versa.
In the board view toolbar, you can select any existing filter, switch between filters, or turn filters off. You can edit or delete any saved filters by selecting the pencil or trash can icon on the filter’s row. You can also further filter your data by applying additional filters on top of your saved filters. You can save these new filters and share them as needed.
Hierarchy in board view
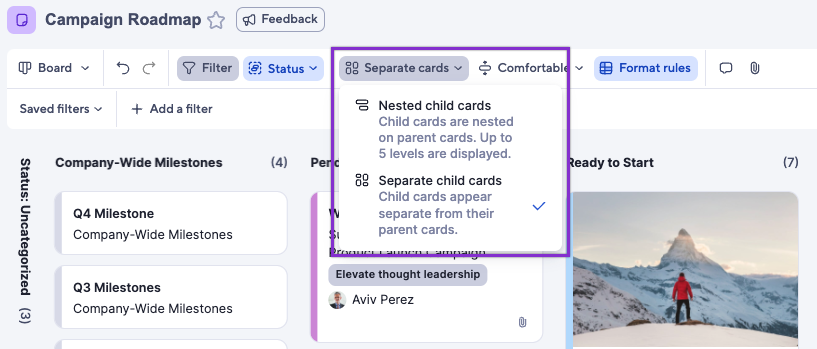
In the nested child view, up to five levels of child cards are displayed beneath their parent card so you can easily visualize task relationships. You can add child cards directly in board view by selecting the card content menu.
In the separate child card view, cards are displayed in their own lanes.
Attach files
To attach files to a specific card, open the card and select Add in the attachments panel. In the attachments panel, you can also view or edit other attachments to the card.
To view all attachments on the sheet, select the paperclip icon in the toolbar and then select All from the drop-down in the attachments panel.
Share your board
You can share your sheet with collaborators directly from board view or set board view as the default view with specific grouping applied.
- In the sheet, select Share in the upper right.
- Insert any people or groups as needed.
- Select Edit next to Default view.
- In the Filter dropdown, add a filter if necessary.
- In the View dropdown, select Board view.
- In the Card View Lanes dropdown, set default grouping.
- Select Save.
- Select Share or Copy link
Collaborate with others
You can comment on cards or on the sheet as a whole. To comment on a specific card, open the card and add a comment in the conversations panel. To view all comments on the sheet or comment on the sheet as a whole, select the comment icon from the toolbar, then select All from the drop-down in the conversations panel.
You can see changes made by other users, specifically newly created, updated, and deleted items, in board view as they happen in real-time. The other users viewing or editing the sheet are listed in the top right corner. Hover over their account photo to see their contact information.
Users viewing the sheet in board or timeline view can see all other users regardless of the view they are using. Users viewing the sheet in grid, card, calendar, or Gantt view cannot see users viewing the sheet in board or timeline view.
Board view limitations
Board view isn't currently available in reports, dashboards, or WorkApps. However, it's under active development, and we will continue to introduce new functionality over time. Your feedback can help us shape the evolution of this product. Please share your feedback with us directly using the Product Feedback Form.
Frequently asked questions
What is the difference between card and board view?
Board view is the new and improved card view. Here are some features that are new with board view:
- Ability to easily add cards anywhere with one click
- Vertical scrolling is lane-specific
- Smoother card editing with the new record detail panel
- Enhanced image display on cards with images at the top of cards
- Continuous save
- Real-time events for the addition, deletion, and update of cards
- Enhanced board setting experience - users can choose up to 14 fields to display on the cards
- A significantly more modern, intuitive, and delightful user experience all around!
Is it possible to provide a Smartsheet Control Center template for board view?
Yes. Just like other views, it’s possible to set board as the default view in the Share modal, which means that any template sheet in SCC that sets its default view to board view can be provisioned in board view. It is also possible to define the filter that should apply during provisioning.
Does the placement of cards within a lane persist when the view is reopened and/or when other users access the view?
Yes, the placement of cards within a lane persists across sessions, and is the same for ALL users of the sheet.