Achieve consistent enforcement of your organization's security and compliance policies with the Smartsheet - Okta SCIM integration.
This article discusses information relevant to both the Legacy Collaborator Model and the User Subscription Model. If you're unsure about your model type, learn how to determine the model your plan is on.
Overview
With the Smartsheet - Okta SCIM Integration, you can manage your user roles and access based on updates made in your Okta active directory environment.
Systems Admins can provision, deactivate, and manage the profile data of Smartsheet users through Okta’s active directory service. The integration allows you to provision and deactivate users through a central user directory and ensure that they can no longer access company data within Smartsheet once someone leaves the business.
Keep in mind that
- In Legacy Collaborator Model plans, Smartsheet supports unlicensed users so you can also provision Smartsheet users without any roles. Any new unlicensed user provisioned through Okta doesn't appear in Smartsheet's Admin Center until they sign in for the first time or are added to a Smartsheet group.
- In User Subscription Model plans, all new users provisioned through Okta are designated Provisional Members upon creation. The only exception to this rule is the System Admin role, which can be provisioned as non-Member (Viewer). Additionally, upgrading or downgrading existing users is only supported through the Manage True-up page in Admin Center.
Provisional Members have the same access to features as regular Members, but only for a limited time. Learn more about the True-up process and capabilities of Provisional Members.
Prepare Smartsheet for the Okta/SCIM integration
Before you configure the integration, you must complete a few tasks in Smartsheet. View the setup process as a tutorial. Remember that you must be a System Admin in Smartsheet and Okta to configure the integration.
- Enable SCIM Support: Your plan needs SCIM provisioning. Contact support to activate the feature.
- Validate your domain(s): Validate each domain used with Smartsheet-Okta. You must have at least one validated domain in Smartsheet. Only plans with the primary email address on a validated domain are supported.
Generate the API token: This is required to configure automatic user provisioning with Okta. Copy and save the API Access token. You aren't able to retrieve it, and you need the key to configure Okta.
If you don't want your users to sign up for Smartsheet through UAP, turn off the UAP setting.
Turn on Directory Integration: To use Okta SCIM, a System Admin must activate the directory integration feature via Admin Center. On the Security & Controls page, locate the Directory Integration card and toggle the feature on.
Brandfolder Image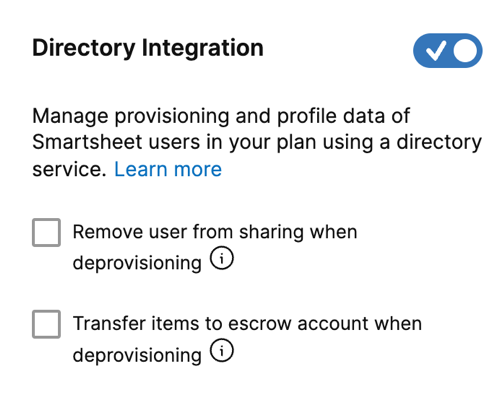
Configure Okta for the Smartsheet integration
- Sign into the Okta Admin page.
- Navigate to Applications > All integrations and search for Smartsheet SCIM in the application catalog. Select Smartsheet SCIM.
- Enter an application label, such as Smartsheet US.
- Set your Sign-On Options. If you're setting up SAML SSO, select View Setup Instructions towards the bottom of the page and complete the SAML SSO configuration.
- On the Advanced Sign-on Settings screen, under Credential Details, select Email for the Application username format and then select Done. This email is the user's Smartsheet account.
- Go to the Provisioning tab and select Configure API Integration.
- Select Enable API Integration and provide the Base URL:
- For Smartsheet US, use https://scim.smartsheet.com/v2
- For Smartsheet EU, use https://scim.smartsheet.eu/v2
- Enter your saved API Token into the API Token field. Select Test API Credentials to verify the token. If everything works as expected, you'll see the following message: "Smartsheet SCIM was verified successfully"
- Select Save. On the Provisioning tab under Settings, select To App.
- Select Edit > Enable the features you want, then save your changes.
Users you remove from your Okta SCIM instance will be deactivated in Smartsheet. Deactivated users can't sign in to Smartsheet and are no longer assigned a license or Member designation. That license or Member designation is then available for you to reassign.
Additional resources
Follow each link below to learn how to continue configuring the integration. It's important to follow these steps in the sequence listed here.
You can also view these articles as a step-by-step tutorial.