Use Okta SCIM with Smartsheet

Achieve consistent enforcement of your organization’s security and compliance policies with the Smartsheet - Okta SCIM integration.


Who can use this?

Plans:

  • Enterprise

Permissions:

  • System Admin

Find out if this capability is included in Smartsheet Regions or Smartsheet Gov.

With the Smartsheet - Okta SCIM Integration, you can manage your user roles and access based on updates made in your Okta active directory environment.

Systems Admins can provision, deactivate, and manage the profile data of Smartsheet users through Okta’s active directory service. The integration allows you to provision and deactivate users through a central user directory and ensures they can no longer access company data in Smartsheet once they leave the organization.

How it works

Directory Integration (DI) uses Okta as the source of truth for seat management. Once enabled, Smartsheet automatically assigns and updates seat types based on the Okta groups your users belong to, reducing the need for manual updates in Admin Center.

Here's what happens during a sync:

  • Seat assignment by group: Users receive a seat type based on their Okta group membership. Members of a licensed group (such as Smartsheet Licensed User) receive a Member seat, while users assigned the Smartsheet app but not placed in a specific group default to a Contributor seat.
  • Automatic upgrades and downgrades: When a user moves between Okta groups, their seat type updates automatically during the next sync. No manual intervention is necessary.
  • Privileged group takes precedence: If a user belongs to multiple groups with different roles, DI assigns the most privileged seat type.
  • Provisional Members: DI upgrades Provisional Members as needed, but doesn't automatically downgrade them. System Admins must handle downgrades manually in Admin Center—or, if your plan is set to auto-downgrade, the change happens at the end of the review period. Learn more about Provisional Member settings.
  • Deactivation: When a user is removed from Okta or unassigned from the Smartsheet app, they're automatically deactivated in Smartsheet on the next sync.

To reactivate a deactivated user, a System Admin must temporarily turn off DI, reactivate the user, and then re-enable DI.

Once DI is active, it overrides any manual seat changes made by System Admins in Admin Center during the next sync. It’s recommended to turn off the auto-upgrade setting in Smartsheet to avoid conflicts with IdP-driven workflows.

Provisional Members have the same access to features as regular Members, but only for a limited time. Learn more about Smartsheet’s user model and provisional membership


Group-to-seat mapping

Smartsheet rolesMapping valuesVariable names (preferred)Resulting seat type
Smartsheet Licensed UserLICENSED_USERsmartsheetLicensedUserMember
Smartsheet Group AdminGROUP_ADMINsmartsheetGroupAdminMember
Smartsheet Resource ViewerRESOURCE_VIEWERsmartsheetResourceViewerMember
Smartsheet System AdminUSER_ADMIN, PAYMENT_ADMIN, DATA_ADMINsmartsheetSystemAdminContributor

Assigning a user to the Smartsheet app without adding them to any Okta group results in a Contributor seat type.

Supported seat type changes via group mappings

Directory Integration handles the following transitions automatically:

FromTo
ContributorMember
Provisional MemberMember
MemberContributor
  • If a Contributor enters a Provisional Member state and then gets added to a Member-level group in DI, they automatically upgrade to a Member seat.
  • If a Contributor enters a Provisional Member state but hasn't been added to a Member Seat Type IdP group, they remain in that state until either the Admin Approval Setting downgrades them or a System Admin manually changes their seat type in Admin Center.

Unsupported seat type changes via group mappings

Directory Integration doesn't handle the following transitions. Find out where you should perform them:

FromToWhere to act
Provisional MemberContributorAdmin Center
ContributorNo AccessAdmin Center
ContributorProvisional MemberSystem-triggered only
Provisional MemberNo AccessAdmin Center
MemberNo AccessAdmin Center
  • Downgrading from Member to Provisional Member isn't supported directly in Admin Center or in DI.
  • Deactivation is still supported by removing or deactivating the user profile in Okta.
  • You must manage Guests entirely in Admin Center, as they don't exist in your IdP.

Prepare Smartsheet for the Okta/SCIM integration

Before you configure the integration, you must complete a few tasks in Smartsheet. View the setup process as a tutorial. Remember that you must be a System Admin in Smartsheet and Okta to configure the integration.

  1. Enable SCIM Support: Your plan needs SCIM provisioning. Contact support to activate the feature.
  2. Validate your domain(s): Validate each domain used with Smartsheet-Okta. You must have at least one validated domain in Smartsheet. Only plans with the primary email address on a validated domain are supported.  
  3. Generate the API token: This is required to configure automatic user provisioning with Okta. Copy and save the API Access token. You can't retrieve it, and you need the key to configure Okta.

    If you don't want your users to sign up for Smartsheet through UAP, turn off the UAP setting.

  4. Turn on Directory Integration: To use Okta SCIM, a System Admin must activate the directory integration feature via Admin Center. On the Security & Controls page, locate the Directory Integration card and toggle the feature on.

    Brandfolder Image
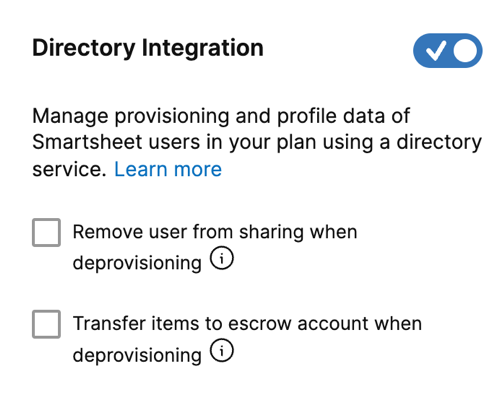
    Directory Integration feature in Admin Center

    In Smartsheet's item ownership model, plans take ownership of items rather than individual users. This means Smartsheet doesn’t transfer the items from a  deprovisioned user to an escrow account because those items remain active on the plan. However, doing so is still recommended as a precautionary measure.

  5. Assign the Smartsheet app: Ensure the Smartsheet app is assigned to the relevant users within Okta.
  6. Organize users into groups: Assign users to the appropriate Okta groups to trigger the correct seat type in Smartsheet.
  7. Deactivate auto-upgrade (recommended): If DI is active, deactivate the auto-upgrade setting in Smartsheet to avoid conflicts with IdP-driven seat assignments.

Configure Okta for the Smartsheet integration

  1. Sign in to the Okta Admin page.
  2. Navigate to Applications > All integrations and search for Smartsheet SCIM in the application catalog. Select Smartsheet SCIM.
  3. Enter an application label, such as Smartsheet US. 
  4. Set your Sign-On Options.  If you're setting up SAML SSO, select View Setup Instructions towards the bottom of the page and complete the SAML SSO configuration.
  5. On the Advanced Sign-on Settings screen, under Credential Details, select Email for the Application username format and then select Done. This email is the user's Smartsheet account.  
  6. Go to the Provisioning tab and select Configure API Integration
  7. Select Enable API Integration and provide the Base URL:
  8. Enter your saved API Token into the API Token field. Select Test API Credentials to verify the token. If everything works as expected, you'll see the following message: Smartsheet SCIM was verified successfully
  9. Select Save. On the Provisioning tab under Settings, select To App
  10. Select Edit > Enable the features you want, then save your changes.

Additional resources

Follow each link below to learn how to continue configuring the integration. It's important to follow these steps in the sequence listed here.

  1. Set up Smartsheet roles
  2. (Optional) Set up additional premium Connector roles

You can also view these articles as a step-by-step tutorial.

With the Smartsheet - Okta SCIM Integration, you can manage your user roles and access based on updates made in your Okta active directory environment.

Systems Admins can provision, deactivate, and manage the profile data of Smartsheet users through Okta’s active directory service. The integration allows you to provision and deactivate users through a central user directory and ensure that they can no longer access company data within Smartsheet once someone leaves the business.

Keep in mind that

Smartsheet supports unlicensed users so you can also provision Smartsheet users without any roles. Any new unlicensed user provisioned through Okta doesn't appear in Smartsheet's Admin Center until they sign in for the first time or are added to a Smartsheet group.


Prepare Smartsheet for the Okta/SCIM integration

Before you configure the integration, you must complete a few tasks in Smartsheet. View the setup process as a tutorial. Remember that you must be a System Admin in Smartsheet and Okta to configure the integration.

  1. Enable SCIM Support: Your plan needs SCIM provisioning. Contact support to activate the feature.
  2. Validate your domain(s): Validate each domain used with Smartsheet-Okta. You must have at least one validated domain in Smartsheet. Only plans with the primary email address on a validated domain are supported.   
  3. Generate the API token: This is required to configure automatic user provisioning with Okta. Copy and save the API Access token. You can't retrieve it, and you need the key to configure Okta.

    If you don't want your users to sign up for Smartsheet through UAP, turn off the UAP setting.

  4. Turn on Directory Integration: To use Okta SCIM, a System Admin must activate the directory integration feature via Admin Center. On the Security & Controls page, locate the Directory Integration card and toggle the feature on.

    Brandfolder Image
    Directory Integration feature in Admin Center


Configure Okta for the Smartsheet integration

  1. Sign into the Okta Admin page.
  2. Navigate to Applications > All integrations and search for Smartsheet SCIM in the application catalog. Select Smartsheet SCIM.
  3. Enter an application label, such as Smartsheet US. 
  4. Set your Sign-On Options.  If you're setting up SAML SSO, select View Setup Instructions towards the bottom of the page and complete the SAML SSO configuration.
  5. On the Advanced Sign-on Settings screen, under Credential Details, select Email for the Application username format and then select Done. This email is the user's Smartsheet account.  
  6. Go to the Provisioning tab and select Configure API Integration
  7. Select Enable API Integration and provide the Base URL:
  8. Enter your saved API Token into the API Token field. Select Test API Credentials to verify the token. If everything works as expected, you'll see the following message: "Smartsheet SCIM was verified successfully"
  9. Select Save. On the Provisioning tab under Settings, select To App
  10. Select Edit > Enable the features you want, then save your changes. 

Users you remove from your Okta SCIM instance will be deactivated in Smartsheet. Deactivated users can't sign in to Smartsheet and are no longer assigned a license. That license is then available for you to reassign.


Additional resources

Follow each link below to learn how to continue configuring the integration. It's important to follow these steps in the sequence listed here.

  1. Set up Smartsheet roles
  2. (Optional) Set up additional premium Connector roles

You can also view these articles as a step-by-step tutorial