Create an upload workflow with Data Shuttle to import information from a CSV or XLSX file into a Smartsheet sheet.
Prerequisites
To use Data Shuttle, you must:
- Have Owner, Admin, or Editor permissions on the target sheet.
- Have Data Shuttle Premium Application permissions enabled in Admin Center by your Smartsheet System Admin.
To contact your sales representative and learn more, visit the Data Shuttle Marketplace.
If you can access Smartsheet University, you can find this information with interactive instructions in the Data Shuttle Upload Workflows course.
Key terms
- Source: The source is where you import data from. For example, the source might be an XLSX export from another system that you want to port into Smartsheet.
- Target: The target is where you import the data to. Data Shuttle can import data to a sheet or a DataTable. In this article, we overview how to import data to a sheet. To learn how to upload to a DataTable, follow the steps in Create and populate a DataTable.
- Unique identifier: Unique identifiers are unique IDs (key column values) that must not be duplicated within a specific column on a sheet.
Example
If you use a sheet to track your contacts, you might designate Email Address as the unique identifier to avoid having the same email address listed twice in the Email Address column. Other examples of unique identifiers are part numbers, student ID numbers, or employee codes.
The basics of Data Shuttle upload workflows
Data Shuttle can upload data from:
- Systems that allow export to Google Sheets, XLSX, or CSV text files
- Files in Google Drive, Microsoft (OneDrive/SharePoint), or Box
- Shared Google, Box, and SharePoint drives
If you select OneDrive as your source/target location, your SharePoint sites appear in the left pane under your OneDrive files.
When creating a workflow, make sure that:
- The CSV or XLSX file is attached to a sheet in Smartsheet; or,
- The CSV, XLSX, or Google Sheet file is located in the Google Drive of an account you can access.
- When importing files from Google Drive to Data Shuttle, a Smartsheet user must have at least Viewer access on the docs in Google Drive.
Step 1: Create a workflow
You can also access the feature by going to the Navigation Bar and selecting Launcher > Data Shuttle.
- On the left Navigation Bar, select
Brandfolder Image
 to create a workflow.
 Select Upload Data.
Brandfolder Image
Pro tip: Copy from an existing workflow
You can also make a copy of an existing workflow and edit it to create a new one:
- Hover over the workflow that you’d like to copy. Then select
Brandfolder Image
 on the right side of the screen on that row.
 - Select Create a copy and give the new workflow a name.
Hover over this row and select Brandfolder Image
again to edit the workflow with any desired changes.Brandfolder Image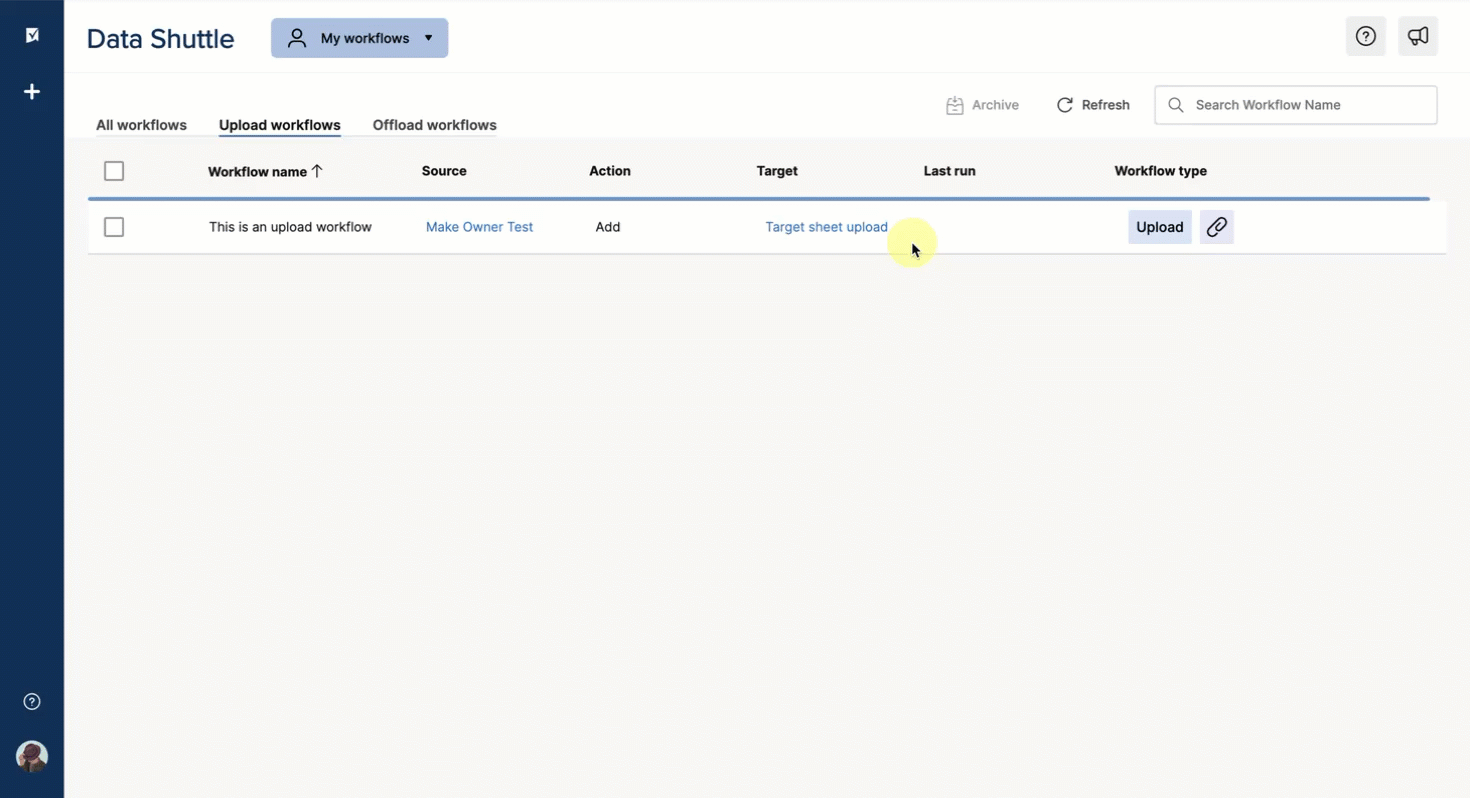
Step 2: Select a source file
Notes regarding sources
- For any shared drives used as a source, you must have at least Editor permissions. For OneDrive, Smartsheet only supports a connection with personal drives.
- Data Shuttle doesn’t support open XML-based XLSX files. When generating your file data using an API, consider generating a CSV file rather than an XLSX file.
- Your source file should be no larger than 1 GB.
To set a source
- Select your Source Location. Your source file may live in one of the following locations:
Smartsheet Attachment: since you’re logged in, you can search or select a file to locate the sheet where the file is attached. You must have at least Viewer permissions for the sheet. Choose whether you always want to import the most recent attachment or an attachment with a specific name.
If you have difficulty attaching files to your sheets, contact your Smartsheet System Admin.
OneDrive or SharePoint: Follow the prompts to allow smartsheetapps.com to view files in your OneDrive or SharePoint account. After successful authentication, search or browse your synced OneDrive/SharePoint to locate your file.
If you choose OneDrive as your source/target location, your SharePoint sites show on the left pane under your OneDrive files.
- GoogleDrive: Follow the prompts to allow smartsheetapps.com to view files in your Google Drive account. After successful authentication, search or browse your synced Google Drive to locate the file (XLSX, CSV, or Google Sheet).
- Box: Follow the prompts to allow smartsheetapps.com to view files in your Box account. After successful authentication, search or browse your synced Box to locate your file (XLSX or CSV). You can upload Box files you own and Box files shared with you.
- Check the This file has column headers box if your file contains column headers.
- If your data doesn’t begin on row 1 or isn’t on tab 1 of your workbook, specify the First Row of the data and Tab Number.
Select Next.
Brandfolder Image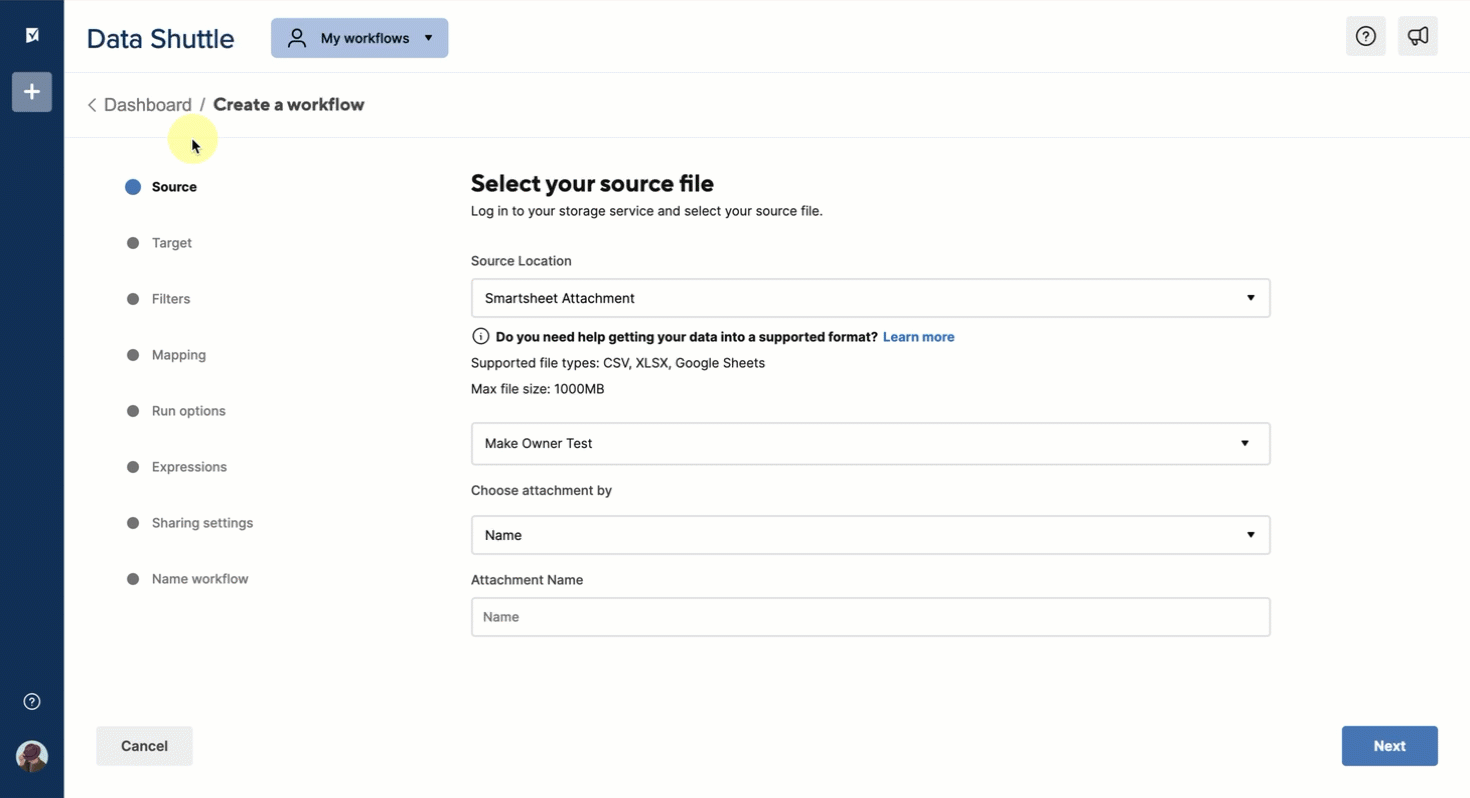
Step 3: Select the target and workflow actions
Configure how you want results uploaded into Smartsheet.
Select the target — where your data is going. For this example, we cover how to upload data to a sheet.
- If you’d like to learn how to upload to a DataTable, follow the steps in Create and populate a DataTable.
- If you’re using Smartsheet Attachments as a source, your target sheet can be the same as your source sheet.
Brandfolder Image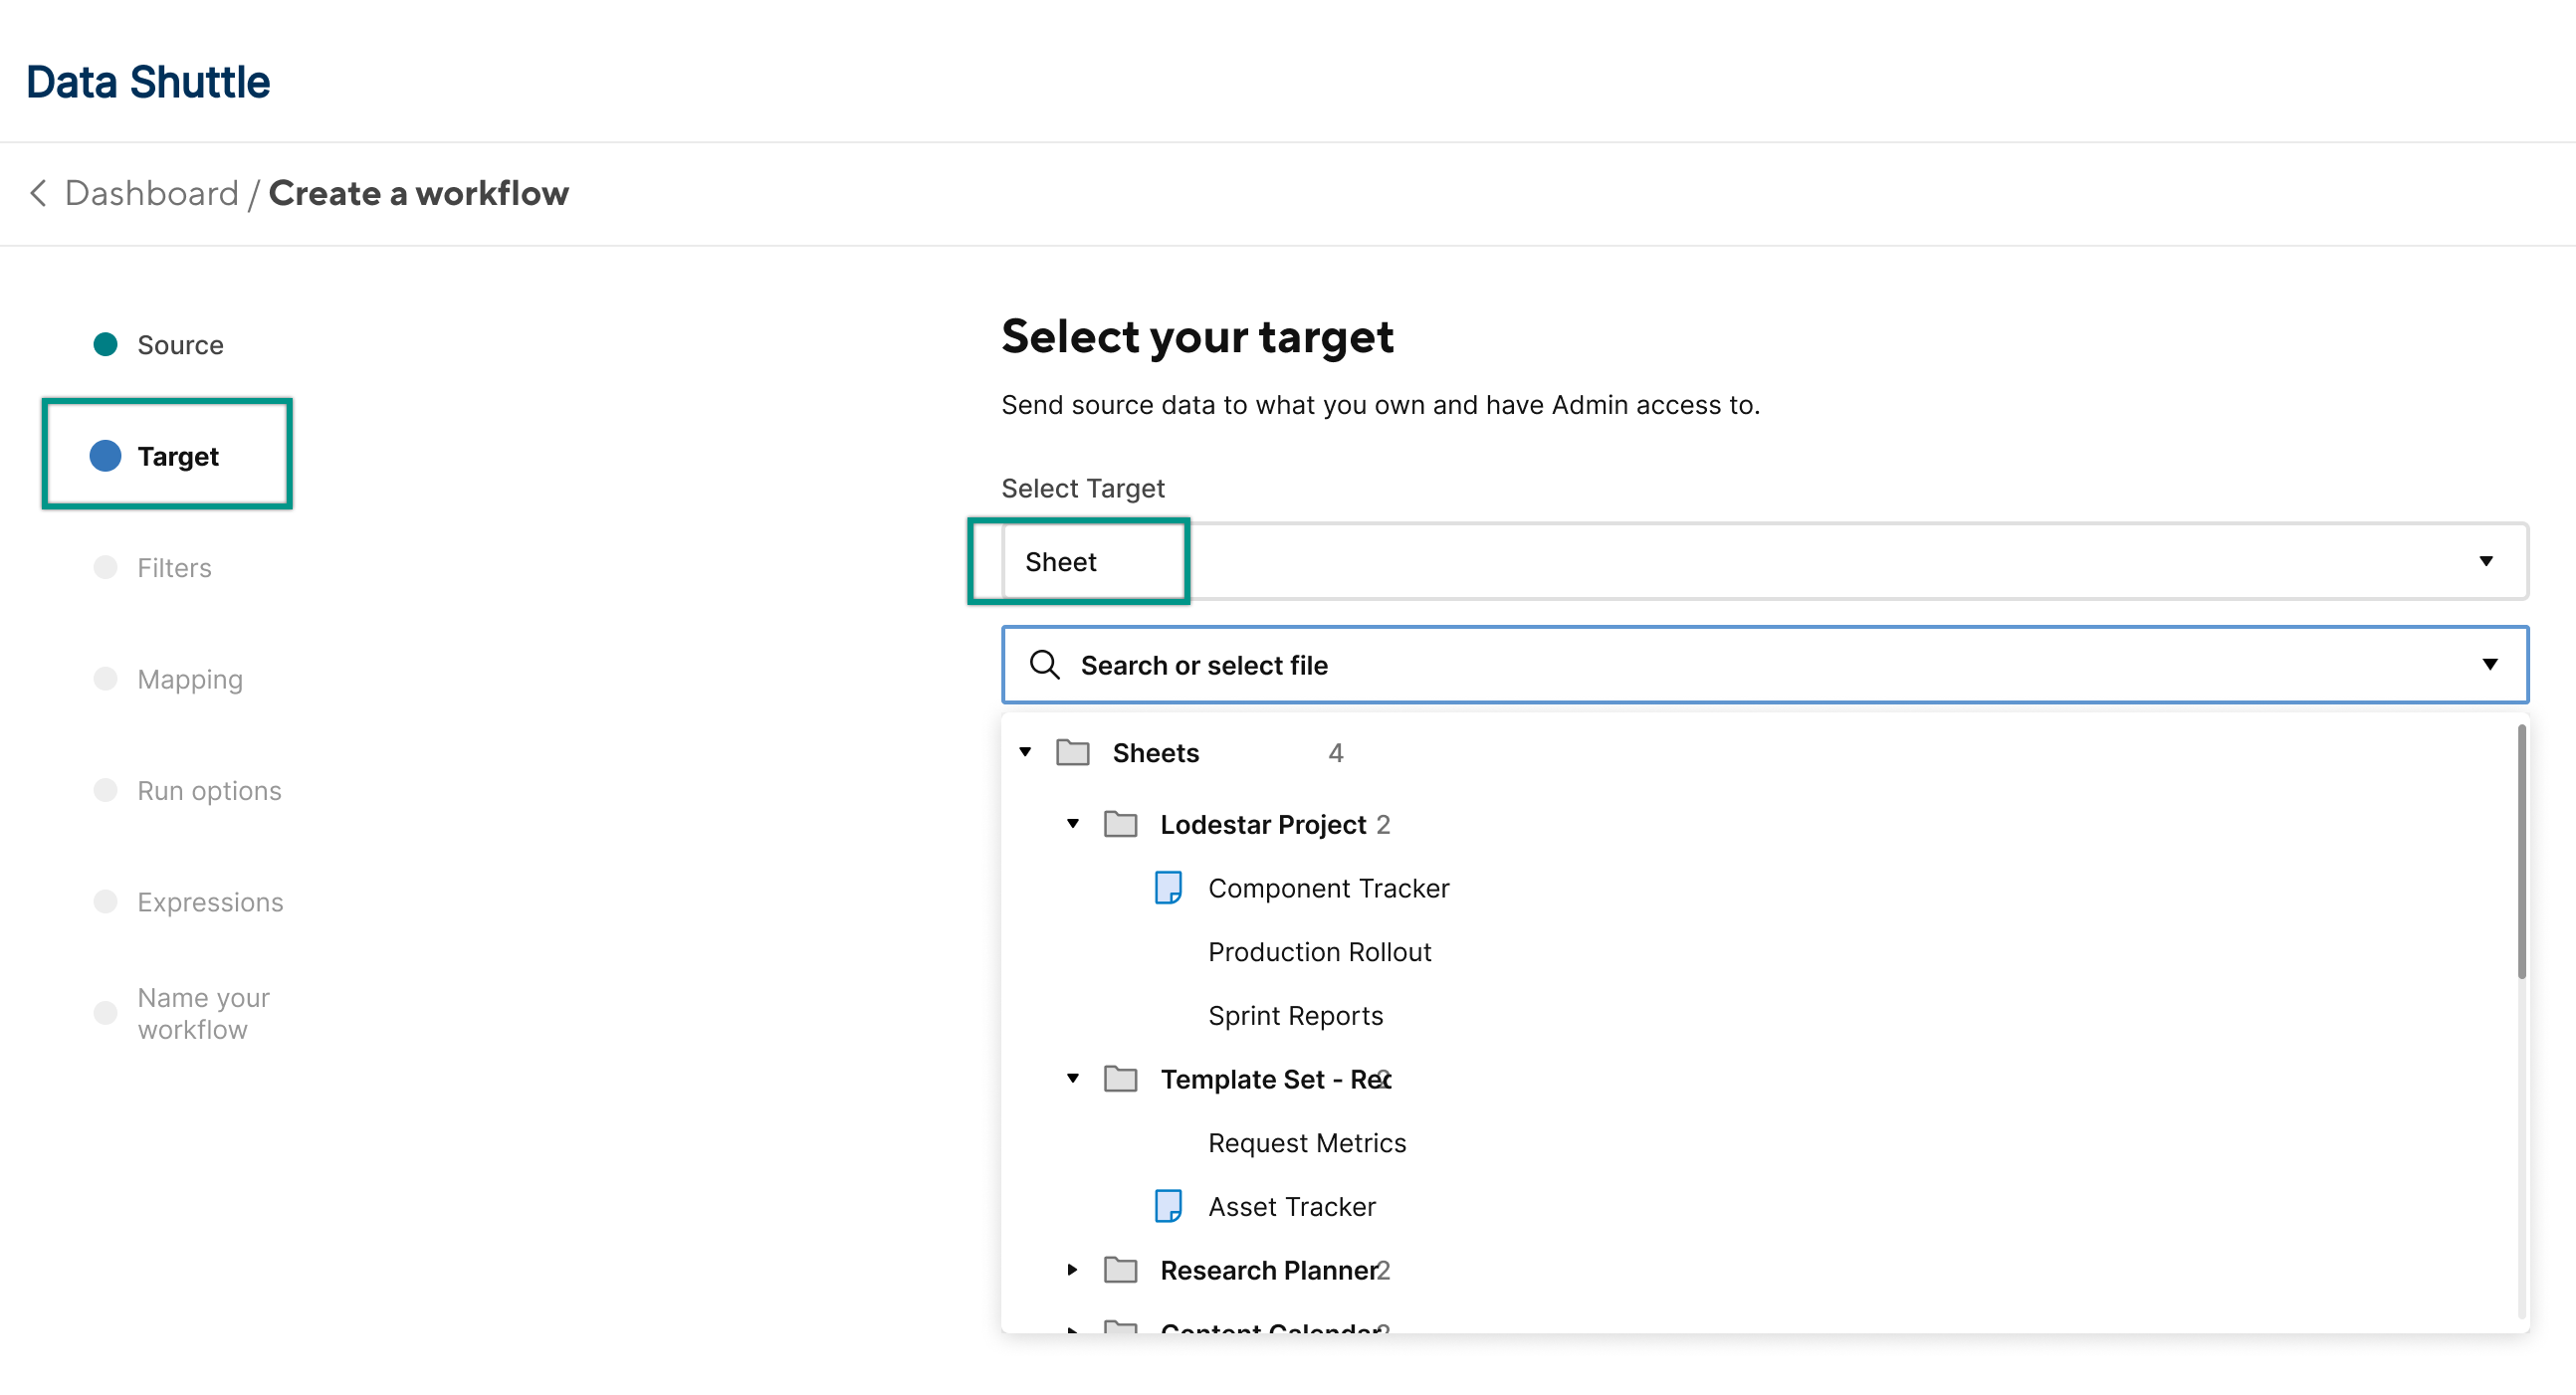
Select how you want to import the data into Smartsheet. You can only select one of these options:
- Replace all target sheet rows with the data from the input file. This option scans the source sheet to find the first change. When a change is detected, Data Shuttle replaces all data in the target sheet from that row onward.
- Merge data into the target based on a key column value. Note that you must have a unique identifier column to use this functionality. When you choose to merge data, you also select row options. You can select any of these combinations:
Add rows to the sheet as they are added to the source file. This option adds new rows for unique identifiers not already included in the target.
Example
If you have a list of contacts and use email addresses as the unique identifier and Data Shuttle finds a new email address on your source (for example: Hiro Senjima, hiro.senjima@mbfcorp.com) that isn’t already on your sheet, it would add a new row for Hiro and populate his details. If Hiro has two different email addresses, this could result in a situation where he is listed twice on your target sheet.
Update rows as the change in the source file. This is part of a true “merge” functionality. If there’s an existing row of data in your sheet for a unique ID and any changes are made to that record in the source, it updates that row in the target.
Example
If your Unique Identifier column is email addresses and Sally Smith (sally.smith@mbfcorp.com) changes her phone number to (111) 222-3333, Data Shuttle would look for the row where the email address is sally.smith@smartsheet.com and update the phone number for this row.
Delete rows that no longer match the filter criteria. This option deletes rows that no longer match the filters you’ll set up in the next step.
Example
If you set a filter to only import records from your source where the Location column has the value of United States and Hiro Senjima moves to Canada, this would delete the row with Hiro’s data from your target sheet.
- Update the dropdown choices for the selected columns. This option replaces the dropdown column options in your target sheet with values within your Excel or CSV file. Use this feature to create dynamic dropdowns with Data Shuttle.
Brandfolder Image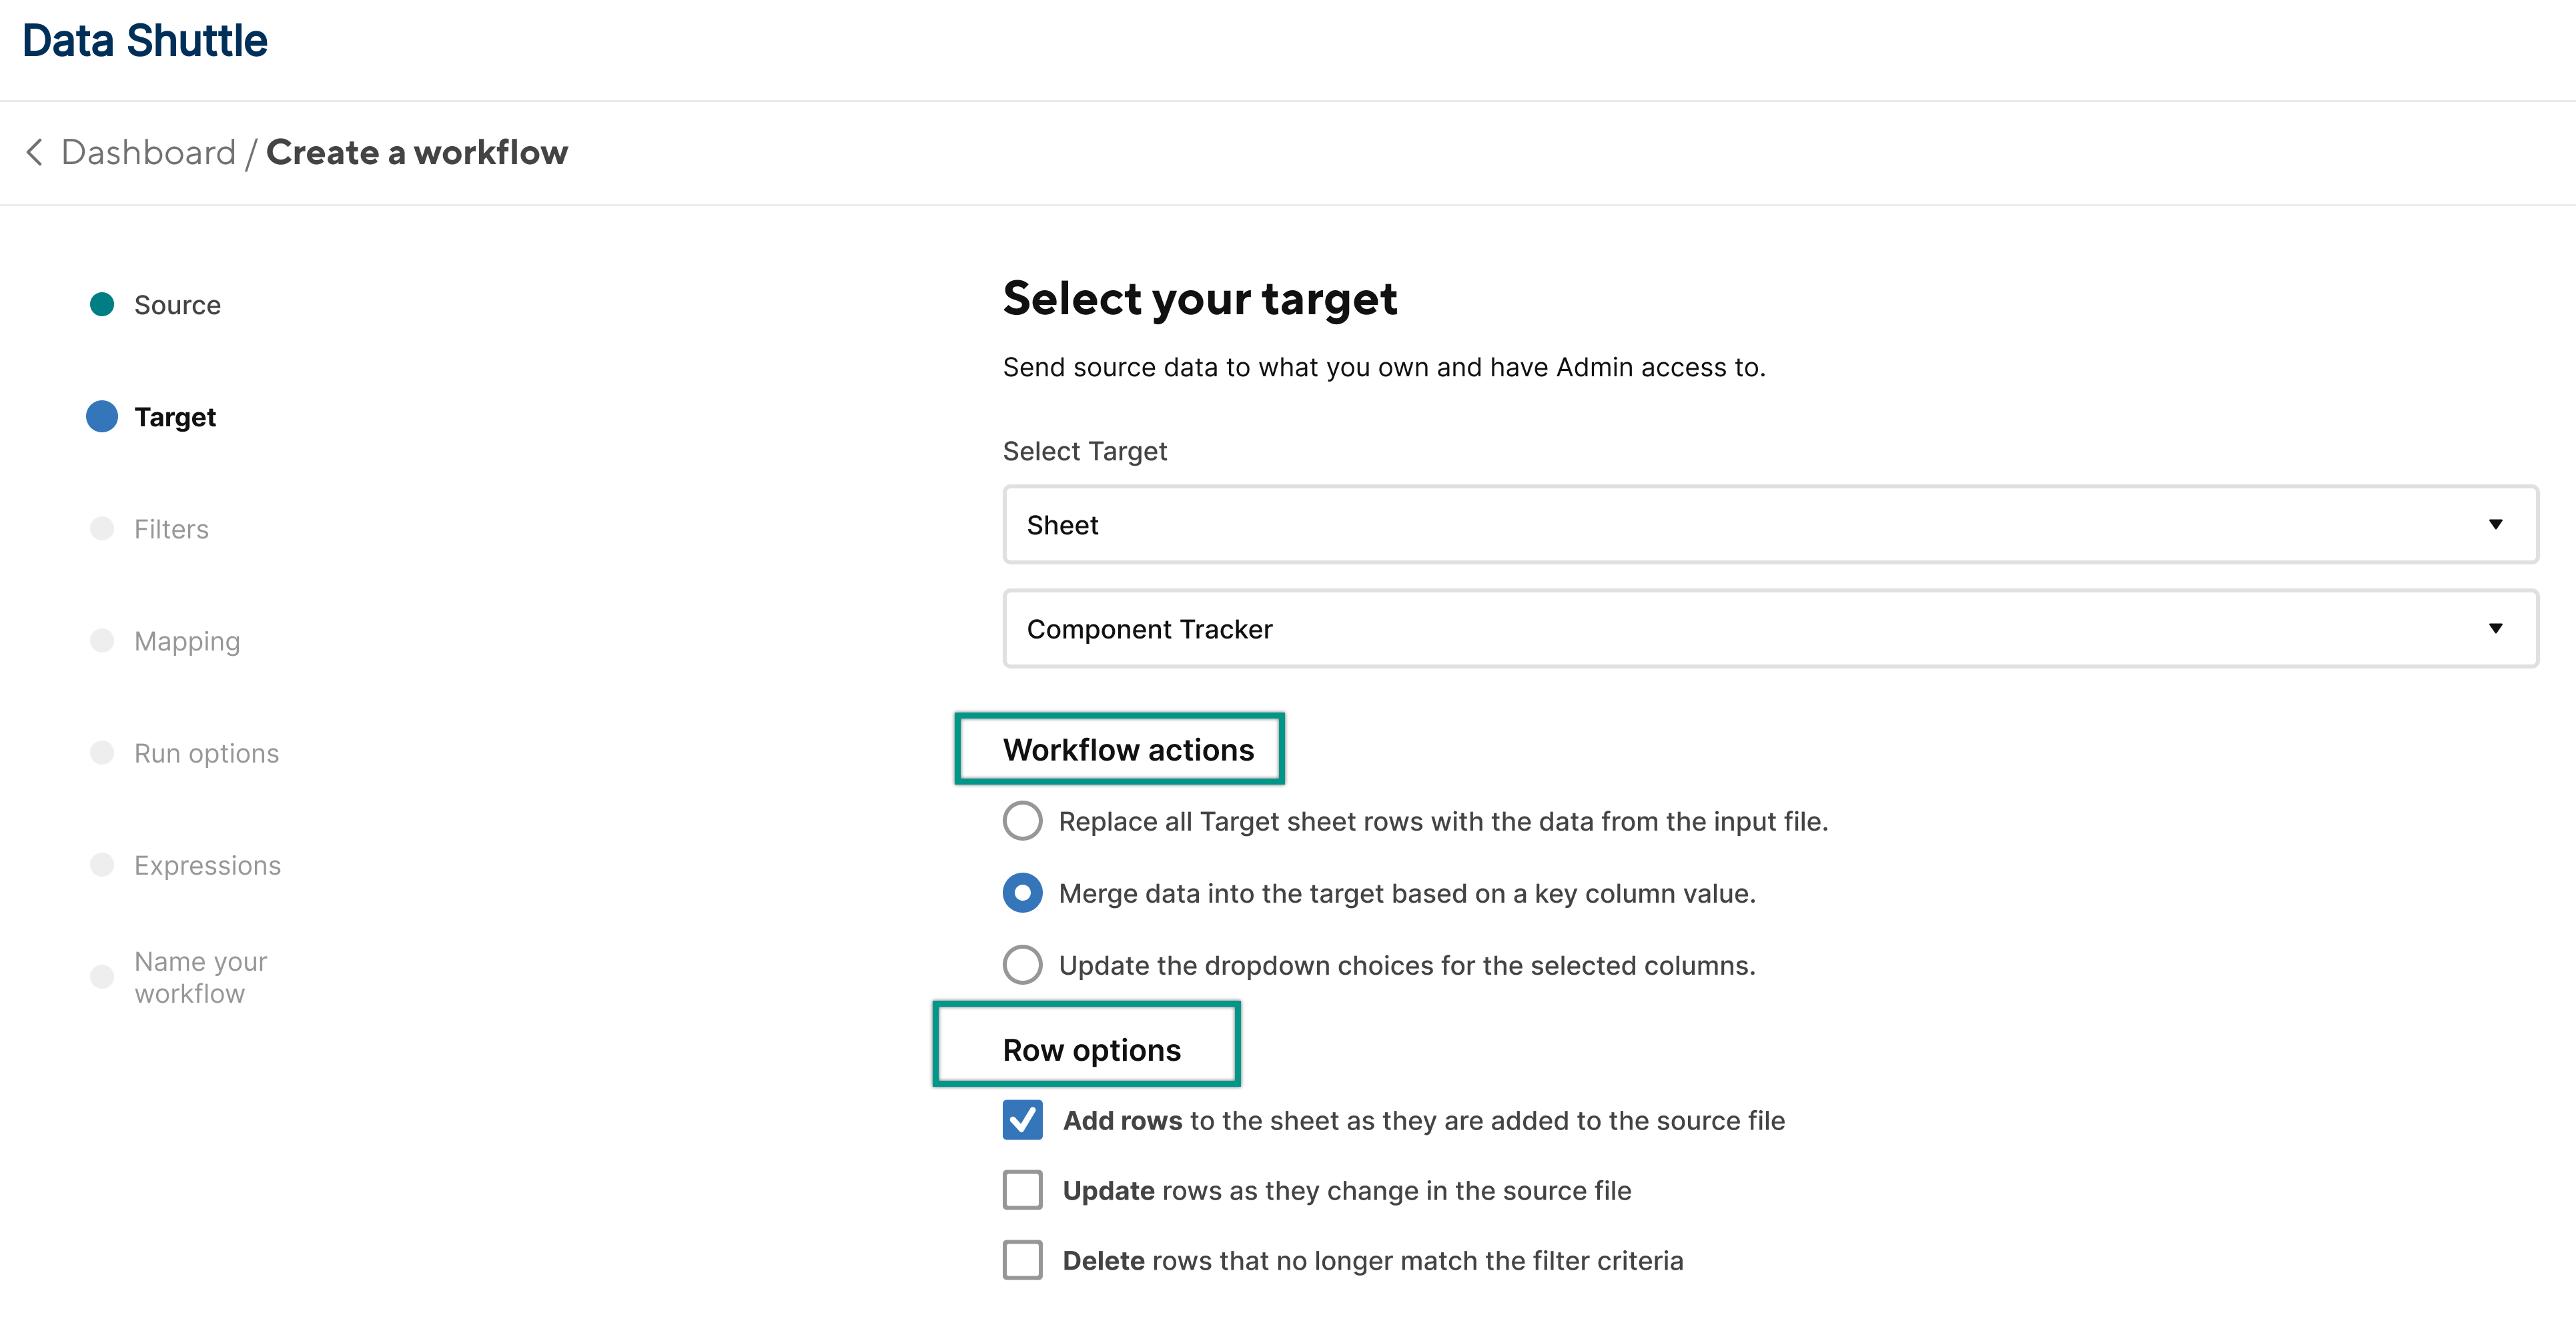
Step 4: Build filters (optional)
- If you don't want to build a filter, select Next and continue to Step 5.
Creating filters is optional, but you can use them to determine the data you want to bring into Smartsheet. For example, you can create a filter to import rows with a value of In Progress in the Status column.
Filters are helpful when working with large data sets that exceed the sheet limit of 20,000 rows. For data sets that exceed sheet limitations, consider using DataTable. For more information on sheet and imported file size maximums, see Smartsheet System Requirements and Guidelines.
Filters are case-sensitive. Ensure they're an exact match to the values in your file.
On the Filter tab, select Add another filter.
Brandfolder Image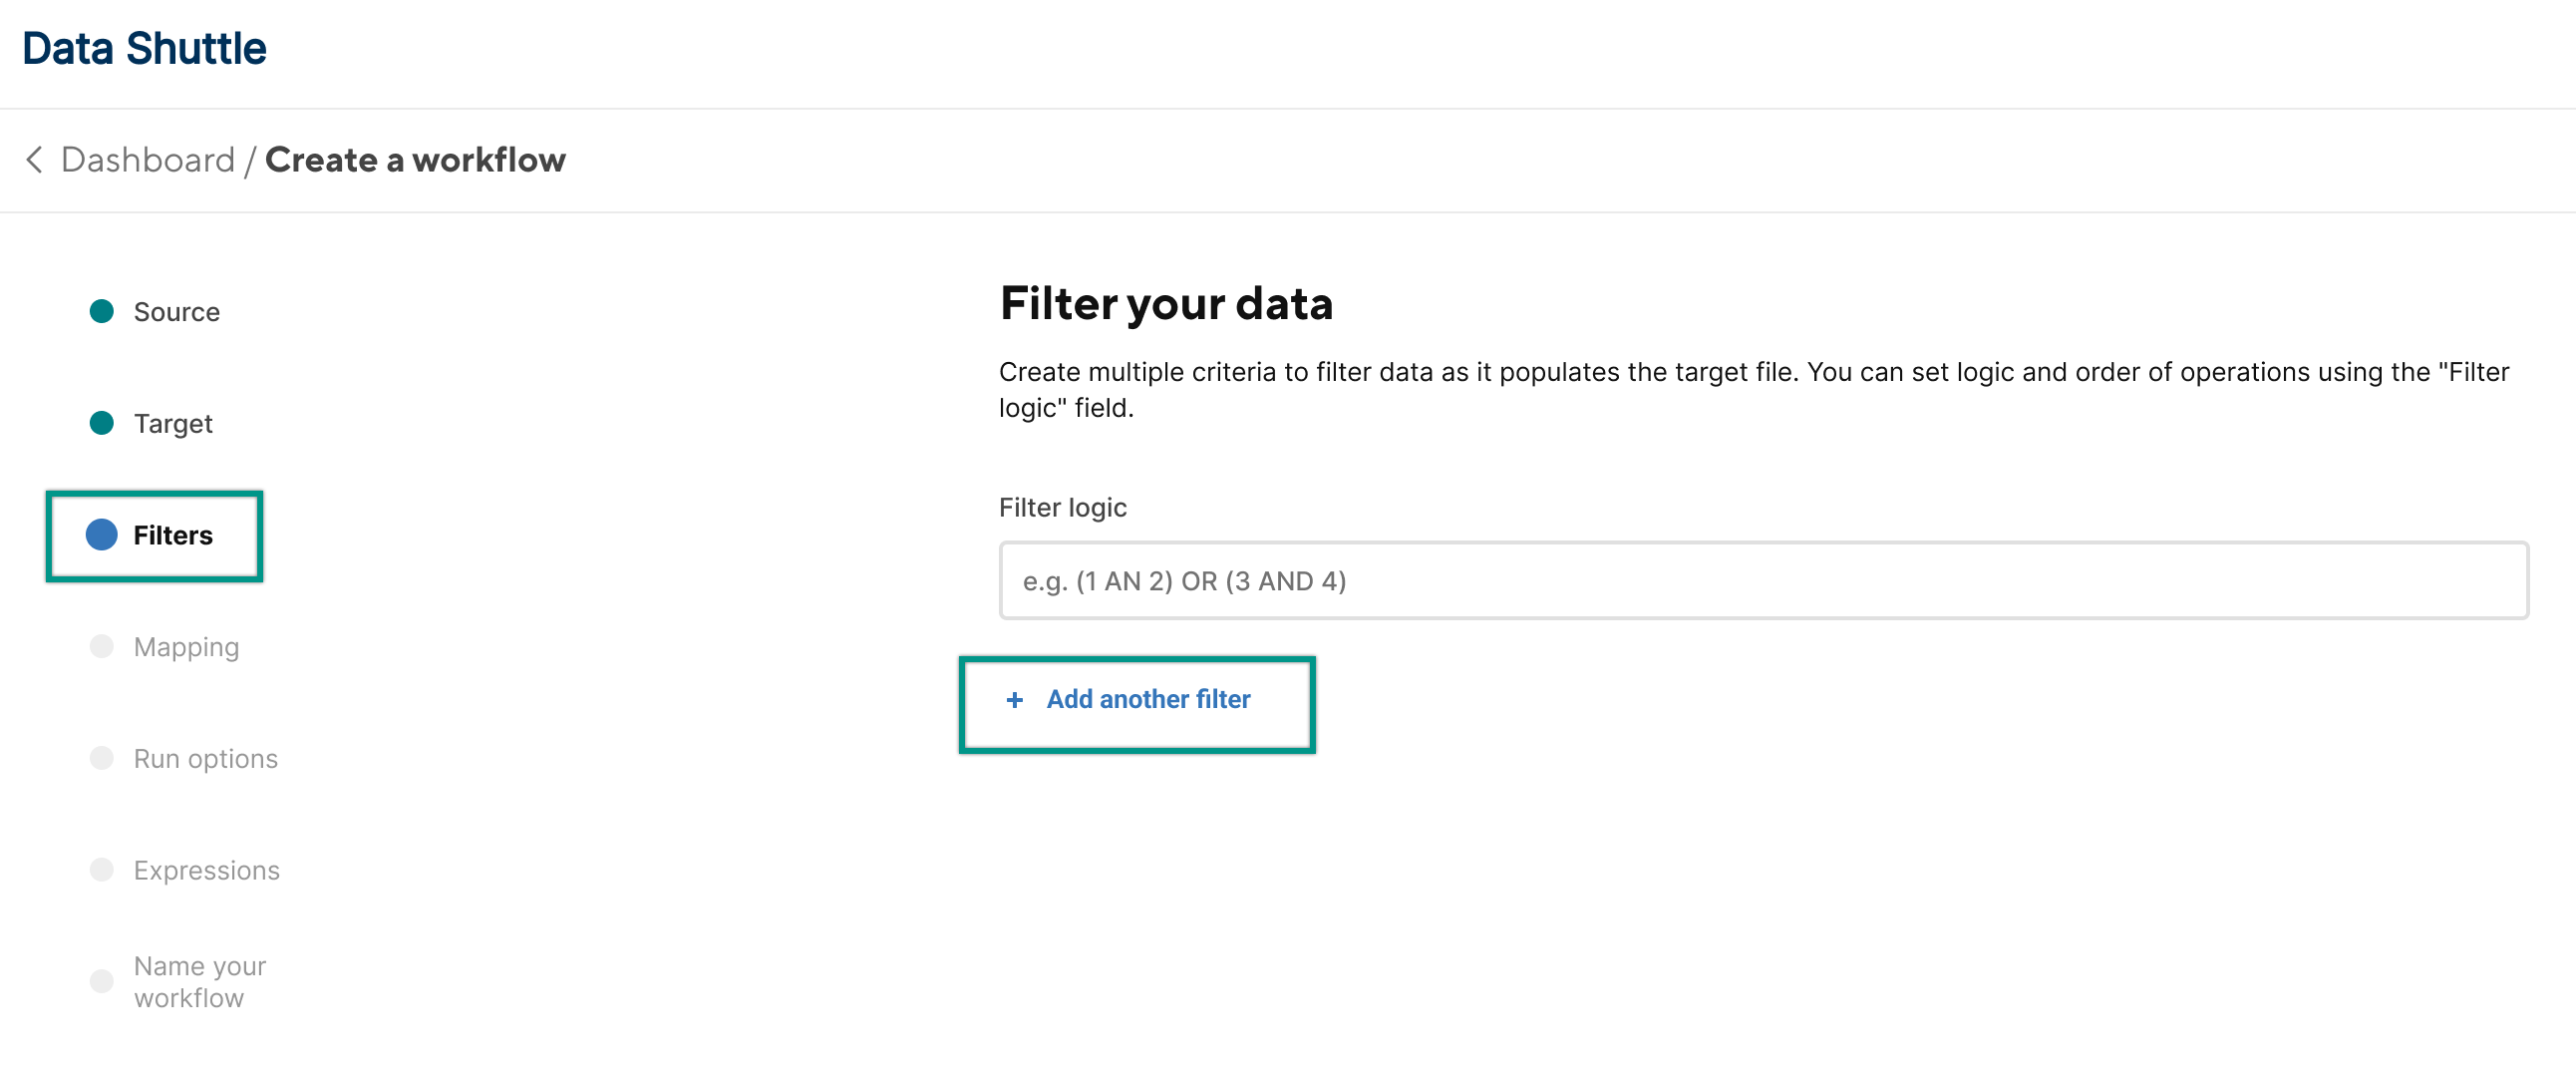
- In the filter setup, select an input column, a comparison operator (for example: equals or contains), and the value.
- In the Filter logic box, connect each filter you’ve created with the AND or OR operators.
To define relationships between each filter, use the filter IDs. The filter ID is the number next to each filter.
Brandfolder Image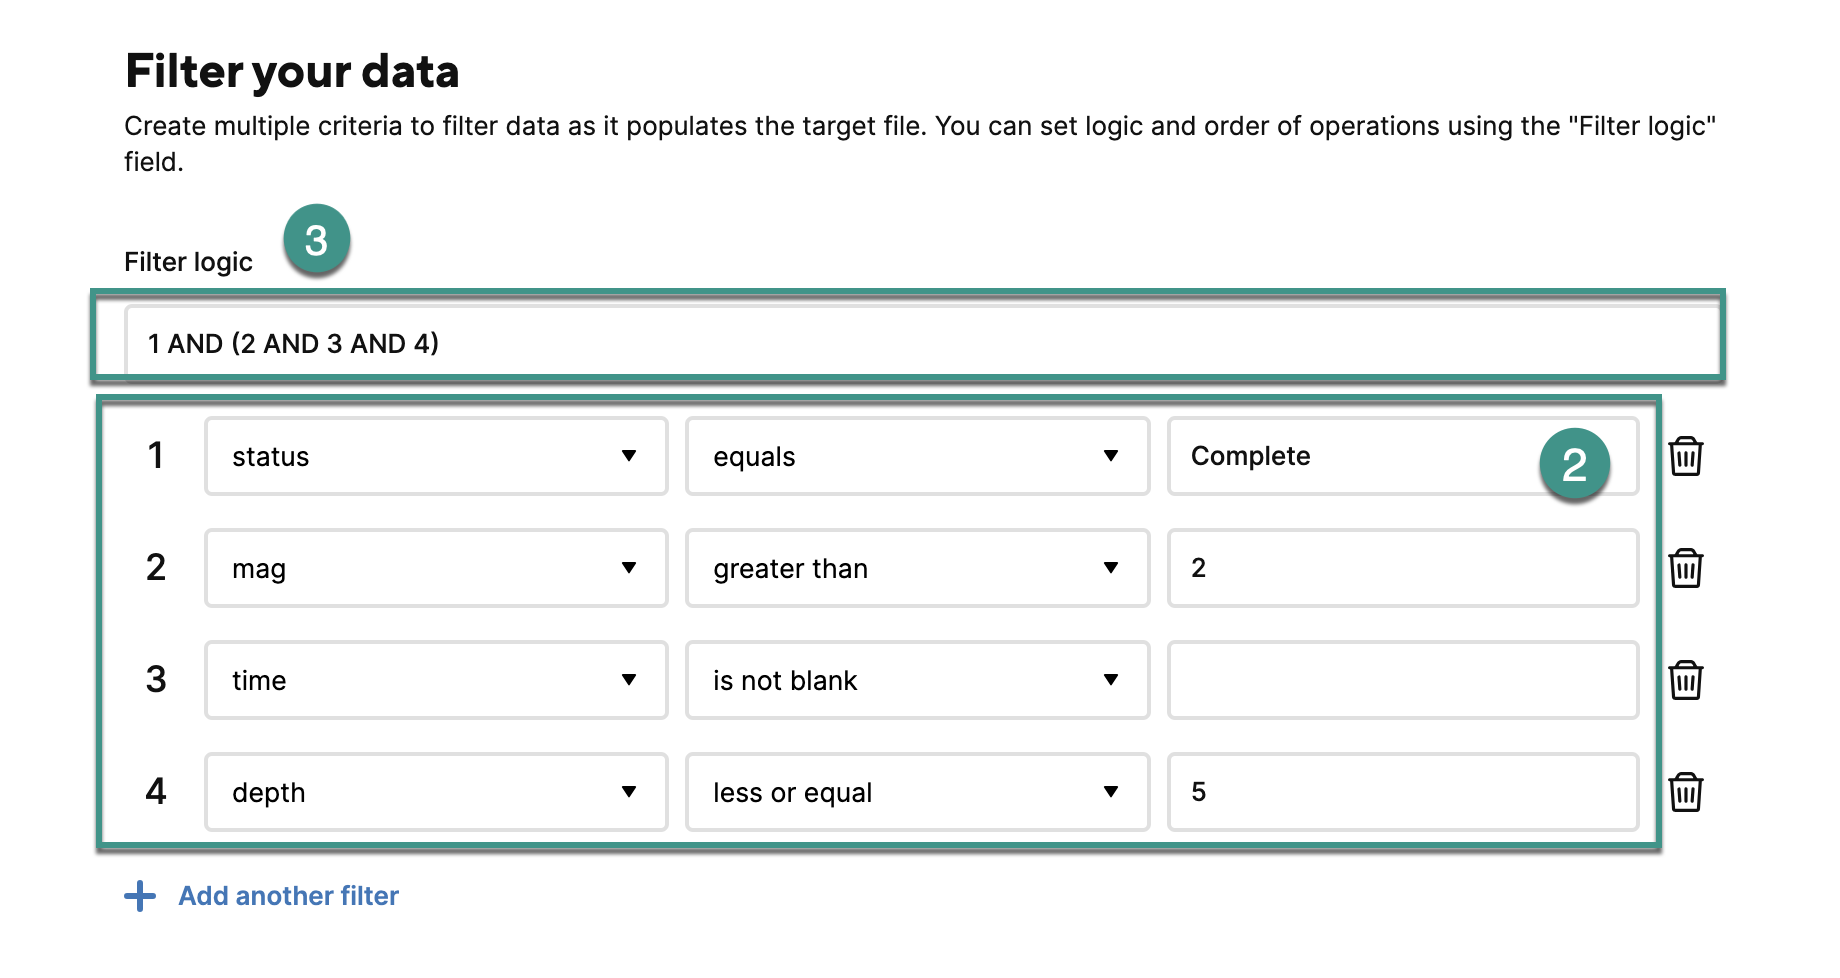
- Select Next.
Define more complex logic
You can define more complex filter logic with parentheses and the AND or OR operators.
Example
(1 AND 2) OR 3 combines logic to include all data where the (Department = “Services” AND Widget Size = “Large”) OR the Department = “Marketing.”
In this example, only large widgets for the services department would be imported, but all marketing widgets would also be imported.
Step 5: Map columns between source and target
Designate which columns from the source file should map to the target columns. Here are a few things to note:
Your source and target column names don’t need to match.
If there are column names from the source that match the column names in the target sheet, they map automatically. You can add or edit any of these mappings.
You don’t need to map all columns of the source or target.
You must select the Unique Identifier column if you merged data into the target based on a key column value. Refer to the key terms for more information.
If you experience issues with formatting of your fields after import, you can select the Column Type formatter to change the column format. This option is a hidden column menu between Source field and Sheet Column.
If you modify the underlying sheet, select the Refresh button to update the source and target columns. Refreshing overwrites any manual changes you make, so ensure your columns are mapping correctly.
When mapping, you see the columns of your source file and the sheet columns.
To map a column, select the dropdown on the Source field column and choose the correct mapping for the Smartsheet column on the right side.
After you've completed all mapping, select Next.
Brandfolder Image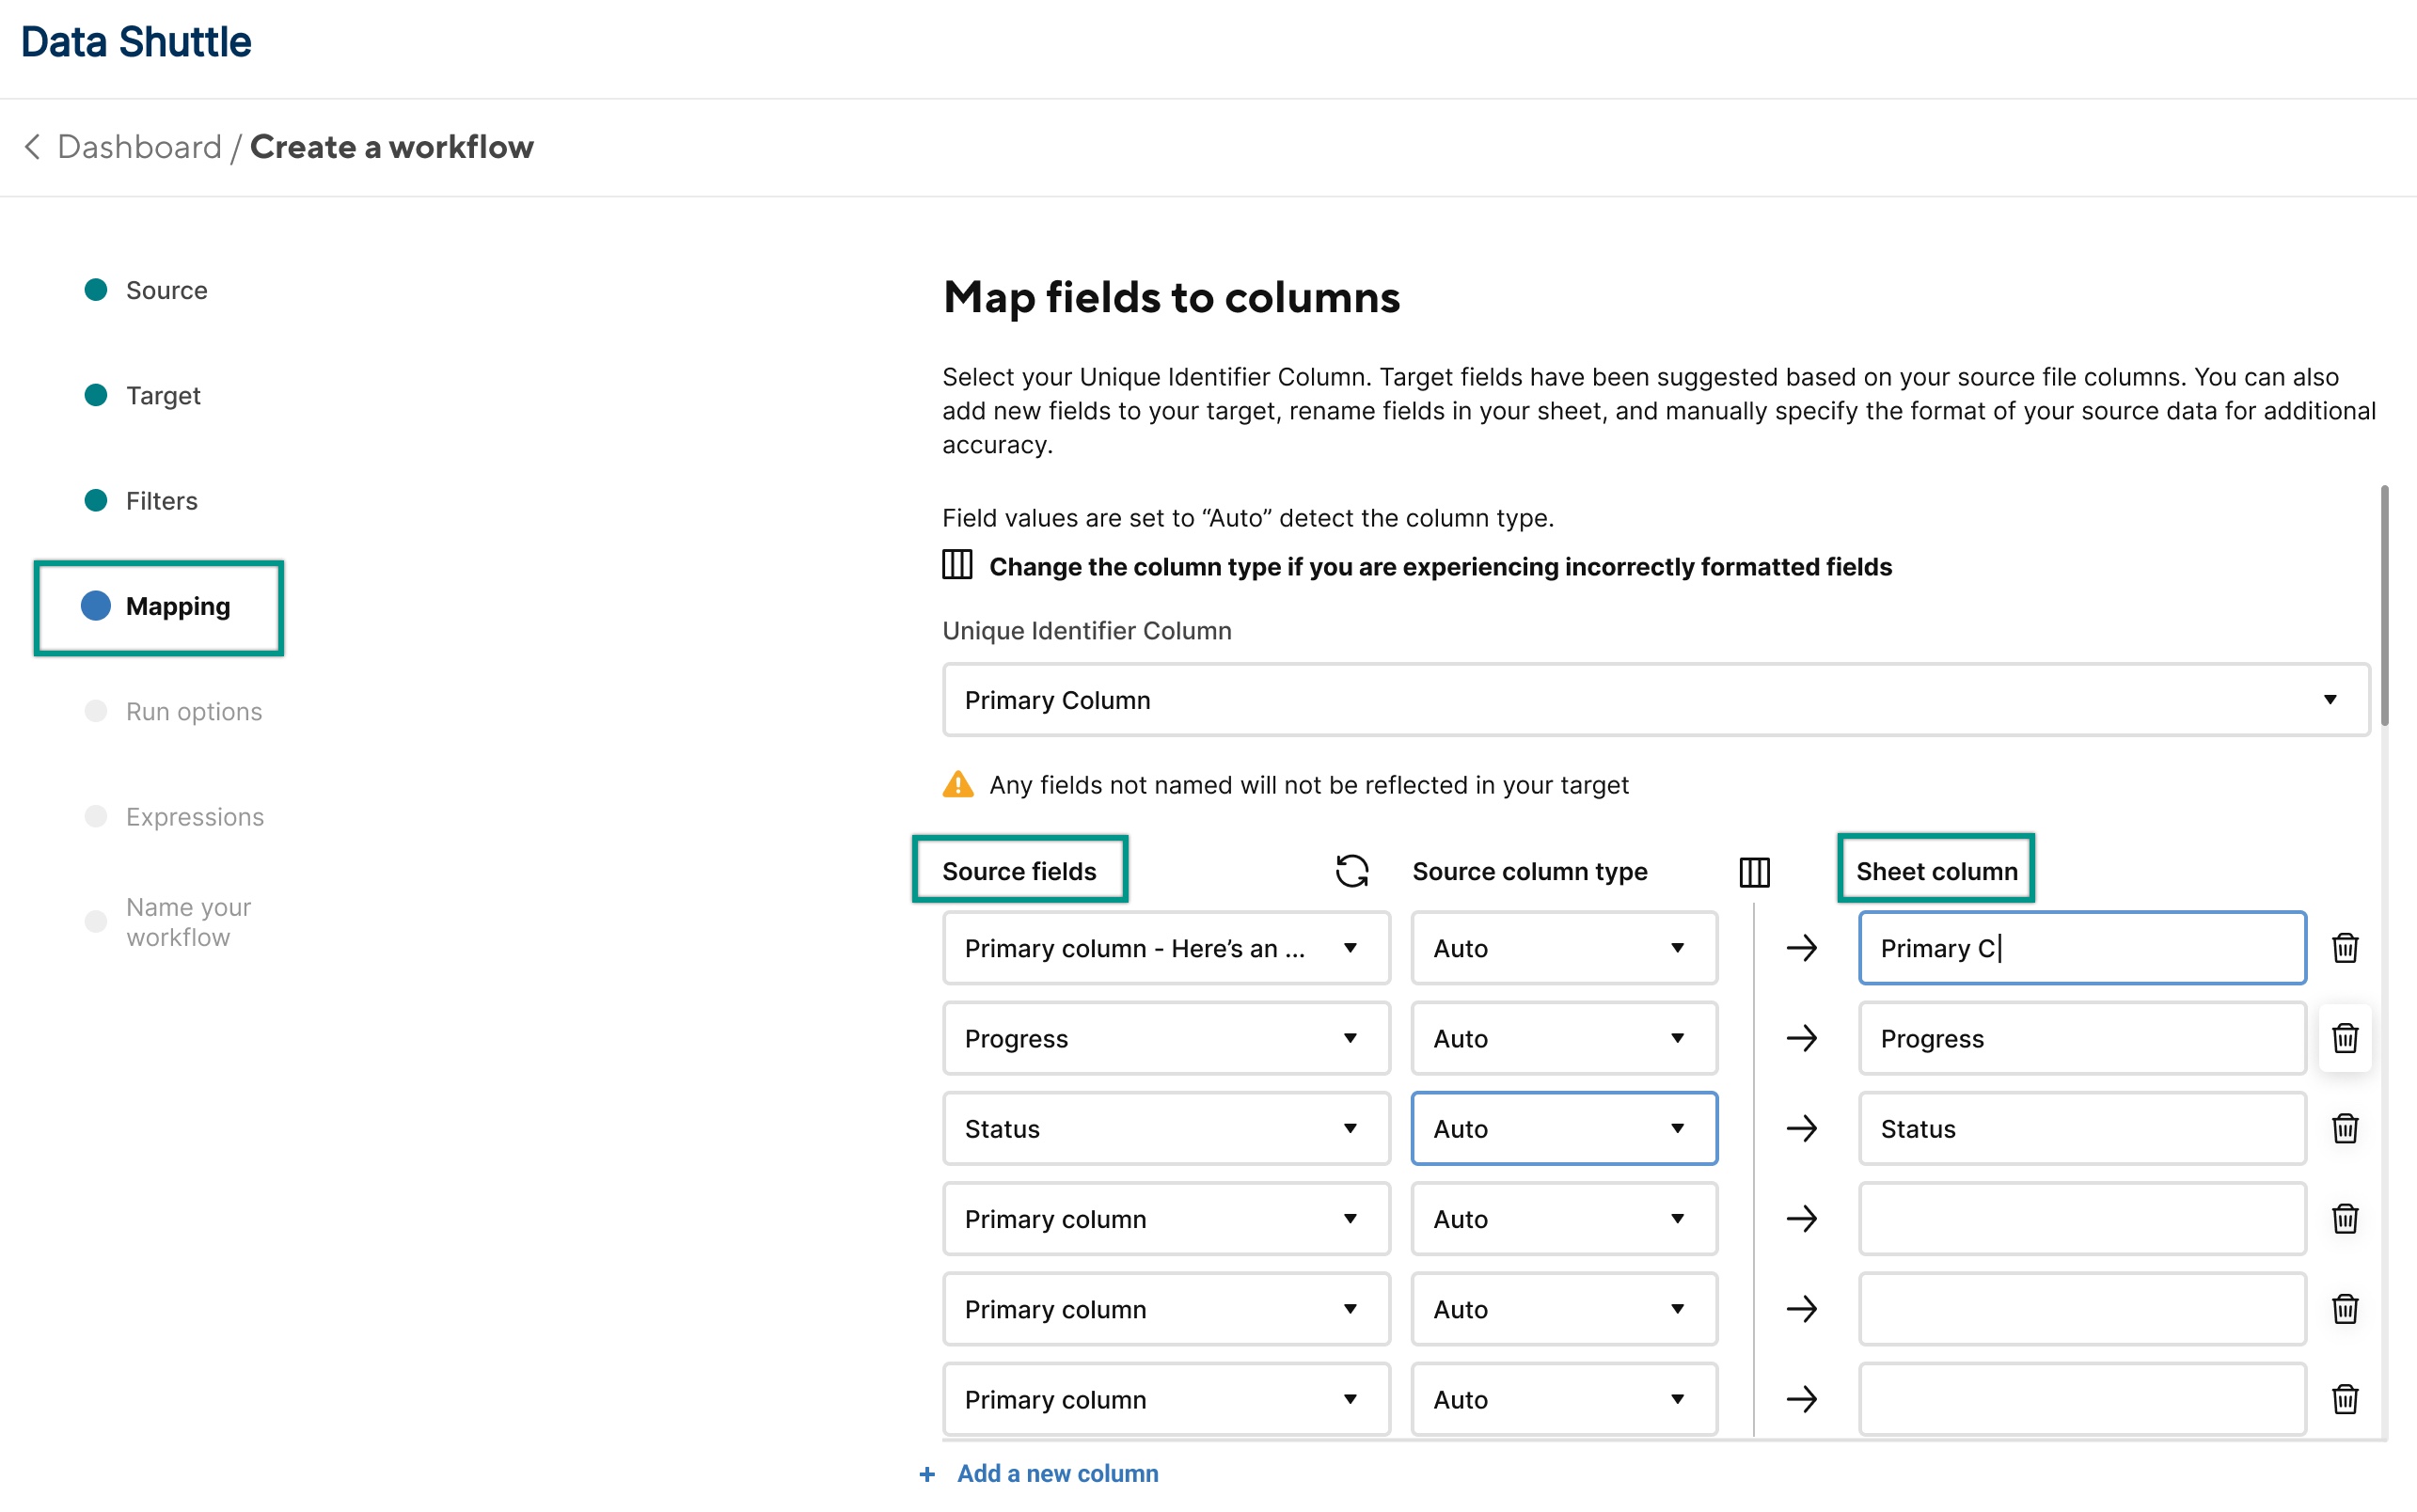
Step 6: Schedule your workflow
There are two ways to schedule your workflow to run automatically:
- Run on attachment
- Run on schedule
You can choose one, both, or neither set. If you don’t choose a setting, you must run your workflow manually.
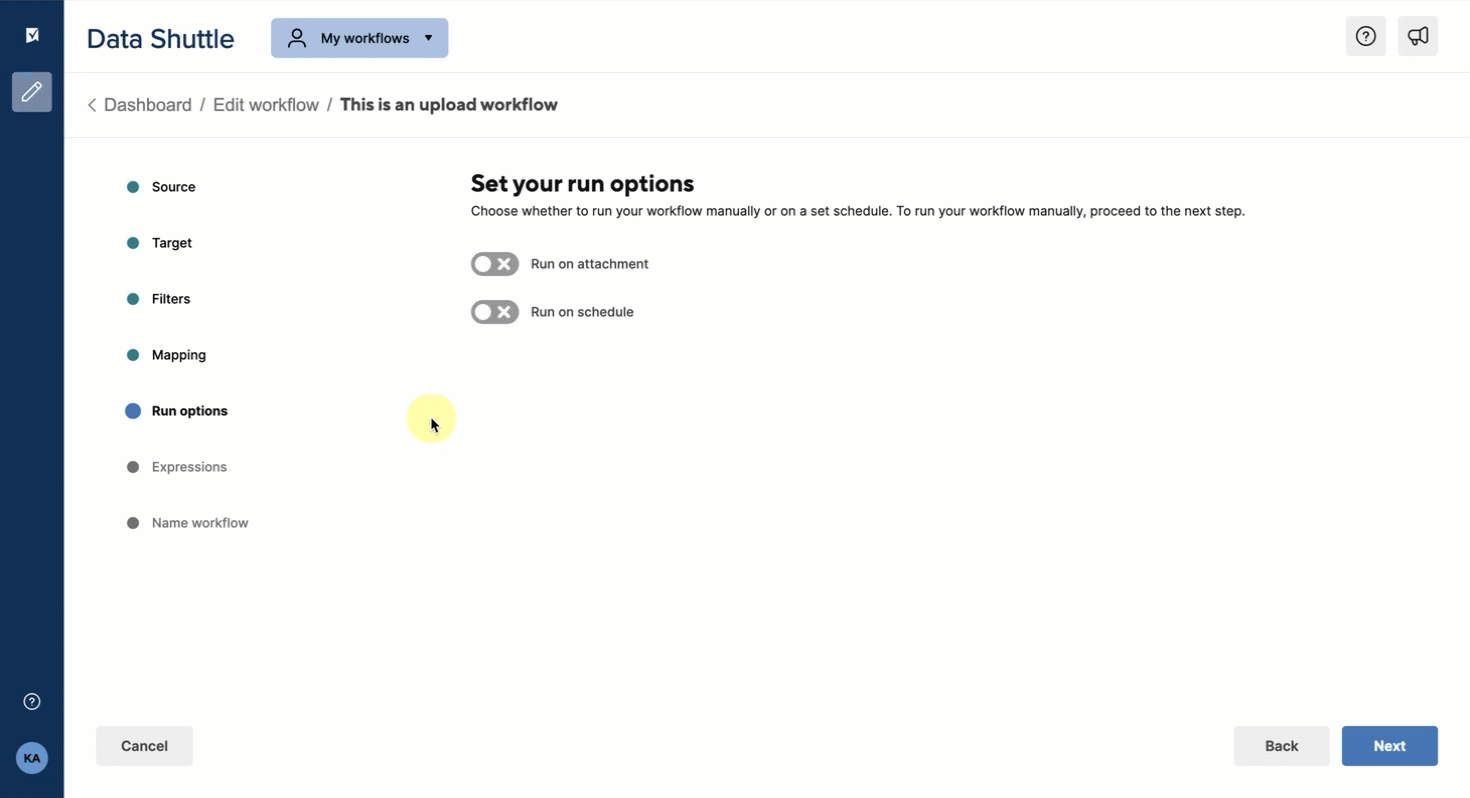
Run on attachment
Use this option if your source is a Smartsheet attachment. Note that you can't use it if the target is DataTable.
When active, every time someone adds a new attachment to the source sheet, the workflow runs if the new attachment fits the criteria. The criteria for matching depend on whether it aligns with the indicated name you set on the source page. If you select Most Recent, it consistently imports new data if the columns in your attachment match the column names in the mapping step.
Run on schedule
If you select Run on attachment, you can still choose Run on schedule. Note that you can also activate them separately.
When you enable Run on schedule, Data Shuttle looks at the source location on a recurring basis and automatically updates the target sheet with any changes found. Source locations include shared drives such as Google Drive, OneDrive/SharePoint, and Box.
- Toggle Run on schedule to on.
- To set up the schedule, fill in the following fields:
- Days of the week: Days you want to run the workflow
- Start time: What time you want the workflow to run
- Execute every: The frequency of the workflow schedule. For example, every 15 minutes.
- End time (UTC): What time you want the workflow to stop running
Select Next.
Data Shuttle uses UTC.
Run on manual
This option isn't a selectable, but you can manually run any Data Shuttle workflow once it's built, even if it has if it has Run on attachment or Run on schedule set.
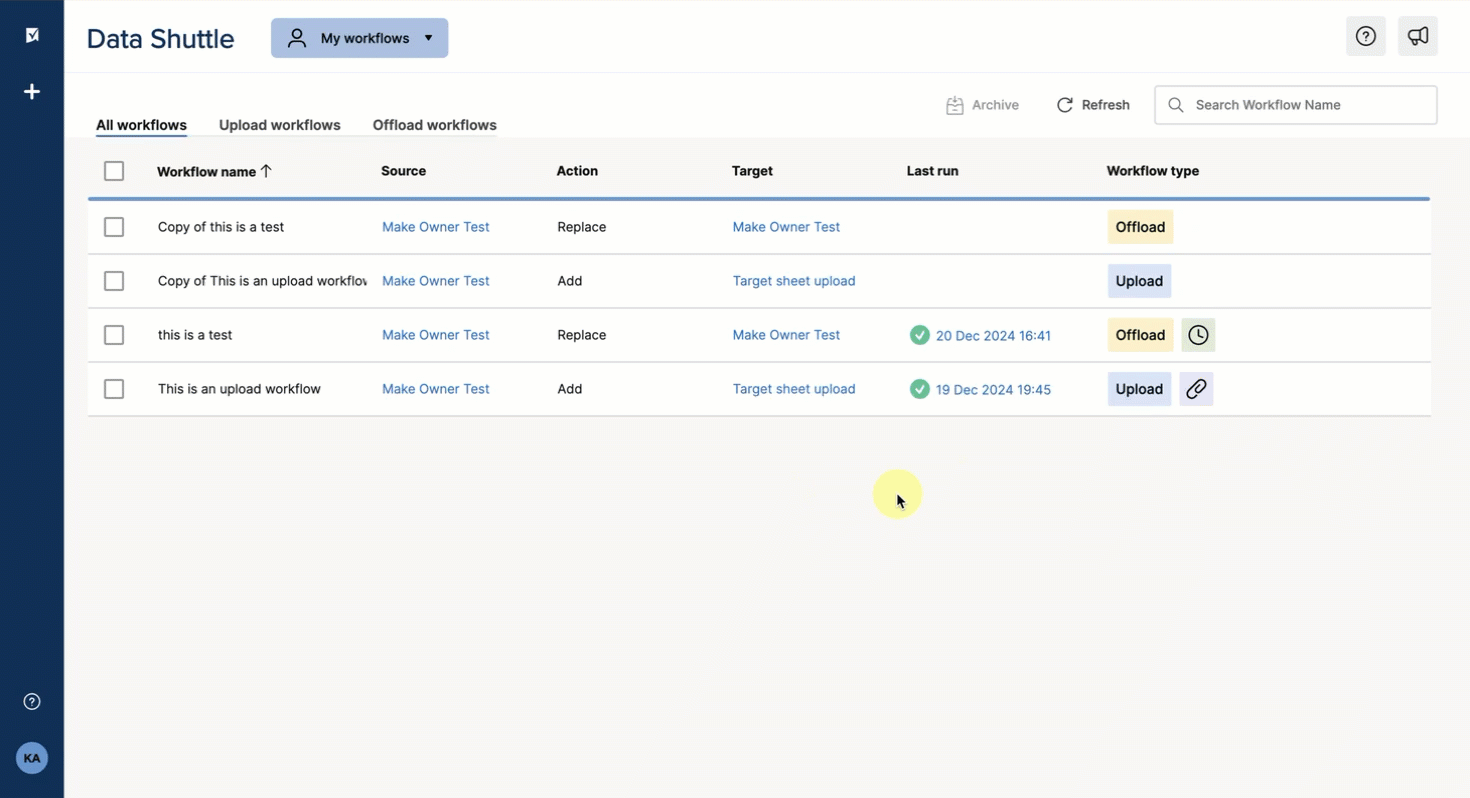
Once you publish a workflow, you can manually run your workflow from the dashboard by hovering over the desired workflow and selecting Run.
You can see the workflow execution status in the Last Run (UTC) column on the dashboard.
Step 7: Use input expressions (optional)
As an optional step, you can use input expressions to apply a Smartsheet formula to data brought into your sheet via Data Shuttle. You may often forgo this step and instead create column formulas once you’ve uploaded the data to your target sheet.
Example
Let’s say you have several source files feeding into a sheet in Smartsheet. You want to distinguish which data source a particular row of data comes from. If one file comes from Netsuite and another from Oracle, you can use an input expression to identify the source during the Data Shuttle upload.
Tag the data with the source location information
Your target sheet must already contain the column you use for the input expression. In this example, the column is Source.
Brandfolder Image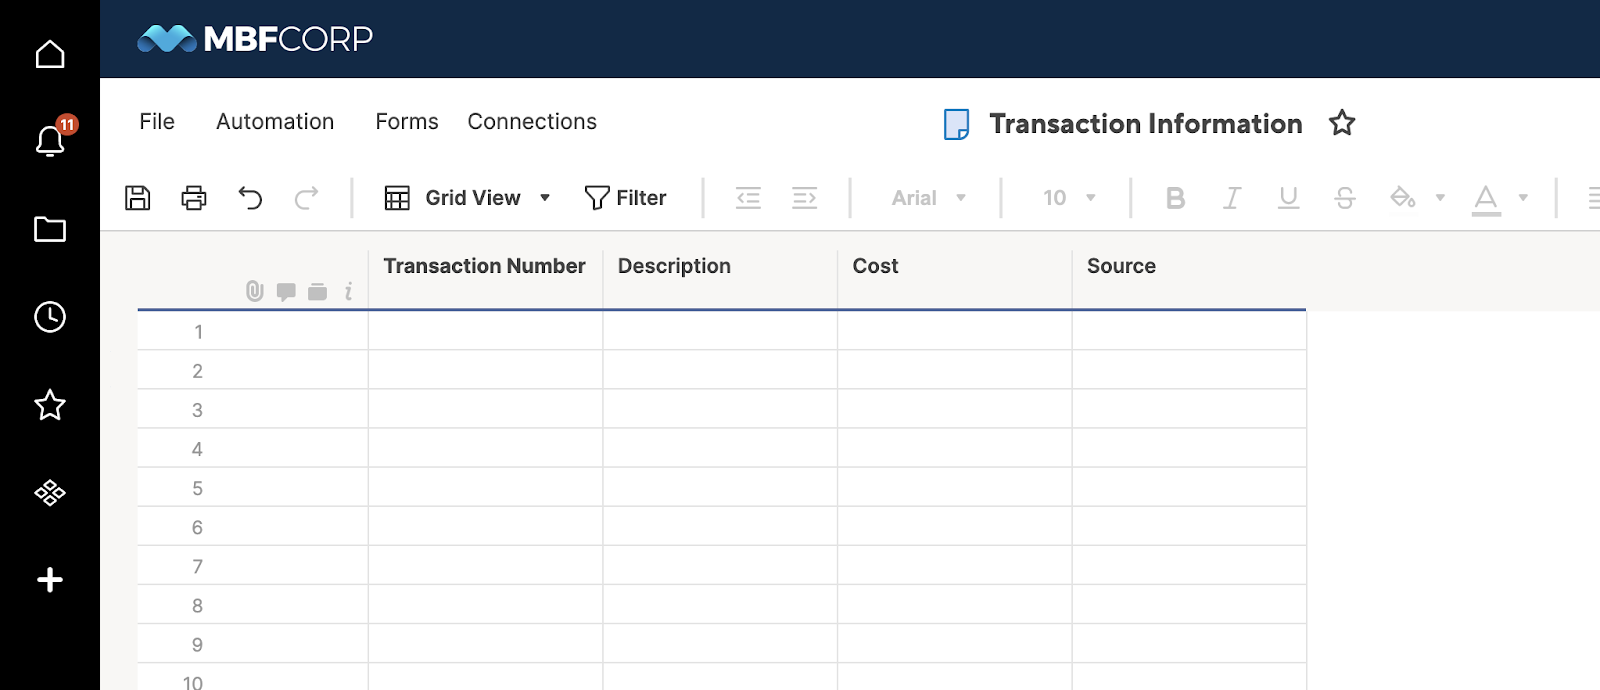
When you build your Data Shuttle workflow, skip the Source column in the mapping step.
Brandfolder Image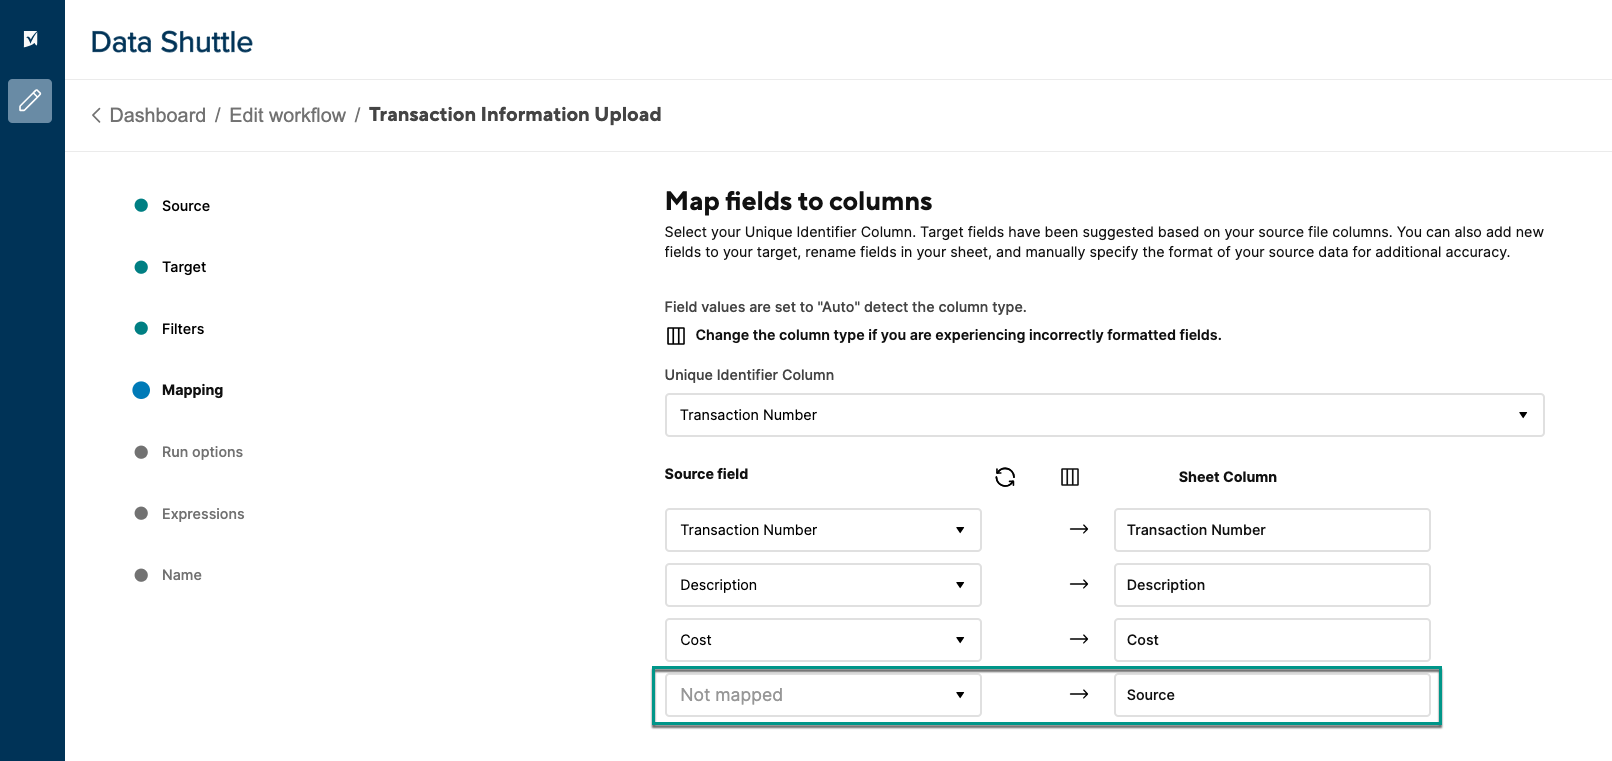
- On the Expressions tab, select Add another expression.
- Enter the new column name for the Unique Field Name. This example uses Source.
Enter a formula in the Function Syntax field. This example uses =”Netsuite”.
Brandfolder Image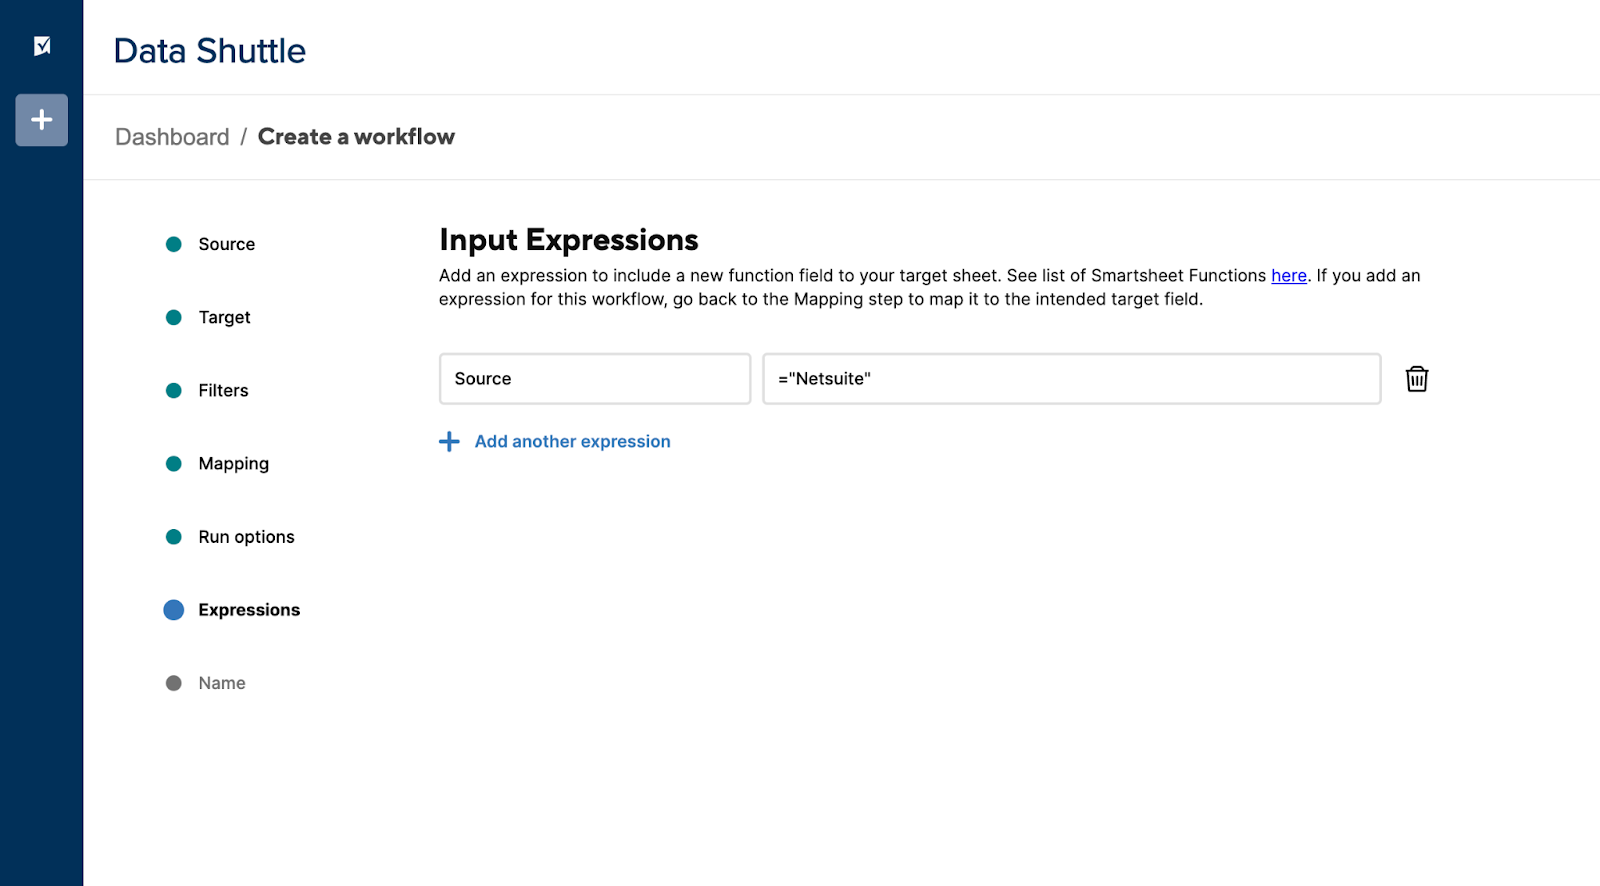
Return to the Mapping tab and map this expression field to the corresponding column. For this example, Source maps onto Source.
Brandfolder Image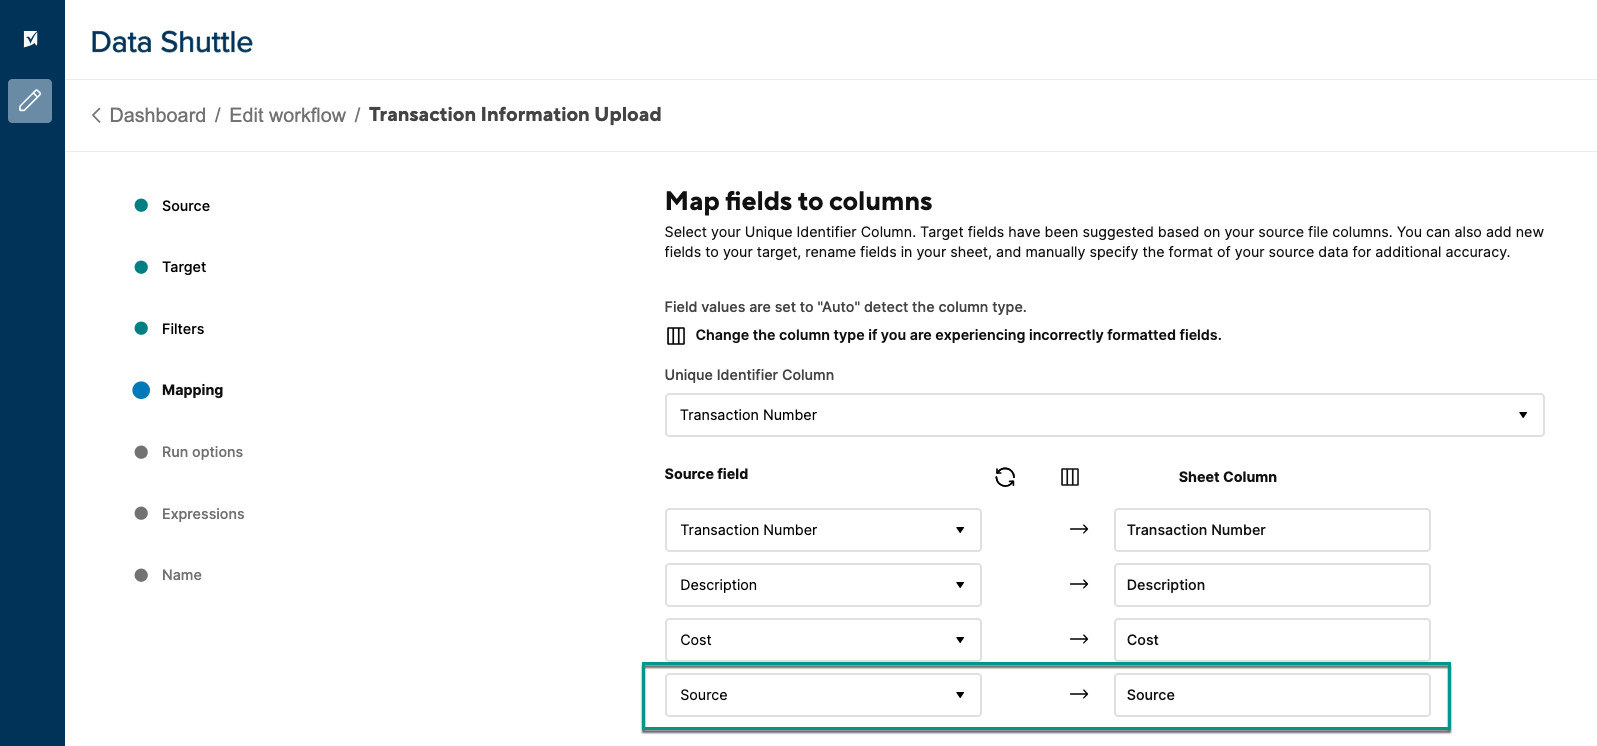
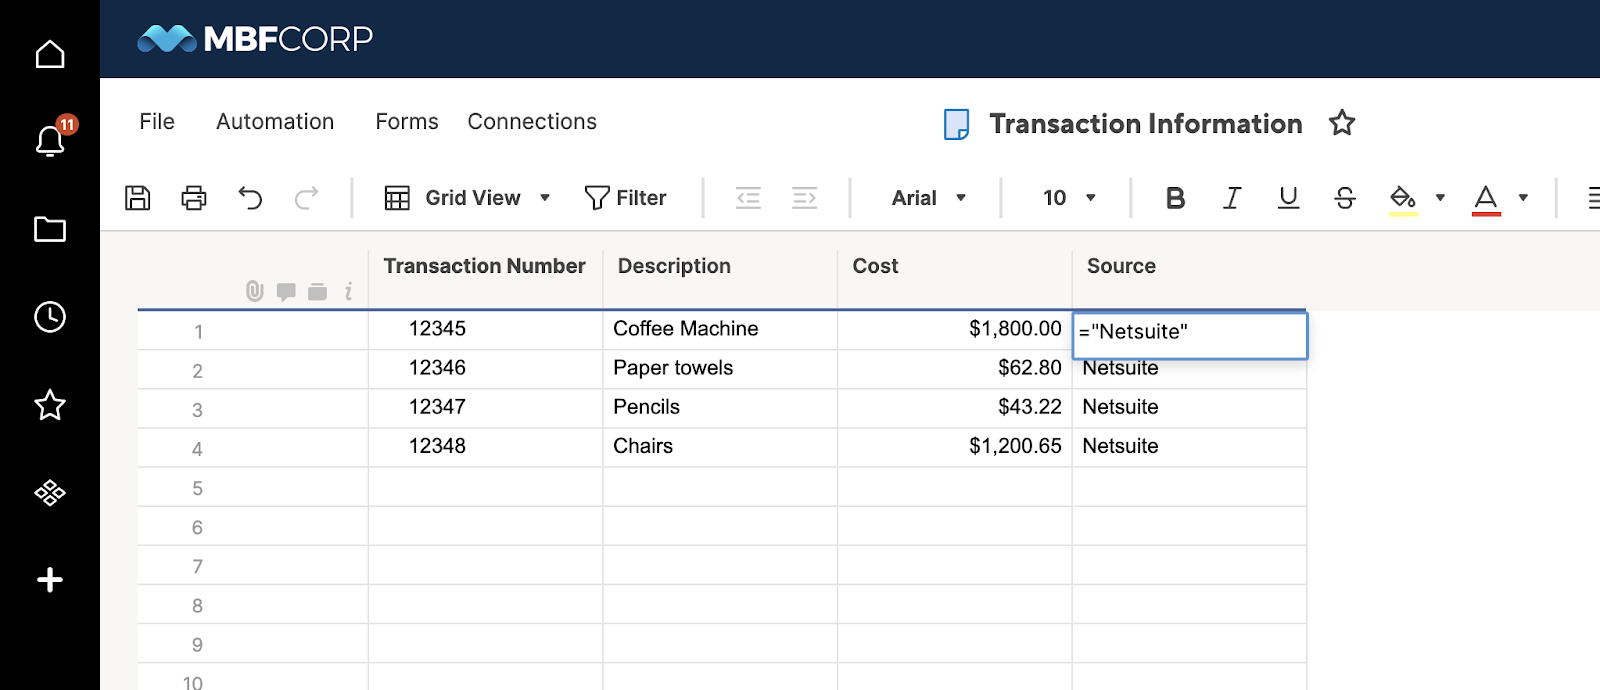
After you finish building the workflow and publishing it, when Data Shuttle runs, the formula is placed into the uploaded rows. In this example, when you select a cell in the Source column, you see the =”Netsuite” formula.
You can use other Smartsheet functions as expressions, including those referencing values in different columns.
As some examples, you could use:
- =TODAY(). This formula would be placed in the TODAY() function, updating whenever someone opens the sheet.
- =RIGHT(Location@row,3). This formula would pull the right three characters of the string in the Location column and corresponding row.
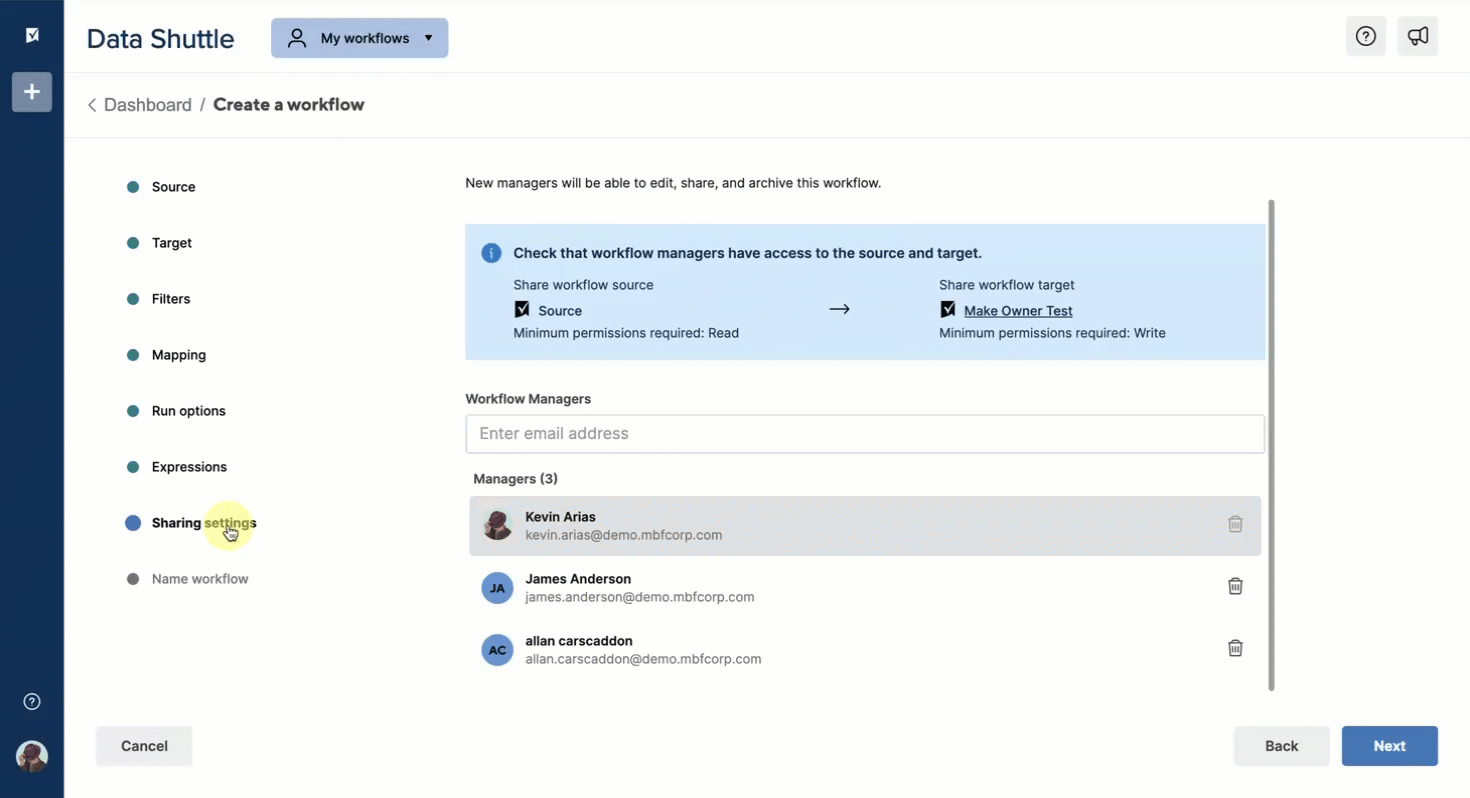
Step 8: Share your workflow
You can share your workflows with other users in your Smartsheet plan. When you share a workflow, those users become Workflow Managers. As Workflow Managers, they can edit, run, archive, and share the workflow as long as they have at least Editor permissions on both the source and target files. Admins can also add or remove Workflow Managers for any workflow in their plan.
- In the Sharing settings tab, type the name of the user you want to share the workflow to in the text field provided.
- Select Next.
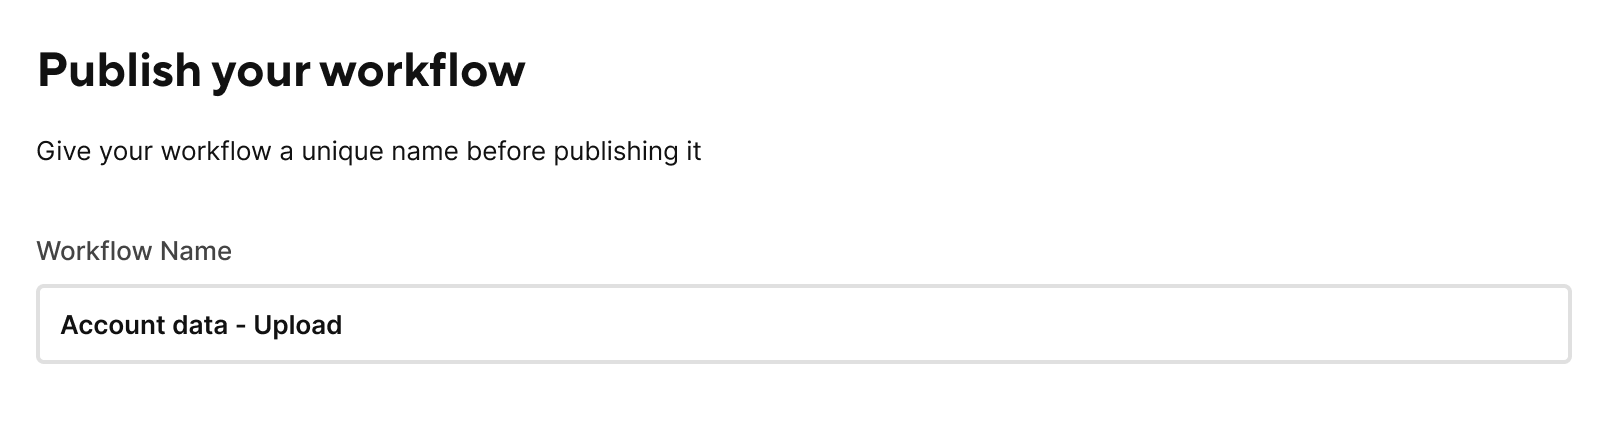
Step 9: Publish your new workflow
- Finish your work on the Input Expressions page and select Next.
Enter a name for your workflow and select Publish. You can now access your workflow on the Data Shuttle dashboard anytime you wish to run, edit, or delete it.
- If you set the Data Shuttle workflow to Run on a schedule, it will run at the designated time.
- If you chose Run on attachment or neither option, you may need to run the workflow manually by selecting Run when hovering over your workflow in the Data Shuttle dashboard.
Brandfolder Image