С помощью рабочего процесса загрузки данных можно подключиться к внешнему источнику данных, чтобы загружать, редактировать и записывать их в Smartsheet.
Посредством рабочего процесса загрузки данных можно внести данные в файлы Smartsheet и перенести их в таблицу Smartsheet или в облачное хранилище.
Шаг 1. Создание рабочего процесса загрузки данных в Data Shuttle
- В верхней строке меню выберите Соединители. Выберите Создать рабочий процесс, чтобы создать рабочий процесс с нуля, или Управление рабочим процессом для действий с существующим рабочим процессом. Если вы используете Data Shuttle в первый раз, может потребоваться выполнить вход на странице datashuttle.smartsheet.com.
- В Data Shuttle на панели навигации слева нажмите кнопку
 .
. - Выберите Upload Data (Загрузка данных).
Как создать копию существующего рабочего процесса
Вы можете создать копию рабочего процесса и при необходимости изменить её, чтобы сэкономить время при создании нового рабочего процесса.
- Перейдите на вкладку, где находится рабочий процесс.
- Наведите указатель мыши на рабочий процесс.
- Выберите More
 (Дополнительно).
 - Выберите Create a copy (Создать копию).
После того как копия рабочего процесса будет создана, вы сможете её изменить.
- Наведите указатель мыши на копию рабочего процесса.
- Выберите More (Дополнительно).
- Выберите Edit workflow (Изменить рабочий процесс).
Когда шаблон рабочего процесса будет готов, вы сможете его изменить.
Шаг 2. Выбор исходного файла
- Выберите исходный файл. Он может находиться в одном из указанных ниже мест.
- Smartsheet Attachment (Вложение Smartsheet). Найти таблицу, в которую вложен файл, можно с помощью функции поиска или обзора. Укажите, какое вложение следует импортировать при каждом запуске рабочего процесса: самое последнее или вложение с определённым именем.
- Most Recent (Самое последнее). Для синхронизации будет использоваться самое последнее вложение с учётом расписания, заданного для рабочего процесса. Вы также можете запускать процесс вручную.
- Attachment Name (Имя вложения). Data Shuttle будет использовать только вложение, указанное в вашем рабочем процессе.
- Google Диск. Чтобы разрешить smartsheetapps.com просматривать файлы в вашей учётной записи сервиса Google Диск, следуйте указаниям на экране. Пройдя проверку подлинности, с помощью функции поиска или обзора найдите на Google Диске файл (.xlsx, .csv или таблицу Google), который собираетесь использовать.
- OneDrive или Sharepoint. Чтобы разрешить smartsheetapps.com просматривать файлы в вашей учётной записи OneDrive или Sharepoint, следуйте указаниям на экране. Пройдя аутентификацию, с помощью функции поиска или обзора найдите в сервисе OneDrive или Sharepoint файл в формате .xlsx или .csv, который собираетесь использовать.
- Box. Чтобы разрешить smartsheetapps.com просматривать файлы в вашей учётной записи Box, следуйте указаниям на экране. Пройдя проверку подлинности, с помощью функции поиска или обзора найдите в сервисе Box файл в формате .xlsx или .csv, который собираетесь использовать. Вы можете загружать как собственные файлы Box, так и файлы, к которым вам был предоставлен доступ.
- Smartsheet Attachment (Вложение Smartsheet). Найти таблицу, в которую вложен файл, можно с помощью функции поиска или обзора. Укажите, какое вложение следует импортировать при каждом запуске рабочего процесса: самое последнее или вложение с определённым именем.
- С помощью переключателя This file has column headers (Файл содержит заголовки столбцов) укажите, содержит ли источник данных заголовки.
Для файлов Excel или таблиц Google: укажите вкладку таблицы, содержащую данные, которые нужно объединить. - Нажмите Next (Далее).
При создании файла данных с помощью API рекомендуется использовать формат CSV, а не XLSX.
Размер исходного файла не должен превышать 1 ГБ. Отправить файл большего размера, скорее всего, не получится. Data Shuttle не поддерживает XLSX-файлы на основе OpenXML.
Шаг 3. Выбор целевой таблицы и действий рабочего процесса
Настройте загрузку результатов в Smartsheet.
- Выберите целевую таблицу, в которую будут записаны ваши данные. Если источником служат вложения Smartsheet, то в качестве целевой таблицы можно выбрать исходную или любую другую таблицу.
Если у вас возникли трудности при отправке вложений, свяжитесь с системным администратором Smartsheet и попросите проверить настройки вложений для вашей организации.
Вы также можете использовать Data Shuttle, чтобы загрузить данные в существующий объект DataTable. - Выберите режим импорта данных в Smartsheet:
Replace all Target sheet rows with the data from the input file (Заменять все строки целевой таблицы данными из входного файла). Если выбрать этот вариант, ваши данные будут полностью перезаписаны. В целевом объекте могут храниться предыдущие версии, с помощью которых вы сможете восстанавливать ранее выгруженные данные.
или
Merge data into the target based on a unique identifier value (Объединить данные с целевой таблицей на основе значения уникального идентификатора). Выбрав объединение данных, необходимо также задать параметры строк:- Add rows to the sheet as they are added to the source file (Добавлять строки в таблицу по мере их добавления в исходный файл);
- Update rows as the change in the source file (Обновлять строки по мере их изменения в исходном файле);
- Delete rows that no longer match the filter criteria (Удалять строки, которые больше не соответствуют условиям фильтра).
Режим объединения будет действовать только в том случае, если верно следующее:- уникальный идентификатор не является системным столбцом;
- уникальный идентификатор сопоставлен со столбцом в целевой таблице;
- источник данных для уникального идентификатора находится на стороне клиента (а не в целевой таблице).
При выборе столбца уникального идентификатора убедитесь, что:
- он остаётся в исходном файле;
- в нём нет пустых ячеек;
- это не системный столбец и не столбец, содержащий формулу;
- это не столбец с раскрывающимся списком, допускающим выбор нескольких вариантов;
- столбец не содержит дубликатов;
- отсутствуют расхождения в типах данных, из-за которых невозможно будет сопоставить столбцы (например, текстовое значение "11" не будет синхронизировано с числовым значением "11");
- столбец создан не в Smartsheet.Smartsheet не генерирует автоматически идентификаторы, которые можно сопоставить.
- Настройте обновление значений в раскрывающихся списках для выбранных столбцов. В результате значения раскрывающихся списков Smartsheet в свойствах столбцов будут заменяться значениями из файла Excel или .csv.
Шаг 4. Настройка фильтров
Фильтры задают критерии импорта данных в Smartsheet. Например, вы можете создать фильтр, чтобы импортировать только строки со статусом "Выполняется".
Фильтры можно использовать при работе с большими наборами данных, при импорте которых может быть превышено ограничение Smartsheet на максимальное число строк. Если число строк в вашем наборе данных превышает ограничения Smartsheet, для работы с ним можно использовать DataTable.
Дополнительные сведения о максимальных размерах таблиц и импортируемых файлов см. в статье Требования к системе и рекомендации по использованию Smartsheet.
Фильтры задаются с учётом регистра. Значения в них должны в точности совпадать со значениями в вашем файле.
Настройка фильтров
- В режиме настройки фильтра выберите исходный столбец, оператор сравнения (например, равно или содержит) и значение.
- В поле Filter logic (Логика фильтра) объедините фильтры с помощью оператора AND или OR.
- С помощью идентификаторов фильтров (число рядом с фильтром) можно установить отношения между фильтрами.
- Если вам нужно добавить больше фильтров, выберите Add another filter (Добавить новый фильтр) и повторите шаги 1 и 2.
- Нажмите Next (Далее).
Настройка сложной логики фильтрации
Вы можете задать более сложную логику фильтрации, используя скобки, а также операторы AND и OR. Пример. Выражение (1 AND 2) OR 3 позволяет включить все данные, где (Отдел = "Обслуживание" И Размер виджета = "Большой") ИЛИ Отдел = "Маркетинг". В этом примере будут импортированы только большие виджеты для отдела обслуживания, а также все виджеты для отдела маркетинга.
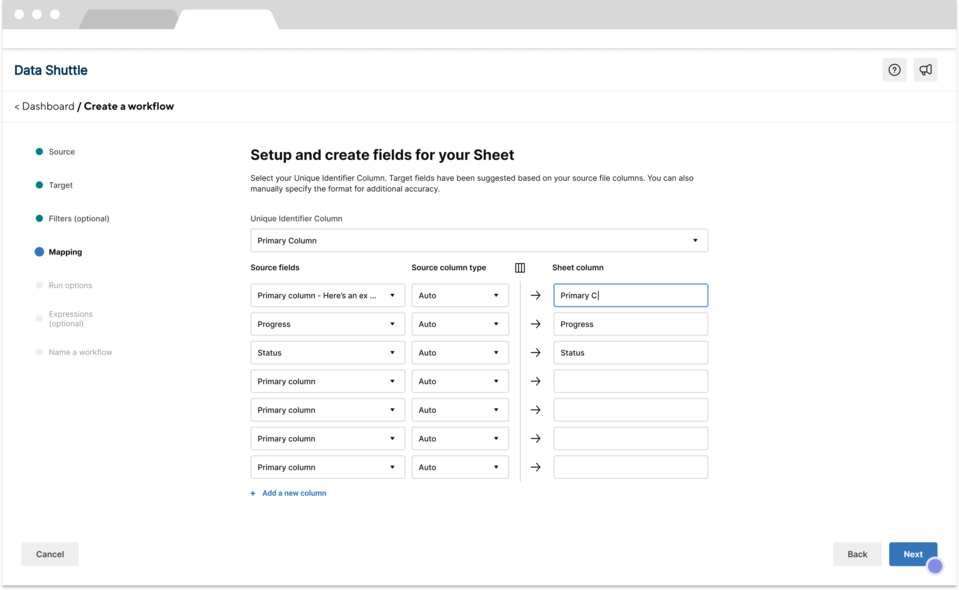
Шаг 5. Сопоставление столбцов двух систем
Значения в столбцы Smartsheet подставляются заранее. Вам необходимо выбрать входные столбцы в исходном файле.
Сопоставление столбцов вручную
Если вы внесли изменения в исходную таблицу, используйте кнопку Refresh (Обновить), чтобы обновить сопоставление. Однако при этом будут перезаписаны изменения, внесённые вручную, поэтому убедитесь, что столбцы сопоставлены правильно.
На этом этапе можно добавлять, переименовывать или удалять столбцы. Помните, что изменения могут затронуть зависимые автоматизации. Если возникает ошибка из-за переименования столбца, верните исходное имя или обновите автоматизацию, указав новое имя. Вы сможете удалить только столбцы, добавленные во время этой операции сопоставления рабочего процесса.
Шаг 6. Планирование рабочего процесса
Рабочий процесс может запускаться автоматически при выполнении одного из двух условий: при добавлении вложения (Run on Attachment) или по расписанию (Run on Schedule). Если вам не требуется регулярное обновление данных, вы можете запускать рабочий процесс вручную. Это можно сделать с помощью панели мониторинга.
Запуск при добавлении вложения
Когда выбран этот режим, при добавлении вложения в исходную таблицу рабочий процесс будет оценивать его и запускаться, если вложение соответствует критериям. Использовать режим Run On Attachment (Запуск при добавлении вложения) можно только в том случае, если в качестве источника используется вложение Smartsheet, а целевой ресурс не является объектом DataTable.
Обратите внимание: если рабочий процесс настроен так, чтобы запускаться каждый раз при добавлении нового вложения, то любой пользователь, добавивший вложение, спровоцирует запуск рабочего процесса.
Запуск по расписанию
- Активируйте переключатель Run on Schedule (Запускать по расписанию).
- Выберите нужные значения в полях Days of Week (Дни недели), Start Time (Время начала), Execute every (Выполнять с интервалом) и End Time (Время окончания). В расписание можно добавить несколько параметров.
- Нажмите Next (Далее).
Запуск вручную
Если на этом этапе ничего не указывать, вы сможете запускать рабочий процесс в любой момент.
Чтобы запустить рабочий процесс вручную, перейдите на панель мониторинга и выберите Run (Запустить). Если позднее вы решите, что этот рабочий процесс должен запускаться по определённому расписанию, то можете отредактировать его, указав новые параметры запуска.
Рабочие процессы, которые запускаются при добавлении вложения, также можно запускать вручную в любое время.
Шаг 7. Создание входных выражений
Выражения DataShuttle позволяют применять к данным, импортированным в таблицу с помощью Data Shuttle, формулы Smartsheet.
Предположим, что у вас есть несколько исходных файлов, данные из которых поступают в одну и ту же таблицу Smartsheet. Вы хотите видеть, из какого источника была импортирована та или иная строка.
Если один набор данных поступает из Netsuite, а другой — из Oracle, вы можете создать входное выражение и получить информацию об источнике данных во время их загрузки с помощью Data Shuttle.
Добавление сведений об источнике данных
- Создайте таблицу, в которую будут загружены данные посредством Data Shuttle, и включите в неё столбец (например, Источник), где будут отображаться сведения об источнике данных.
- Сохраните таблицу.
- При создании рабочего процесса в Data Shuttle не назначайте сопоставление для столбца Источник.
- На вкладке Expressions (Выражения) выберите Add another expression (Добавить выражение).
- В поле Unique Field Name (Уникальное имя поля) укажите имя нового столбца. В этом примере используется имя Источник.
- В поле Function Syntax (Синтаксис функции) введите формулу. В этом примере используется формула =”Netsuite”.

- Вернитесь на вкладку сопоставления и сопоставьте поле, содержащее выражение, с соответствующим столбцом. В этом примере это будет поле "Источник" и столбец "Источник".

- Завершите создание рабочего процесса Data Shuttle.
При запуске рабочего процесса формула будет подставлена в импортированные строки. В этом примере при выборе ячейки в столбце "Источник" вы увидите формулу =" Netsuite".

В качестве выражений можно использовать любые другие функции Smartsheet, включая те, которые ссылаются на значения других столбцов.
Примеры
- =TODAY() [При использовании функции TODAY() значение столбца будет обновляться каждый раз при открытии таблицы.]
- =RIGHT(Местоположение@row,3) [В столбец будут подставляться три символа из соответствующей строки столбца "Местоположение".]
Шаг 8. Публикация рабочего процесса
Введите название рабочего процесса и нажмите кнопку Publish (Опубликовать). Теперь вы сможете в любой момент запустить, изменить или удалить этот рабочий процесс.