The schedule allows you to sort by availability and view the allocation heatmap which distills project assignments into a person’s utilization. Read more on how to get an accurate understanding of your team’s availability on the schedule in Resource Management by Smartsheet.
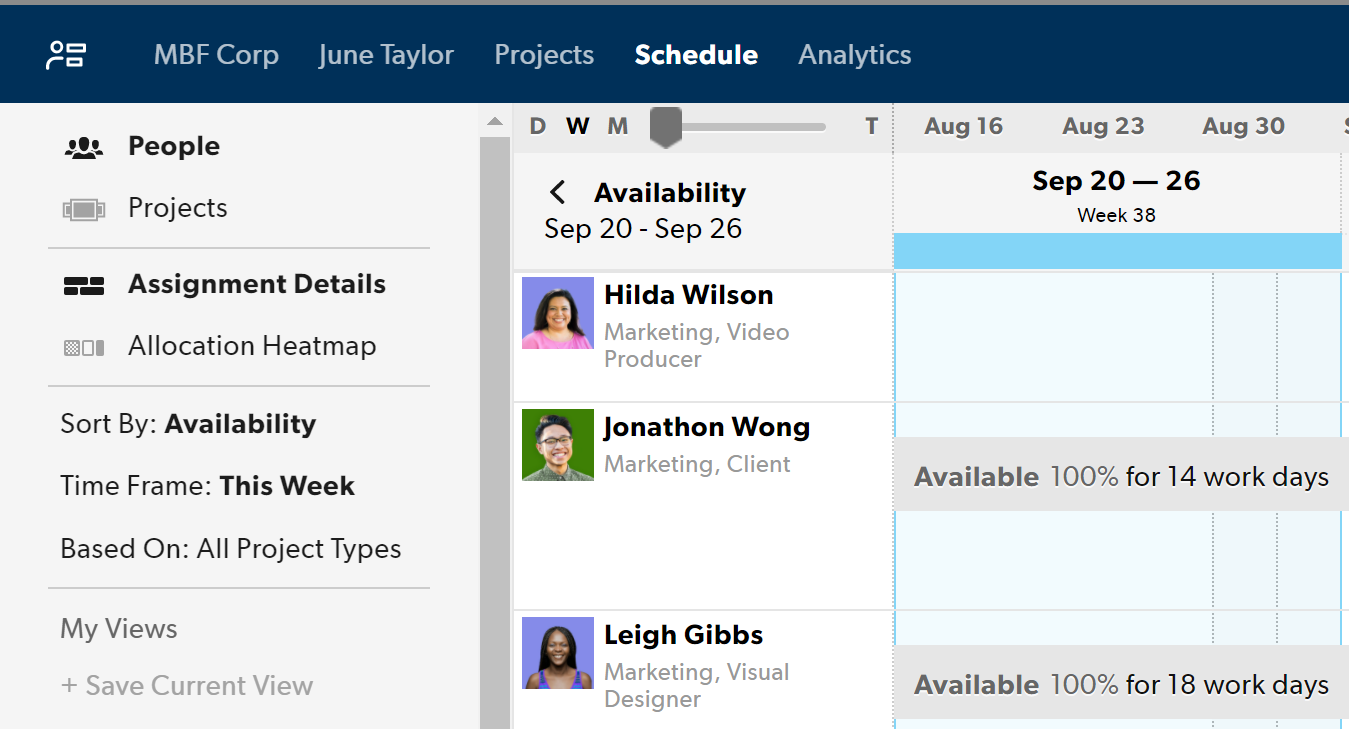
Sort by availability in the schedule view
Use sorting or filtering on the schedule to see when people are available and find specific roles or skills needed for your projects.
Sort By
- Name (default): People are sorted alphabetically by first and last name on the schedule
- Availability: Allows you to sort your team from most to least available. From here, you'll be able to see who on your team can take on work for certain kinds of projects, or who is available for a specific period of time
Time Frame
Choose from a predefined time frame or a custom date range to sort your team from most to least available. The blue highlight on the schedule shows what time frame availability is being sorted by.
Based On
- All (default): Sorts by who is most to least available to work
- Project type: Selecting one or more project types sorts your view in alphabetical order of people who are most to least available to work on the selected project type(s).
To see who can take on a priority project that is billable, filter by availability based on confirmed projects. This sorts your schedule to show people who are available on confirmed projects. Other project assignments (internal, tentative) will be grayed out. Using this filter temporarily recalculates your team's utilization.
View allocation heatmap
- At the top of the screen, select Schedule.
- To expand the left menu, select Everyone.
- Select People and then select Allocation Heatmap.
Varying shades of gray are used to show allocation, unless a person is over-capacity. Then the allocation is red.
To expand or collapse a person's schedule details, hover in the top right corner of the cell with their name, and then select the details icon.
To filter on allocation for a specific person, on the left sidebar, under People Filters, select Team Member
The Team Member must have a start date in their profile or their allocation won't appear.
Configure holidays and weekends
By default, a work week in Resource Management is five days. The work week begins on Monday, making Saturday and Sunday nonworking days.
Your team could work a four-day work week for team members unavailable Friday through Sunday. Or you could have some team members working every day of the week. Some companies consider Friday and Saturday nonworking days and Sunday as the start of the work week. You can adjust the length of the work week based on your needs.
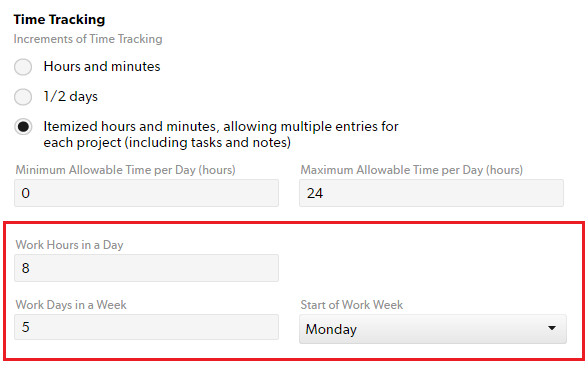
To set your work week
- Select Settings.
- Choose Account Settings.
- On the Account Settings page, scroll down to Time Tracking.
- Enter details for your work week in these fields:
- Work Hours in a Day
- Work Days in a Week
- Start of Work Week
- At the bottom of the Account Settings page, select Save.
On the Schedule page, nonworking days appear as light gray vertical bands. Resource Management doesn’t include nonworking days (official holidays or weekends) in availability calculations.
Managing holidays
Official holidays
Official holidays occur at all locations and appear as nonworking days.
To add an official holiday
Before you begin
Part-time availability takes priority over official holidays. For example, if you work with a part-time employee whose schedule falls on an official holiday(s), the worker appears as available on the holiday.
To make the part-time employee appear unavailable on an official holiday, remove their part-time availability schedule on that day.
- Select Settings.
- Choose Account Settings.
- On the left menu, select Official Holidays.
- Enter the details for the holiday.
- Select Add.
You have to add holidays one at a time. You can not add them in bulk.
Regional holidays
For events that affect only certain locations, create a Leave Type (for example: Regional Holiday), and assign it as needed.
To create a regional holiday or leave type
- Select Settings.
- Choose Account Settings.
- On the left menu, select Leave Type.
- Enter the details for the holiday/leave type.
- Select Add. Once you add a new leave, it appears as an Assignment option.
Workdays with leaves aren’t automatically subtracted from the budget. Any time dedicated to Leave is considered available time.
To remove project assignments that overlap with regional holidays
You can’t undo the removal of overlapping assignments. Double-check your schedule before you make this change.
- Select the assignment, and then select Allocation.
- Select Remove overlapping assignments.
Assign leave time to the schedule
To add leave time to a person on the schedule:
- Select the People view of the schedule.
- Select the row and in the date range where you want to add the leave.
- Select New Assignment, then search for or scroll down to the leave type you want to add.
- Select a leave type from the bottom of the list. The leave will appear on the schedule.
By default, new assignments, including leave, appear on the schedule at 100% allocation for one week.
- Drag the assignment handles to adjust the duration. You can also adjust the duration by selecting the leave and manually change the dates
- Select the leave to adjust the allocation.
Unlike holidays and weekends, Resource Management does not automatically subtract leave hours from availability calculations. Hours scheduled as leave are treated just like work hours.
You may want to split assignments after you’ve added the leave.
Leave is only visible on the schedule, and it resembles a project. Since it is not a project though, it will not come through the integration panel in Smartsheet. Outside of the schedule tab, you can create reports to get a roll-up of all of leave resources are taking.
Configure availability for an individual
The default work week for your organization is set in Account Settings. This default work week informs the allocation % target on the schedule so you can schedule your team for 100% of their available time. For example, 40 hours a week would be 100% allocation.
To set availability for a specific person:
- Go to Settings > Account Settings and click People.
- Click the name of the individual and make adjustments in the Availability section.
Only assignments created or modified after you set part-time availability setting are affected; you may need to modify existing assignments to reflect updated availability Prior assignments will still show full time availability.
If a person has zero hours available on any given day, that day is considered a non-working day. Assignments that overlap with a non-working day are removed from timesheet suggestions and do not count towards the project budget in reports
Time suggestions (unconfirmed hours) will not be scheduled if a person is unavailable.
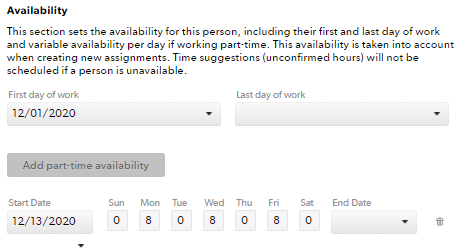
Set first and last days of work
Team members are considered unavailable before their first day of work and after their last day of work.
To set a first and last day for work:
- Go to the People page and select Edit Profile.
- In the Availability section, enter a first and last day for work.
Set permanent part-time availability
For people who have availability that differs from the default settings:
- Open the profile of the person whose availability needs adjustment by navigating to Account Settings > People.
- Click the Add part-time availability button in the person’s profile.
- In the Start Date and End Date boxes, set the dates: enter the start and end dates to indicate when the working duration will differ from the default work week for your organization.
If the individual will have part-time availability for an indefinite amount of time, leave the End Date box empty.
Set a temporary part-time availability
If a person is temporarily unavailable during a specific period of time, set a part-time availability block in their profile:
- Navigate to Account Settings > People.
- Click the Add part-time availability button in the person’s profile.
- In the Start Date box, select the first day you want them to show as unavailable and in the End Date box, select the date for the last day they will be unavailable.
- In the Monday – Sunday boxes for this part-time block, type 0.
Resource Management will show this person is no longer available.