Create projects from the projects portfolio page. This guide runs through different high-level information you can associate with your projects like project type, phases, budgets, and bill rates. All this information can be built out in the project settings page.
Create a new project
New projects appear on your organization's project portfolio page.
Creating single projects
To create a new project:
- In the top right corner of the project portfolio, select New Project.
- Enter a project name and project type. Enter additional details as available.
- Client: select a client from the list, or create a new one
- Project Code: optional internal project codes
- Duration: specify the number of working days of the project to generate your end date. Understanding how many workdays a project will take is useful for projects that overlap with holidays and weekends.
- Custom fields: custom fields allow you to add and track specific information about your projects and people.
- Notifications: enable or mute notifications about changes to this project.
- Budgets: learn more about creating and managing budgets
- Phases: learn more about using phases for projects
- Bill Rates: learn more about configuring bill rates
- Lock/Unlock time entries: set time entries to lock when your team submits their hours.
- Project owner: Specify the person who acts as the project manager or main point of contact for the project. Only active Resourcing Admins will appear in this dropdown list.
- At the bottom of the page, select Save. You can now add people to your project.
Adding project members
If additional stakeholders, such as an executive sponsor, need access to the project, you can add them as project members. Members can edit project settings, make assignments, and run reports on the project.
To add project members:
- Open project settings, then select Project Members.
Select Add Members, select the people you want to add, and then select Add.
Due to their restricted access to Resource Management, you cannot add contractors as project members.
- At the bottom of the page, select Save. You can now add people to your project.
Importing multiple projects
You can also batch-import projects using a spreadsheet. Learn more about importing multiple projects.
Project types
A project type will associate all assignments of that project with a specific color, so you can easily see what types of projects your team is assigned to on the Schedule.
There are three project types: Confirmed, tentative, and internal.
Confirmed projects
Confirmed projects show as blue on the schedule and project pages. Confirmed projects are approved; your team can start their work. For consulting companies, these projects are typically billable and have a signed contract from the client.
Tentative projects
Tentative projects show as gray on the schedule and project pages. These are projects that you want to schedule, but they’re not yet approved.
For consulting companies, you can create projects before you have the signed contract from the client by designating a project as a tentative project type. Creating tentative projects allows you to see the budgeting implications of the project on your resourcing plan before it begins. Once the contract is signed, you can change the project type to confirmed.
Think about when you want to add the project to Resource Management. Many companies add projects as tentative when they’re 75% sure they’ll be doing the work.
Internal projects
Internal projects show as purple on the Schedule and project pages. Internal projects are unique to your team or business. For consulting companies, these projects are typically non-billable.
If you’re tracking time in Resource Management, you may want to create a few internal projects for your team to track their hours on general business activities such as team meetings, marketing, or new business development.
Use phases for projects
You can assign people to phases and track analytics on that phase across multiple projects. Each phase can have its own duration, budget, and bill rate. Phases do not have to be concurrent and have no assumed dependencies.
You can also use phases as a way to create smaller projects within a larger client campaign. This is helpful if you provide ongoing maintenance for clients, or work on projects that are only a few days long.
Phases do not sync to the project via the Resource Management integration panel.
To add a phase to the schedule:
- On the Schedule, click on any white space and select Add Phase.
- Choose a phase name from the default options (created in Account Settings) or type in a new phase name
- Go to the project Schedule to adjust phase start and end dates.
To add a phase on the worklist
- On the worklist, select + Phase
- Type in the phase name and then hit Enter.
- Select the new phase and edit its settings in the right pane.
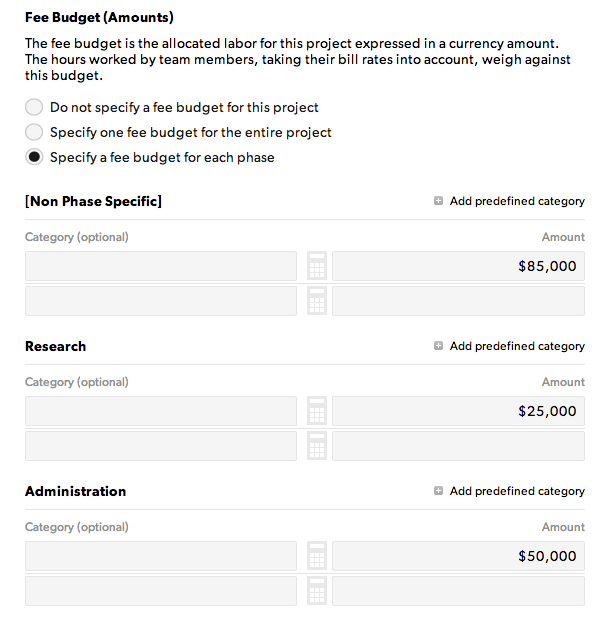
Phase budgets
If your project has phases, you can track a specific budget for each phase. Set this on the project settings page. This option provides you with a table where you can divide the budget across different phases.
The [non-phase specific] budget is allocated to the overall project. Hours recorded or scheduled against the entire project (instead of a specific phase) are tracked in this category.
Phase-specific bill rates
You can set unique bill rates for a phase in phase settings. When you do this, hours tracked to that phase will inherit phase-specific bill rates.
If you use different bill rates for the various project roles, you will want to set up phase-specific rates.