Smartsheet Control Center overview
The following table shows you how to navigate Smartsheet Control Center.
If you want to do this | Follow these steps |
|---|---|
| Create a blueprint source folder |
|
| Create an intake sheet |
|
| Set up profile data |
|
| Create a new program |
|
| Switch between programs |
|
| Identify the program and get information |
|
| Create a blueprint |
|
| Create a new project |
|
| Log out of Control Center |
|
Access Smartsheet Control Center
Only users listed as Program Leads or Additional Leads can log in to Control Center and edit the blueprint.
Log in to Smartsheet Control Center
Access Control Center or use the Launcher in the lower-left corner of Smartsheet.
Brandfolder Image
- Select Log in with Smartsheet. Enter your Smartsheet email and password.
- If it’s your first time logging in, select Allow to give Control Center permission to access your Smartsheet account.
If you’re a Primary lead, consider creating a Smartsheet dashboard for the people who need to access Control Center. Include key information about your program and a link for access.
Grant access to Control Center programs
You can provide access to Smartsheet Control Center to individuals or to a Smartsheet group.
Only Program Leads can grant access.
To grant access to a program:
- Open the Programs menu in Control Center.
- Select the program you want to provide access to.
Next to the name of your program, select the Information icon.
Brandfolder Image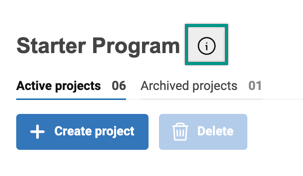
- On the right panel, select Edit.
- Type the email addresses of the people you want to add as Additional leads or Program users.
- Select Save.
Control Center user type restrictions
Limits apply to each user type in Control Center:
- Include up to 5 Additional leads by adding their email addresses.
- Include up to 10 Program users. Fill the slot with individual email addresses, a Smartsheet Group (everyone in the group is a Program user), or an entire company domain (everyone in the domain is a Program user).
Using Smartsheet Groups with Control Center
- Primary leads can add and remove users to the group to grant access.
- Primary leads need to own any Groups they’d like to grant access to and have Admin permissions in Smartsheet.
