Download individual assets
Guest users can download individual assets if their organization’s settings enable downloading.
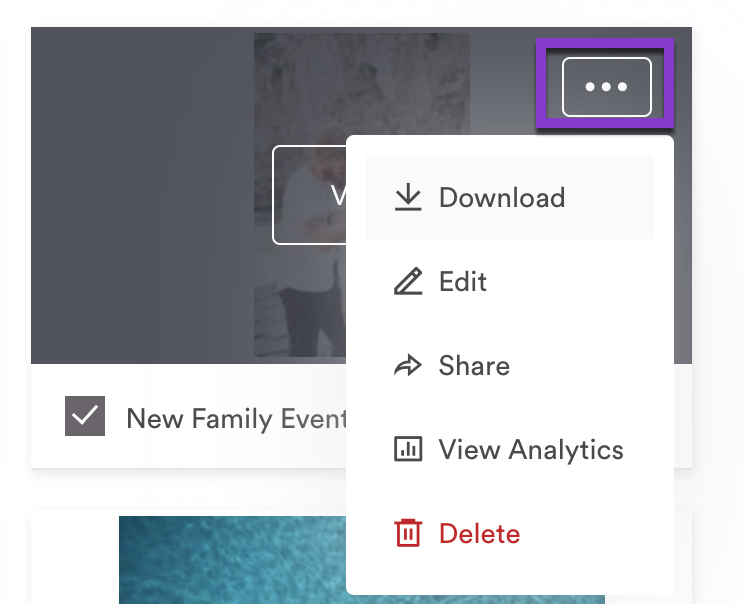
Downloading from the Brandfolder view
When viewing a Brandfolder you can download individual assets by hovering over the asset and clicking the ellipses. From the dropdown menu select Download. If a file has multiple attachments - noted by the attachment count in the bottom right-hand corner of the tile - downloading from the Brandfolder view will download a ZIP file with all the merged attachments.
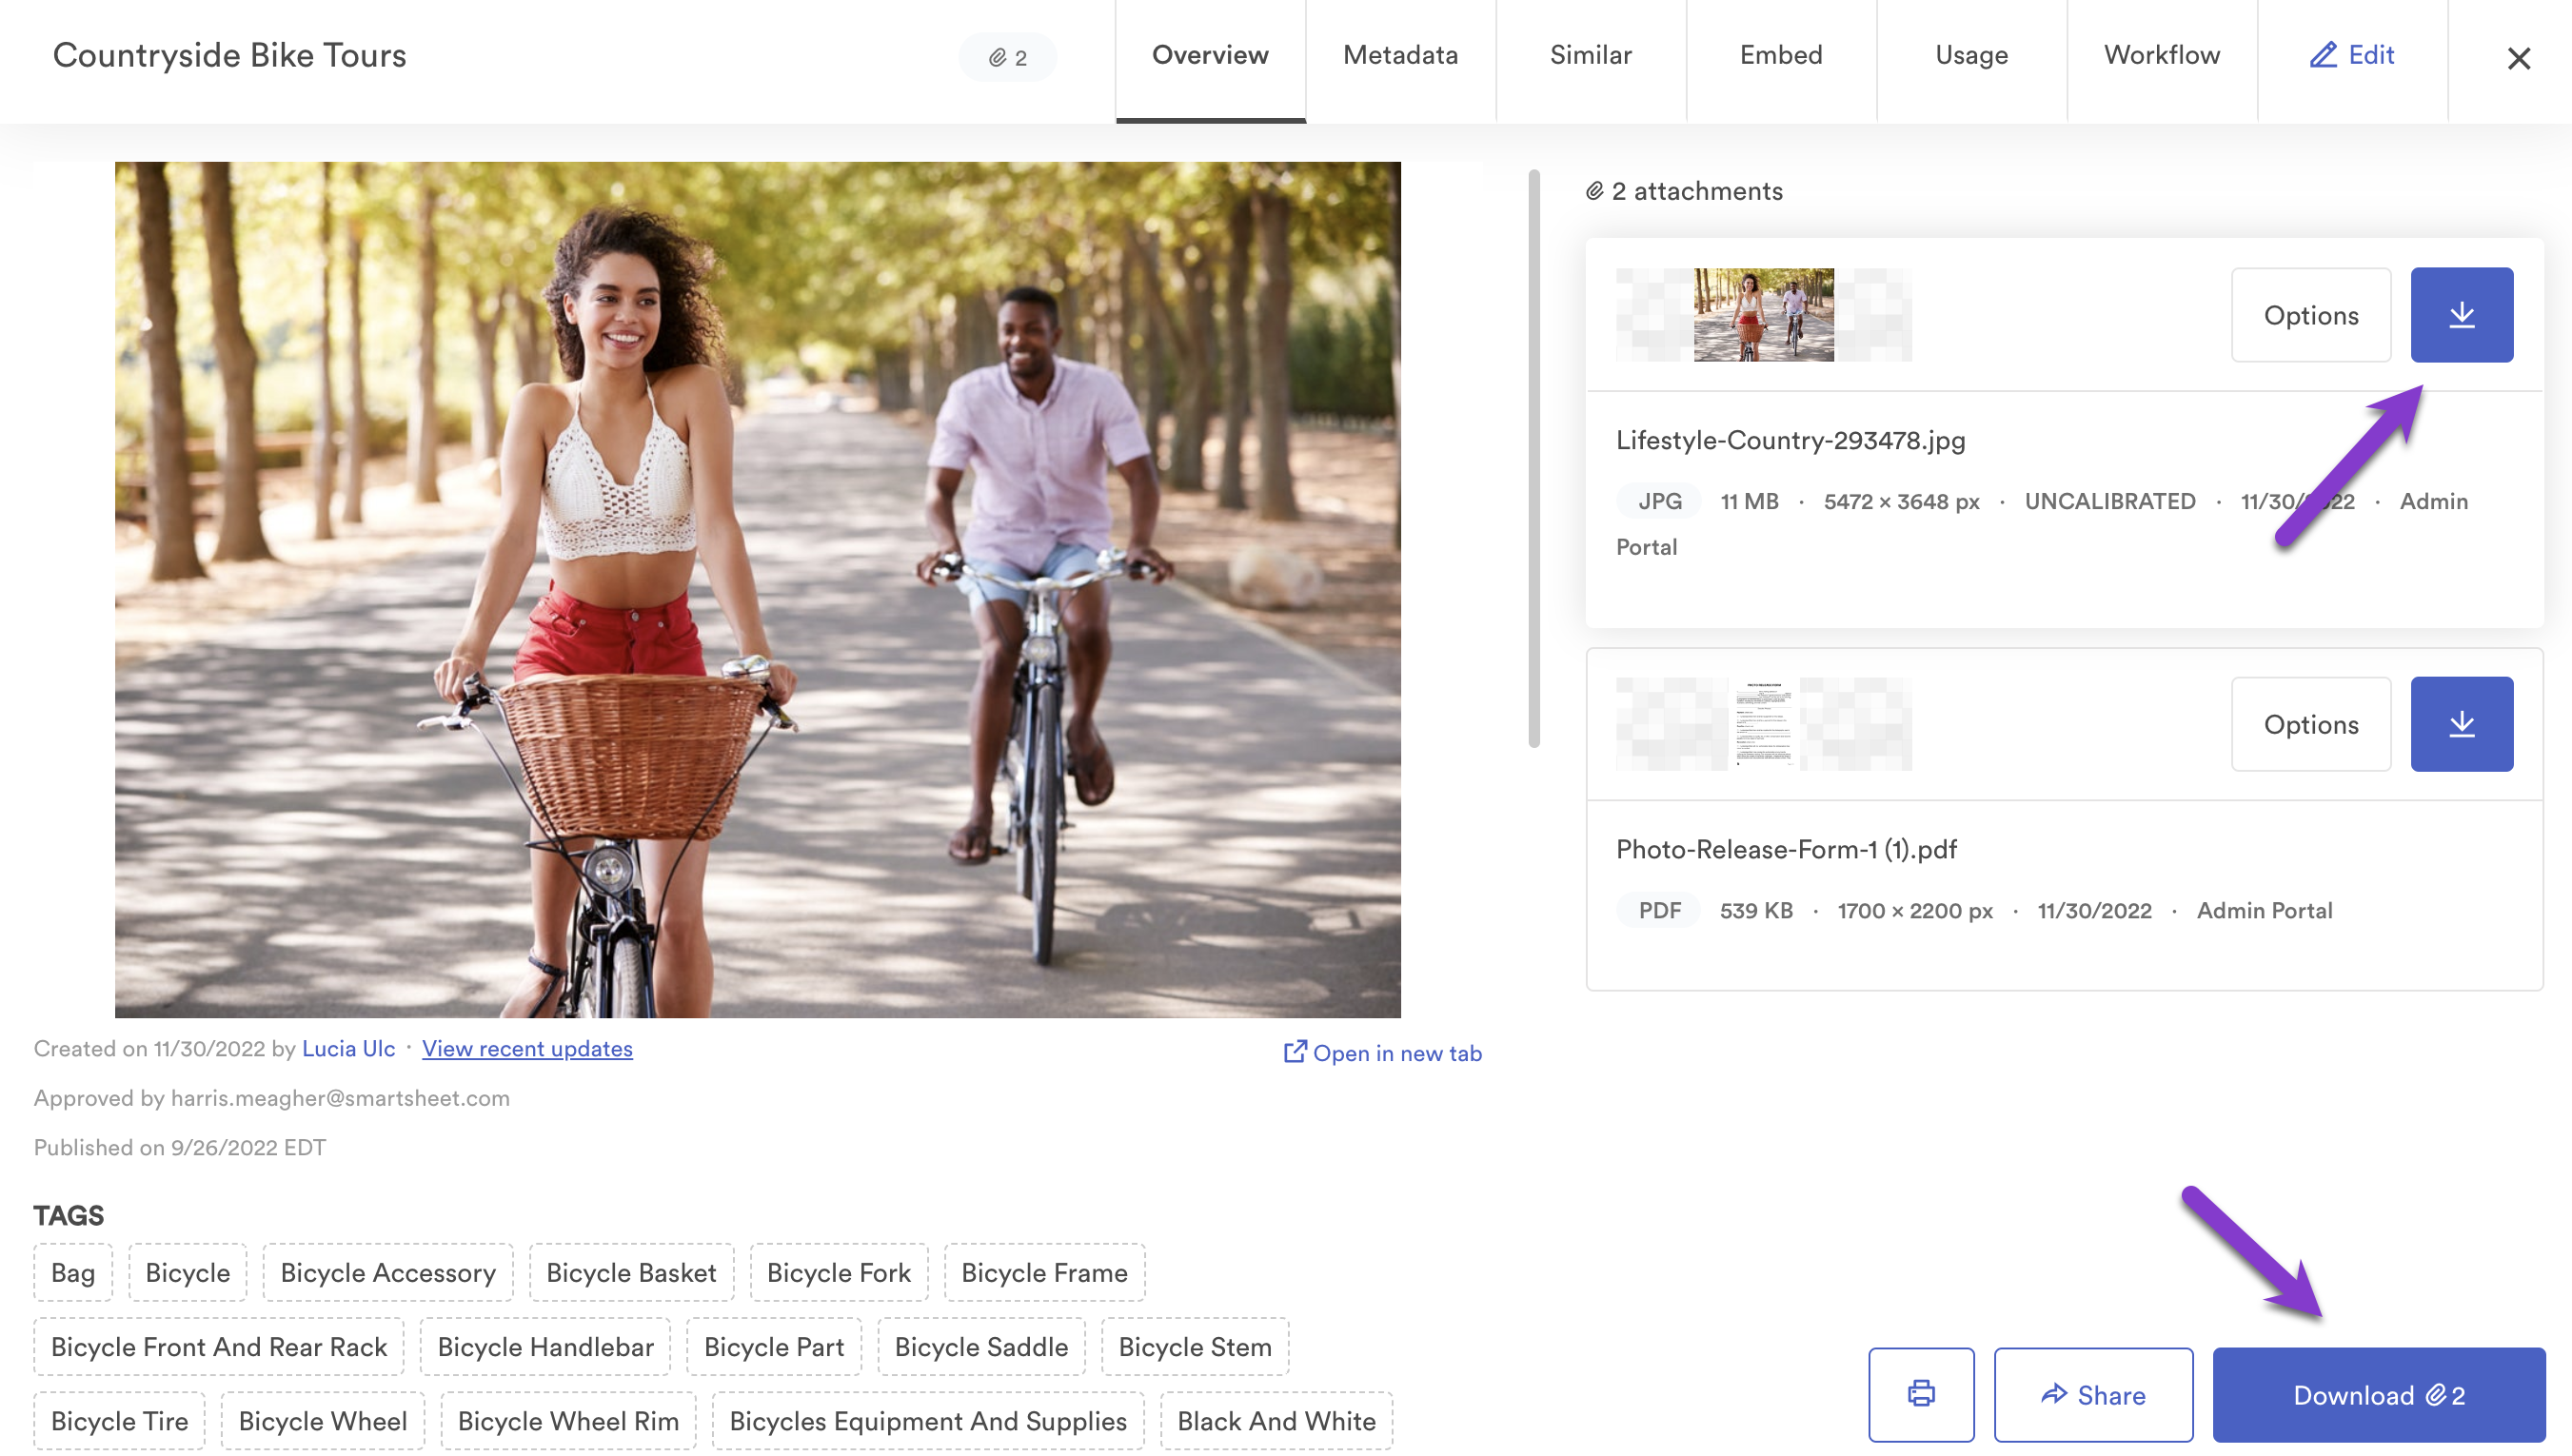
Downloading from the asset modal
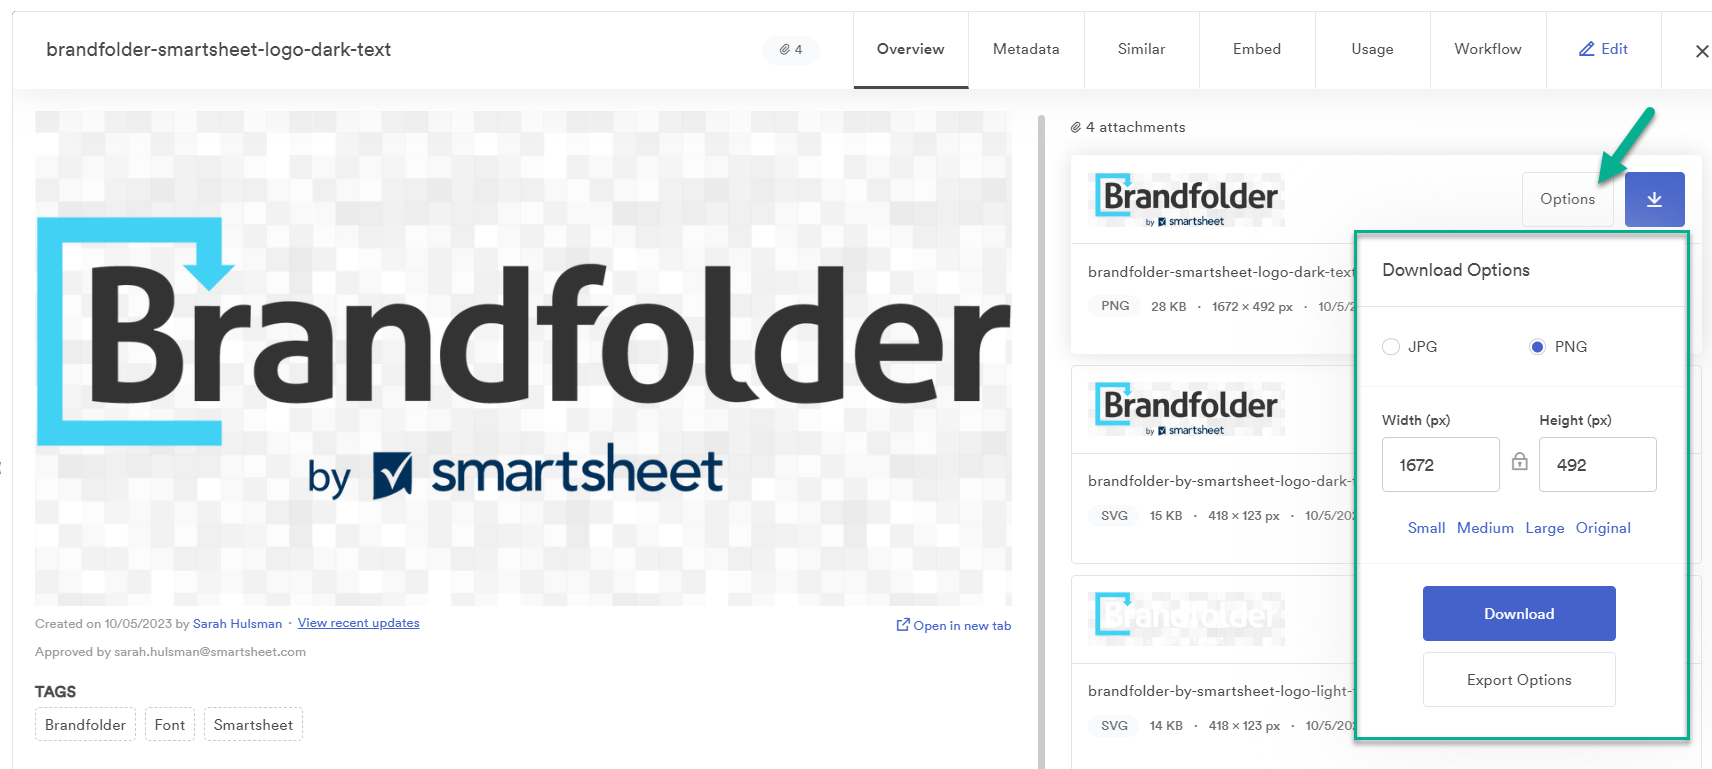
When you are viewing an asset you can choose to download all the attachments within the asset or an individual attachment. To download all attachments select the Download [#] in the bottom right-hand corner. To download an individual attachment select the download icon from the attachment list.
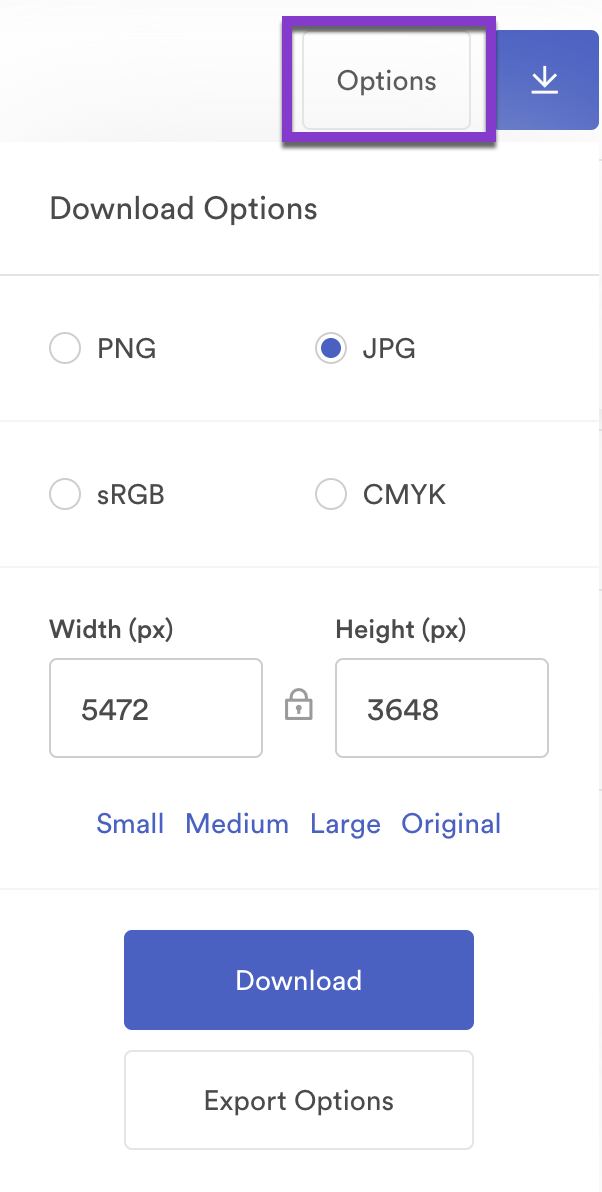
Formatting and resizing
To change the format or size of an image, select Options to the left of the attachment download icon. This will open a menu to select your desired file type and size options.
Brandfolder always respects the original aspect ratio. When entering a width or height, the other will update automatically.
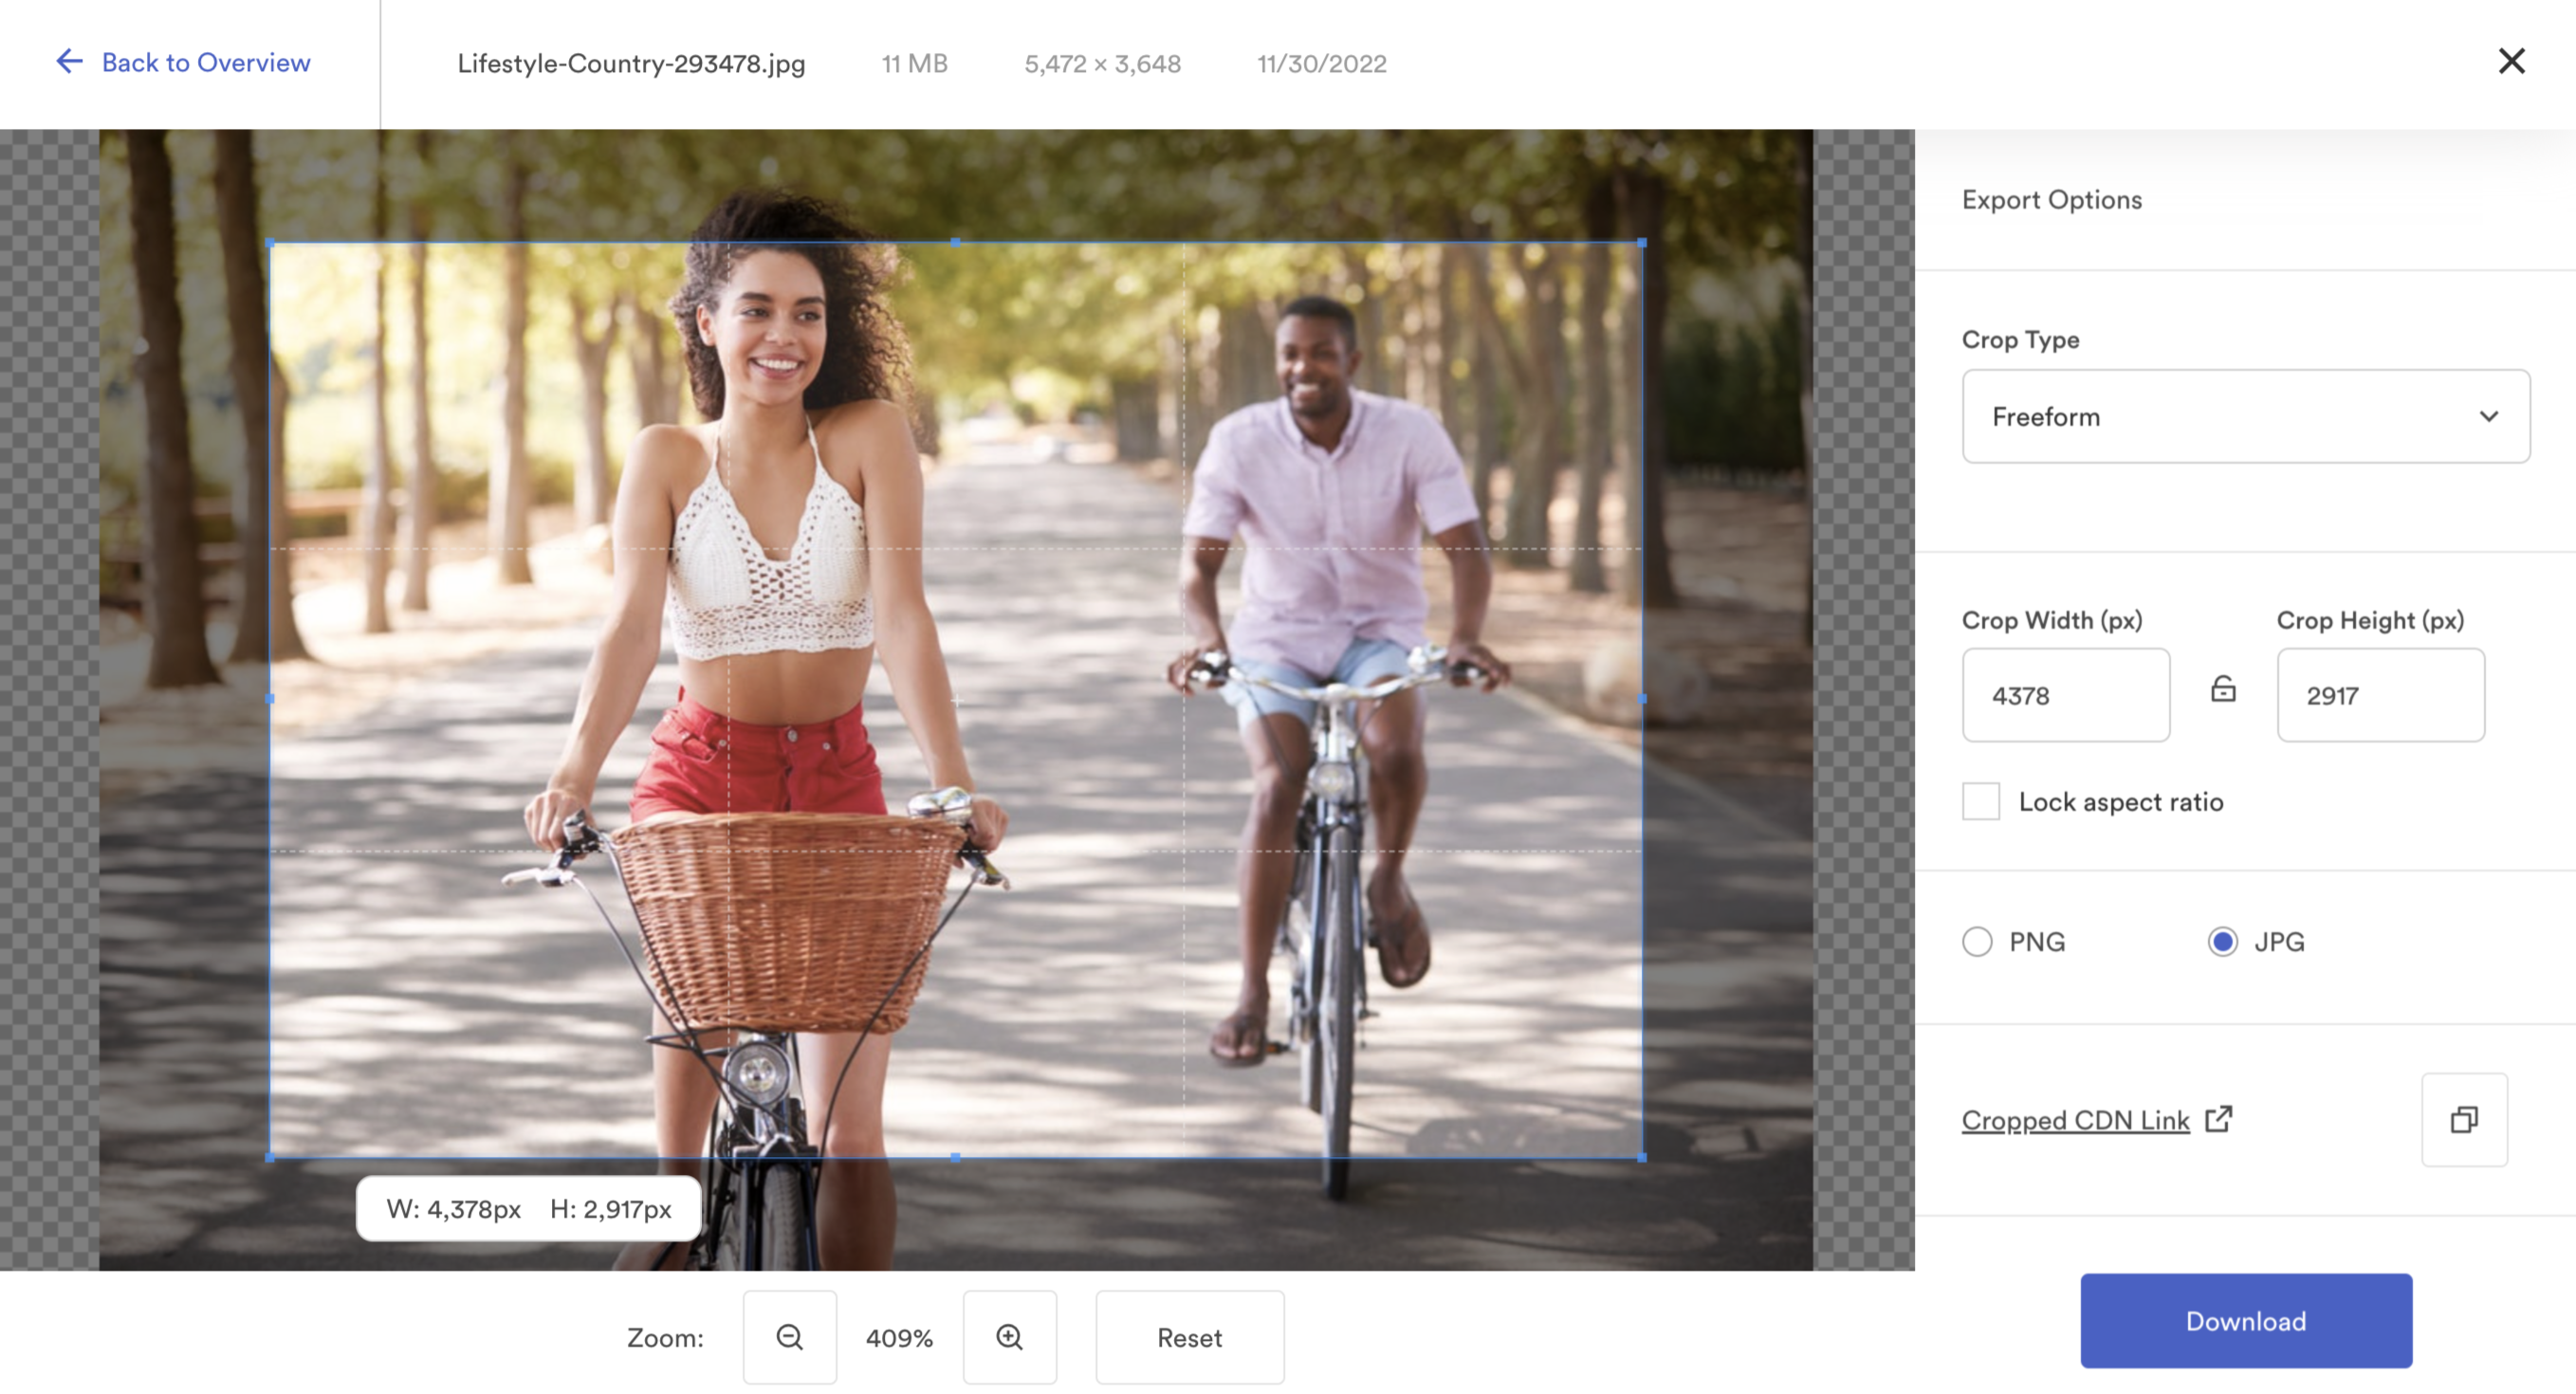
Cropping
If the Brandfolder you are visiting has cropping enabled, selecting Export Options brings you to the cropping interface.
Brandfolder Administrators can choose to enable preset crop types or prevent users from unlocking the aspect ratio when utilizing freeform cropping. Depending on the Brandfolder settings, Guest users can crop or zoom the image as you would like. Guest users can also select an output file type of their choosing.
Download Alerts
Admins can enable the download alert setting in General Settings so that each time a user downloads an asset they will see a personalized message. The personalized message allows you to add agreements, usage guidelines, or directions each time an asset is downloaded. This setting can be set at the Brandfolder and Collection level. By default, if a Brandfolder has a download alert, its collections will have the same download alert enabled.
If an Organization has the download alert enabled on a Brandfolder or Collection then users will not be able to use the Organization level search.
Convert and resize
Convert between file types
1. Select the asset within your Brandfolder to convert and download.
2. Under Overview, select the attachment you wish to convert. Select Options on the right, it will provide a selectable list of file types to choose from.
3. Select the format and size desired.
4. Select Download.
Convert to a specific image size
You may also create a custom-sized image if the Small, Medium, or Large options don't fit your needs. To resize, follow the steps below:
After selecting the file format you'd like to convert, enter a number in either the width or height text box.
Brandfolder always respects the original aspect ratio. When entering a width or height number, the other will update automatically.
- Select Download.
Download assets in bulk
Select assets individually by selecting the checkbox in the bottom left-hand corner of the asset tile, or select entire sections by checking the box next to the section name. You'll see a drop-up appear when you click on the Download option in the bulk action toolbar.
Guest users can download individual assets if their organization’s settings enable downloading.
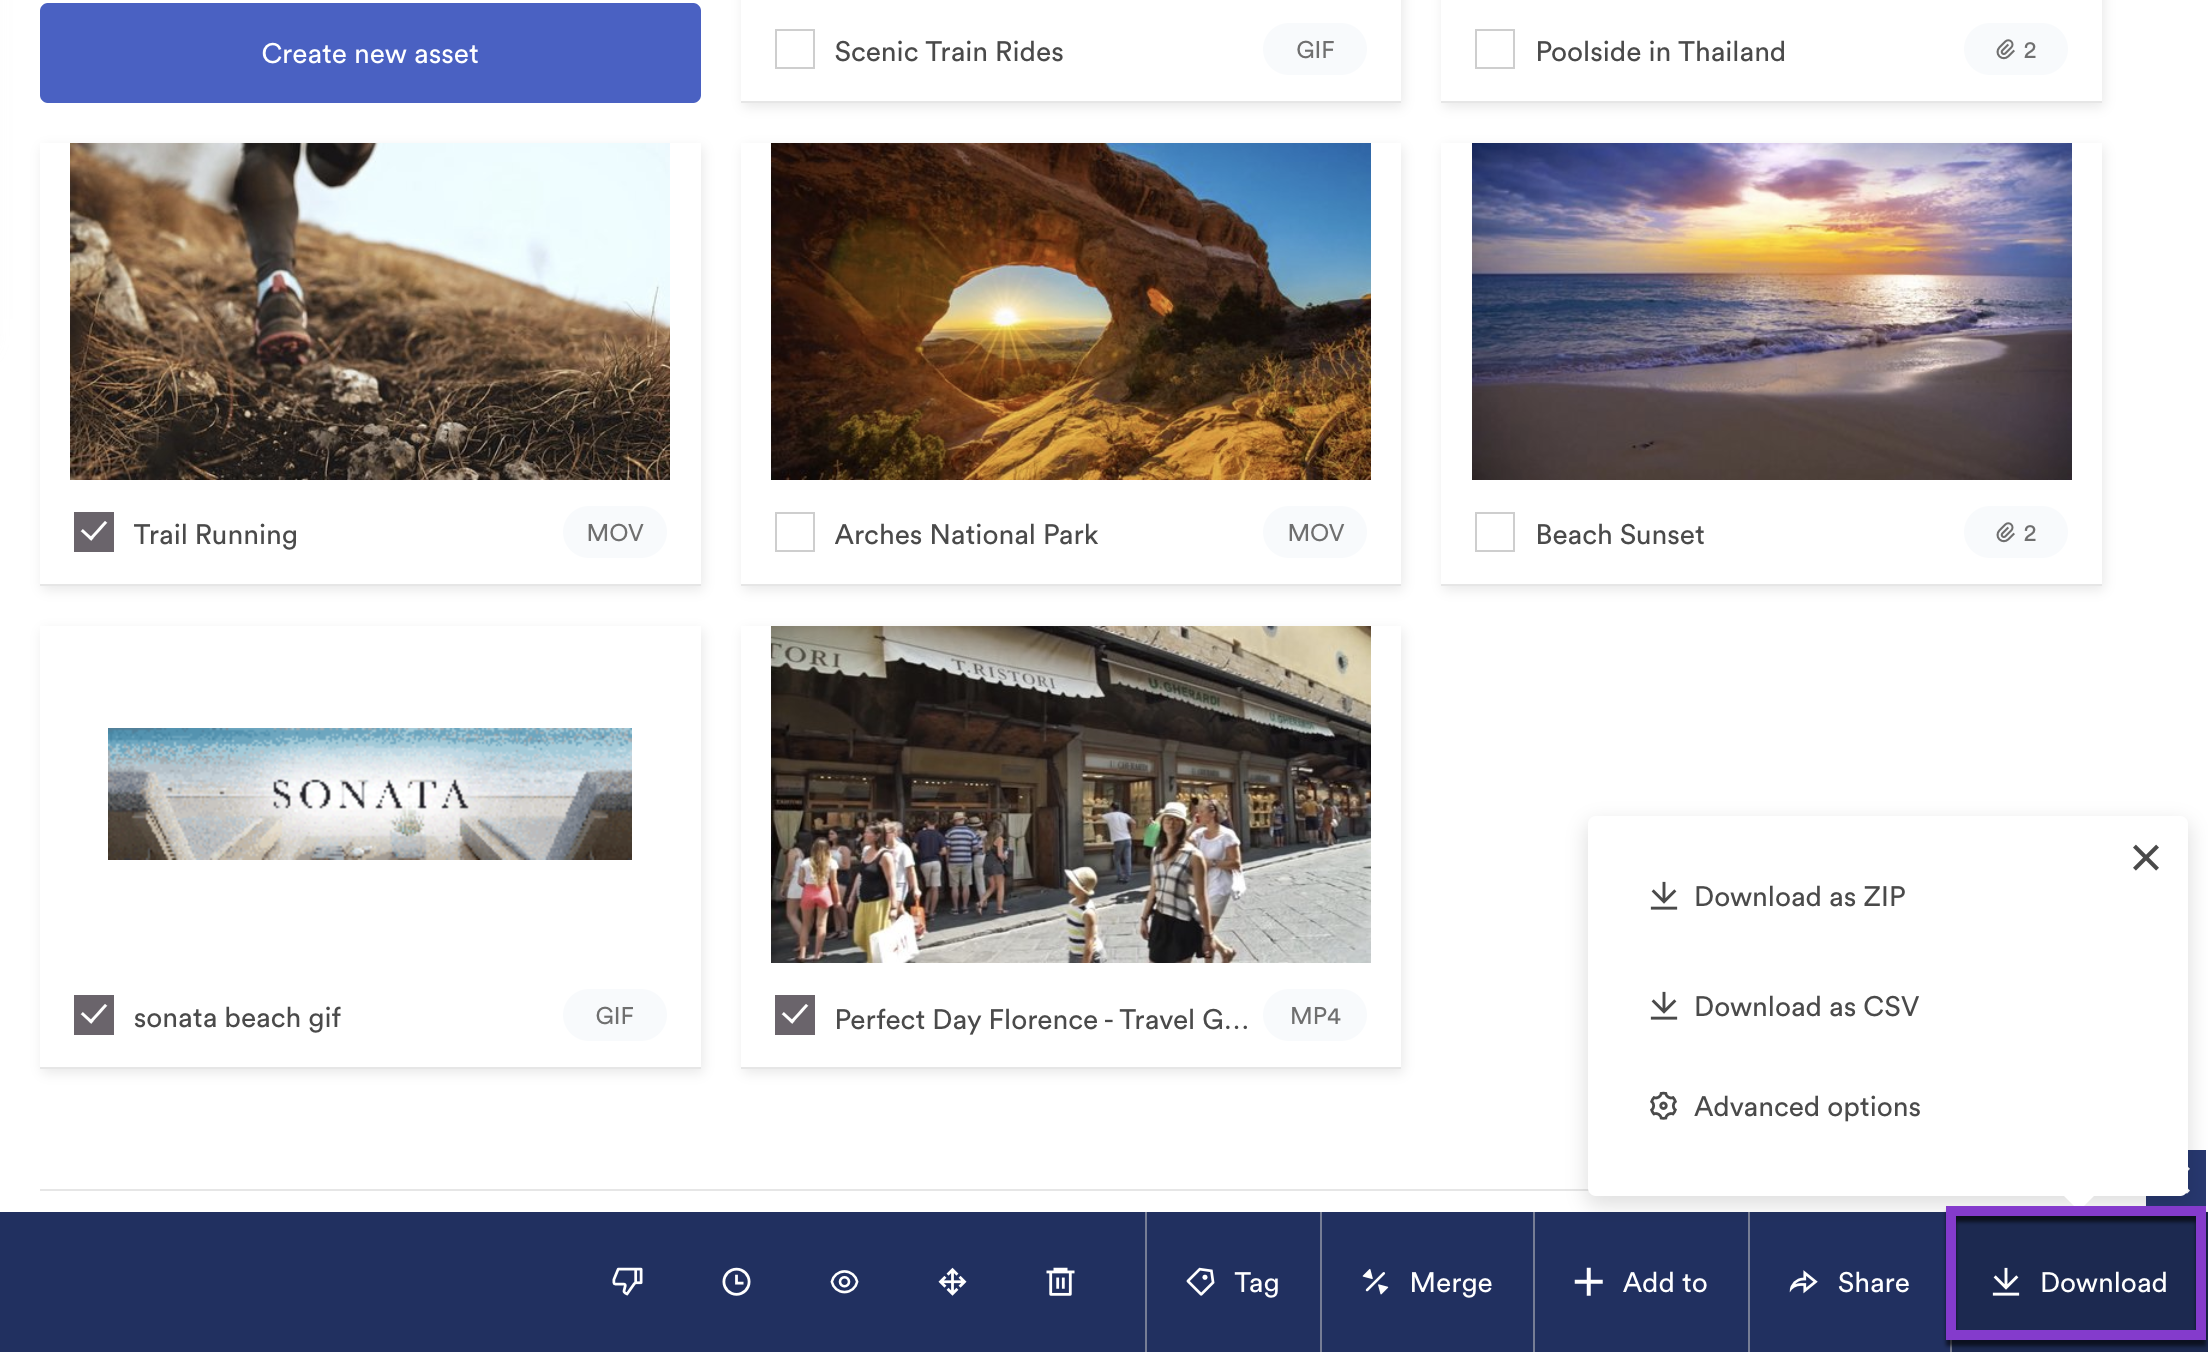
Download as ZIP
Once you select all your desired assets, select Download as ZIP from the bulk action toolbar. A ZIP file is downloaded with all of your selected assets.
Download as CSV
Selecting Download as CSV prepares a download of a metasheet containing critical asset information such as; the asset name, description, tags, etc.
You can make bulk edits to the asset information on the CSV, then upload through bulk management to make bulk updates. Learn more about bulk updates with CSVs.
Advanced Options
Selecting Advanced options will bring up the Bulk Download & Sharing modal. From this modal, you can choose specific assets or attachments to be included in your download.
This option allows you to download select attachments for scenarios such as:
- Only the PNG file types
- Only images with 2200px widths
- Only images smaller in file size
- Only specific versions
Bulk resize and convert assets
This feature is great for getting product imagery ready for distribution. Download all or some in a .zip, or generate a share link to share in bulk.
How do I bulk resize and convert assets?
1. Select multiple assets to display the bulk toolbar, and select Download > Advanced options
2. On the Bulk Download & Sharing window, select the following:
- Max Height
- Max Width
- Pad or Fill
- Pad allows for a white or transparent area around the image. Example: 1000x700 image > resize to 400x400 > output is 400x400 with padding added.
- Fill allows the image to fit the same aspect ratio but in a different size. Example:
1000x700 image > resize to 400x400 > output is 400x280.
- File Type: Select either PNG, JPG or Original. Note that selecting Original will not create changes.
3. Select Download to generate a .zip file on your machine.
4. Choose Share to generate a link internal or external users can access to download the .zip file.