Enregistrez votre feuille quotidiennement et actualisez la fonction TODAY dans votre feuille, sans avoir à ouvrir ou à modifier la feuille.
La fonction TODAY de Smartsheet renvoie la date du jour dans les formules. Toutefois, pour que la fonction TODAY reconnaisse la date du jour, vous devez actualiser et enregistrer la feuille. Si la feuille n’a pas une activité quotidienne suffisante pour que la fonction TODAY l’actualise, ce flux de travail Bridge peut automatiquement le faire pour vous chaque jour.
Lorsque ce flux de travail s’exécute, il récupère le statut actuel de la colonne Save Sheet (Enregistrer la feuille). Ensuite, pour modifier la feuille et forcer son enregistrement, il sélectionne ou décoche la case. Une fois ces modifications appliquées et enregistrées, le flux de travail actualise la formule TODAY.
Ce dont vous avez besoin pour commencer
- Une feuille :
- L’ID de la feuille
- Une colonne de type case à cocher nommée Save Sheet (Enregistrer la feuille)
- L’ID d’une ligne qui restera toujours présente sur la feuille
- Bridge :
- Intégration de Smartsheet
- Déclencheur Schedule (Planification) de Bridge
- Modules de flux de travail Bridge :
- Smartsheet - Get Row (Obtenir la ligne)
- Smartsheet - Update Row (Mettre à jour une ligne)
- Conditional Junctions - Match Junction (Jonctions conditionnelles - Correspondance de jonction)
- États
Premiers pas
Pour créer ce flux de travail dans Bridge, authentifiez l’intégration Smartsheet pour votre espace de travail Bridge. Découvrez comment configurer l’intégration de Smartsheet pour Bridge.
Pendant la création de votre flux de travail, gardez votre feuille et votre flux de travail Bridge ouverts dans deux onglets distincts. Cela facilite la navigation dans le processus de création.
1. Créer un champ masqué
- Dans la feuille que vous souhaitez enregistrer quotidiennement, ajoutez une colonne et nommez-la Save Sheet (Enregistrer la feuille).
- Choisissez pour cette colonne le type case à cocher.
- Cochez la case de la ligne sélectionnée.
- Masquez la colonne Save Sheet (Enregistrer la feuille).
- Enregistrez la feuille.
Vous n’utiliserez qu’une seule ligne de la colonne pour vos flux de travail. Choisissez donc une ligne pertinente pour votre processus et qui ne sera assurément pas supprimée. Cette action n’interférera pas avec les autres colonnes de la même ligne.
2. Créer le modèle de flux de travail de base
Avant tout, extrayez tous les modules dont vous avez besoin pour le flux de travail.
- Créez un nouveau flux de travail dans Bridge.
- Dans l’outil de création de flux de travail, utilisez le panneau pour ajouter les modules dans l’ordre suivant :
- Integrations (Intégrations)> Smartsheet: Get Row (Smartsheet : obtenir la ligne)
- Jonctions conditionnelles > Correspondance : Étiqueter Valeur de la case à cocher. Étiquetez un état Clear Box (Décocher la case) et l’autre Select Box (Sélectionner la case)
- Integrations (Intégrations) > Smartsheet: Update Row (Smartsheet : mettre à jour une ligne). Vous avez besoin de deux de ces modules, un sous chacun chemin Junction (Jonction).
- Enregistrez le flux de travail.
Voici ce que vous devez voir dans votre flux de travail lorsque vous avez terminé :
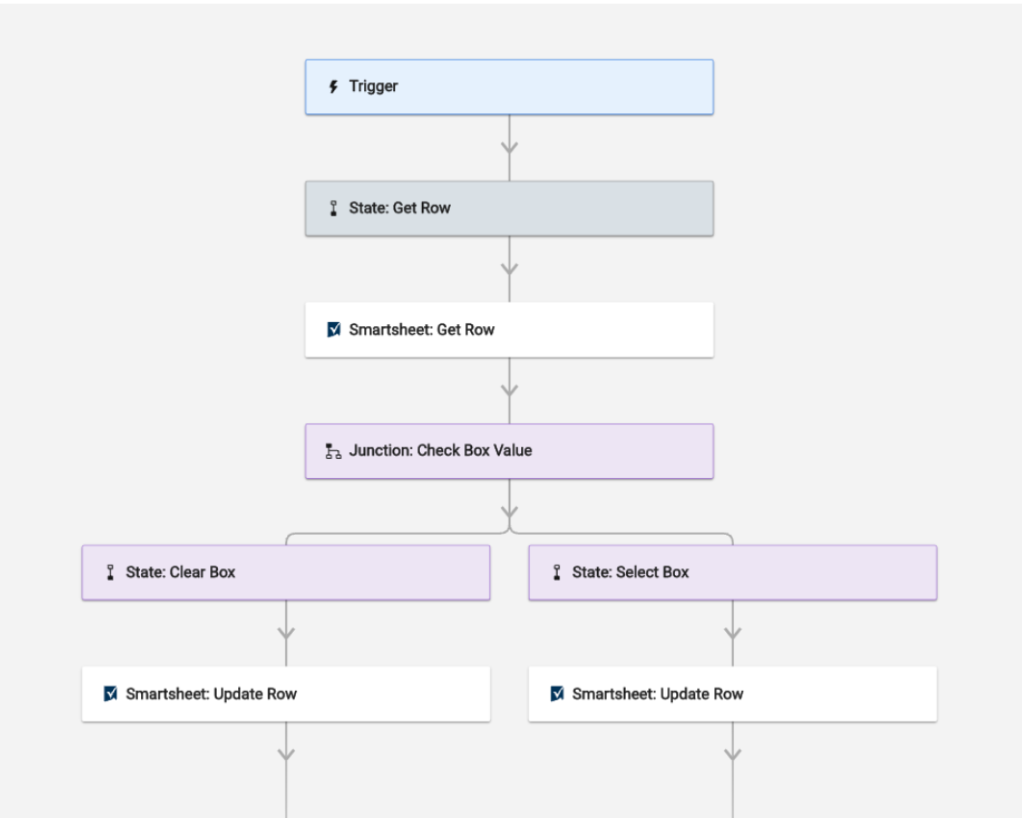
3. Configurer les modules de flux de travail
Étape 1 : configurer le module Get Row (Obtenir la ligne)
Vous devez saisir manuellement les valeurs dans le module Get Row (Obtenir la ligne). Ensuite, remplissez les modules restants en utilisant les références de données de runtime (Run Log [Journal d’exécution]) à partir des résultats de Get Row (Obtenir la ligne).
- Dans le champ Sheet (Feuille), saisissez l’ID de la feuille.
- Dans le champ Row ID (ID de la ligne), saisissez l’ID de la ligne.
- Enregistrez le flux de travail.
- Ouvrez le Run Log (Journal d’exécution) dans le volet de droite.
- Pour exécuter le flux de travail, sélectionnez Play
 (Lecture).
Que fait le module Get Row (Obtenir la ligne) dans ce flux de travail ?
Le module Get Row (Obtenir la ligne) extrait les données de la ligne et les intègre dans le Run Log (Journal d’exécution) du flux de travail. Les données peuvent être référencées dans les étapes suivantes du flux de travail.
Étape 2 : configurer le module Junction Match (Correspondance de jonction)
- Ouvrez le Run Log (Journal d’exécution).
Pour voir l’exécution test créée lorsque vous avez sélectionné le bouton Play (Lecture), actualisez le Run Log (Journal d’exécution).
L’entrée du Run Log (Journal d’exécution) indiquera Stopped (Arrêté). Cela est dû au fait que vous n’avez pas encore terminé la configuration.
- Localisez les références de données nécessaires.
- Développez la ligne Smartsheet: Get Row (Smartsheet : obtenir la ligne).
- Développez la ligne Row: Object (ligne : objet).
- Développez la ligne Cells: Object (cellules : objet).
- Localisez l’entrée de colonne Save Sheet (Enregistrer la feuille) dans la liste des colonnes de la feuille. Puis développez l’entrée.
- Sélectionnez
 à droite de la valeur.
 - Sélectionnez Copy data reference (Copier la référence de données).
- Ouvrez le module Junction: Match (Jonction : correspondance).
- Dans le champ First Value (Première valeur), collez la référence que vous avez copiée.
- Dans le champ Second Value (Deuxième valeur), saisissez true (vrai).
- Enregistrez le flux de travail.
Voici ce que vous devez voir dans le module Junction Match (Correspondance de jonction) lorsque vous avez terminé :
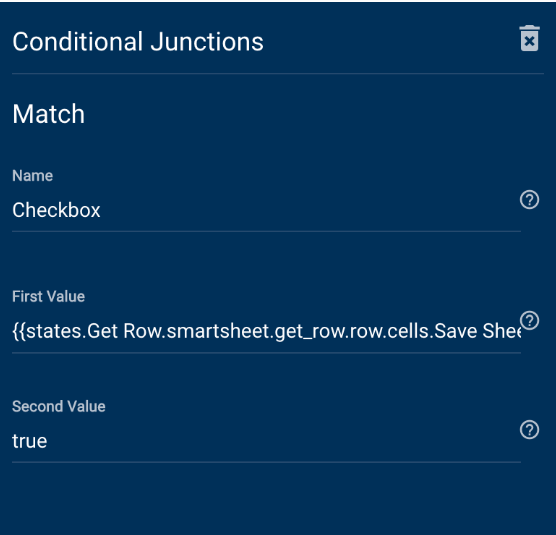
Que font les modules Junction Match (Correspondance de jonction) dans ce flux de travail ?
Le module Junction Match (Correspondance de jonction) analyse les données de la colonne Save Sheet (Enregistrer la feuille) à partir des résultats du module Get Row (Obtenir la ligne) pour déterminer si la case de cette colonne Save Sheet (Enregistrer la feuille) est cochée ou non. Si la case est cochée, le module Junction Match (Correspondance de jonction) suit le chemin Clear Box (Décocher la case). Si la case n’est pas cochée, il suit la Case de sélection.
Étape 3 : configurer les modules Update Row (Mettre à jour une ligne)
- Récupérez la valeur sheetId (IdFeuille) dans le module Smartsheet: Get Row (Smartsheet : obtenir la ligne).
- Ouvrez à nouveau le Run Log (Journal d’exécution).
- Localisez la valeur sheetId (IdFeuille) dans les données Smartsheet: Get Row (Smartsheet : obtenir la ligne).
- Copiez la référence de données.
- Ouvrez le module Update Row (Mettre à jour une ligne).
- Récupérez la valeur id dans le module Update Row (Mettre à jour une ligne).
- Retournez sur le Run Log (Journal d’exécution).
- Localisez le champ id.
- Copiez la référence de données.
- Ouvrez le module Update Row (Mettre à jour une ligne).
- Dans le champ Row ID (ID de la ligne), collez la référence.
- Dans le chemin Uncheck Box (Décocher la case) du module Update Row (Mettre à jour une ligne), suivez ces étapes :
- Développez Cells (Cellules).
- Dans le champ Key #1 (Clé n° 1), saisissez le nom de colonne Save Sheet (Enregistrer la feuille).
Dans le champ Value #1 (Valeur n° 1), saisissez false (faux).
Dans une colonne Case à cocher, la valeur false (faux) décoche la case.
- Dans le chemin Check Box (Cocher la case) du module Update Row (Mettre à jour une ligne), suivez ces étapes :
- Développez Cells (Cellules).
- Dans le champ Key #1 (Clé n° 1), saisissez le nom de colonne Save Sheet (Enregistrer la feuille).
Dans le champ Value #1 (Valeur n° 1), saisissez true (vrai).
Dans une colonne de type case à cocher, la valeur true (vrai) coche la case.
- Enregistrez le flux de travail.
Voici ce que vous devez voir dans les modules Update Row (Mettre à jour une ligne) lorsque vous avez terminé :
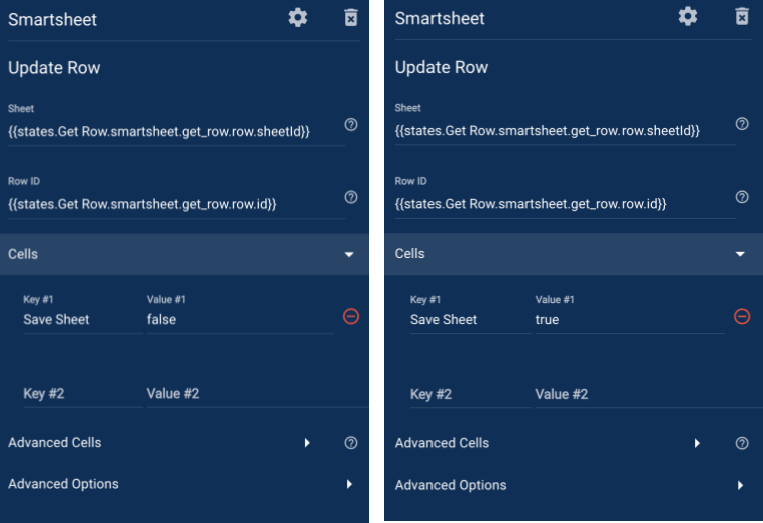
Que font les modules Update Row (Mettre à jour une ligne) dans ce flux de travail ?
Les modules Update Row (Mettre à jour une ligne) cochent ou décochent la case dans la colonne Save Sheet (Enregistrer la feuille) pour forcer une modification de cellule et provoquer l’enregistrement de la feuille.
Étape 4 : tester le flux de travail
Pour contrôler que le flux de travail s’exécute et effectue les bonnes actions, testez les deux conditions. Avant de commencer, vérifiez si la colonne Save Sheet (Enregistrer la feuille) est cochée au niveau de votre ligne de feuille.
- Ouvrez le Run Log (Journal d’exécution).
- Sélectionnez Play
 (Lecture).
 - Revenez sur la feuille.
- Attendez que la case soit décochée sur votre ligne.
- Lorsque c’est fait, retournez dans Bridge.
- Relancez la lecture du flux de travail.
- Pour voir si la case est à nouveau cochée, retournez sur la feuille.
Maintenant que les deux flux de travail ont terminé leurs actions avec succès, il est temps de configurer le déclencheur pour exécuter le flux de travail quotidiennement.
Répétez chaque étape de configuration si le flux de travail ne s’exécute pas comme prévu. Assurez-vous que tous les champs et références de données apparaissent comme indiqué.
4. Configurer le déclencheur de flux de travail
- Dans l’outil de création de flux de travail, sélectionnez le module Trigger (Déclencheur).
- Développez le panneau Schedules (Planifications).
- Choisissez Add a new schedule (Ajouter une planification).
Choisissez une heure pour exécuter le flux de travail chaque jour.
Toutes les heures sont sur le fuseau horaire UTC. Assurez-vous de les adapter aux besoins de votre processus.
- Choisissez une future date de début pour votre flux de travail.
- Dans la liste Frequency (Fréquence), choisissez Daily (Tous les jours).
- Enregistrez le déclencheur.