Learn how to import data from files to sheets and reports.
USM Content
You can import data from the following applications into a new sheet:
- Microsoft Excel(XLS, XLSX, and CSV)
Microsoft Project (.mpp, .mpx, .mspdi, and .xml)
Microsoft Project has some features, such as constraints, that aren't supported in Smartsheet and may cause rows to be out of order when importing .mpp files. To resolve this, save the .mpp file as .xml and import the new .xml copy. If the issue persists, contact our support team.
- Google Sheets
- Atlassian Trello board
For information on automating data imports, see Create an upload workflow in Data Shuttle.
For successful import, files must meet the following criteria:
- 50 MB maximum file size limit
- You can import up to 20,000 rows, 400 columns, or 500,000 cells simultaneously.
Formulas aren't preserved. Due to formula syntax differences between Excel and Smartsheet, imported Excel formulas might not function in Smartsheet.
To work around this, store the source sheet formulas as text by removing the equal sign before the formula and then save the sheet. Once in Smartsheet, you can add the equal sign back and modify the syntax to make the formula work.
How to import data to create a new sheet
There are several ways to import your data; the access point is what varies.
From +Create
- Select +Create on the left navigation bar.
- Select Import. The source application listing appears in the menu.

- Select the source application to import from. Smartsheet prompts you to locate and upload the file from your computer.
- After you've uploaded your file, name the new sheet and select its Primary column.
- Select Import.
From an existing workspace
- In the left bar, navigate to Home > Workspaces.
- Select the workspace where you want to house the new item. This opens the workspace panel.
- Select +Add to workspace at the top of the workspace panel
- Hover over Import and select the file type you want to import.

- Select Browse or drag and drop the file you want to import into the Import panel.
- Review the messages displayed, verify all your desired columns are selected, or unselect those you don’t want to import.
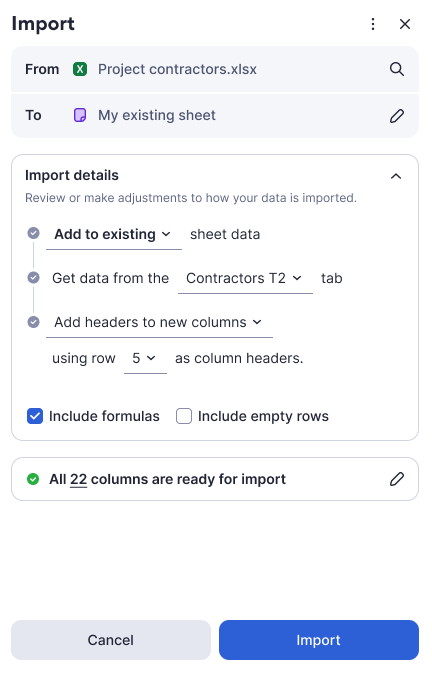
- Select Import to complete or Close to cancel the import.
How to import data into an existing sheet
You can also import data into an existing sheet; just keep in mind that imported data overwrites the existing data.
- Open your sheet in Table View.
- Select the three-dot menu to the right of your sheet name, then select Import.
The Import panel opens on the right.
- Select Browse or the tool from which you want to import data and follow the prompts. You can also drag and drop the file into the import window.
- Verify all your desired columns are selected, or unselect those you don’t want to import.
If your sheet already contains data, importing a file overwrites it.
Review the messages displayed. Select Import to complete or Close to cancel the import.
Brandfolder Image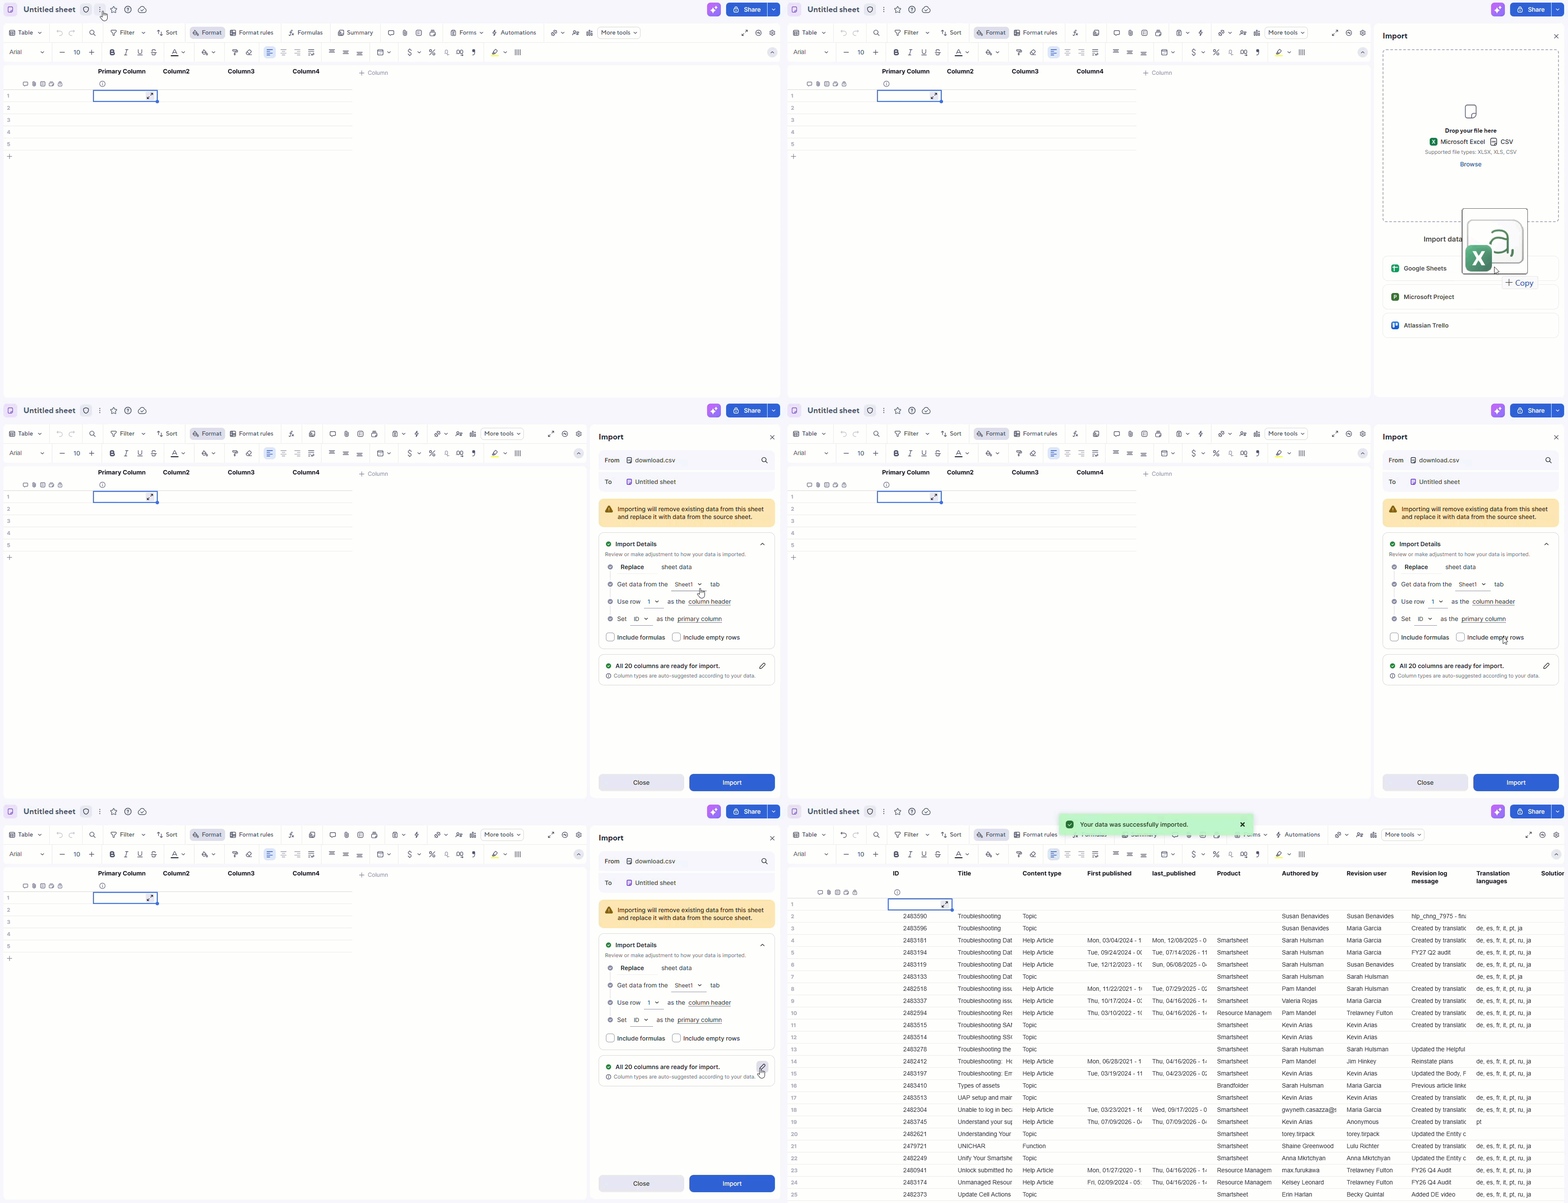
You may need to manually adjust the sheet after it's imported to make it look and function as you want.
How to import multiple sheets from a Microsoft Excel workbook
Only an Excel workbook's first (left-most) worksheet tab gets imported. Look at the bottom of your Excel workbook to see if you have multiple tabs.

Follow these steps to import data from multiple tabs:
- Import data from the leftmost tab by importing the workbook.
- Return to the Excel file, select a tab, and drag it to the left to move it into the leftmost position.
- Save the Excel file and import it again into Smartsheet. This creates a new sheet based on the information in the tab you just moved to the left-most position.
- Repeat the process until you've created a sheet for each workbook tab you want.
In Smartsheet, organize all the new sheets into a folder or workspace.
What to expect when you import an Atlassian Trello board
You can import 5,000 cards or 50 lists from an Atlassian Trello board into a new sheet. If your cards include cover images, note that there’s a cumulative 10 MB limit for importing these image files.
Select the board you want to import and select OK to create a new sheet with the imported data. By default, the sheet displays in Card View.
The import creates the following columns (seen in Grid View):
- Task Name: A text/number column of the Trello card names.
- List: Contains the Trello board list names. List names appear as column set names in Smartsheet's Card View.
- Members: A dropdown list of the Trello board member names (names of the people with whom the Trello board was shared).
- Due Date: If you've set a due date for a card, it will appear in the field in the Due Date column, which is formatted as a date column.
- Description: Description text from the Trello board will be included here. This column will be formatted with a text/number column.
Additional columns and information on the cards will be included depending on what was included in your Trello Board.
Archived cards will not be imported from Trello.
Are there data exclusions when importing data?
Some source items, particularly unsupported items, are excluded from import and may require adjustment.
- Merged cells are excluded.
- Cell borders are excluded.
- Sheets other than the first (left-most) one in a workbook are excluded. See the Import multiple sheets from a Microsoft Excel workbook section below to work around this.
- Drop-down lists for data validation are excluded. You can recreate them.
- Unsupported formulas are replaced by an #UNPARSEABLE error message. To work around this, prepare the source formulas before import. In the Before you import section, see the Formulas aren't preserved note for the workaround.
- Images from an external file are excluded.