Add new projects to your portfolio and activate them to automatically provision a project workspace with all the items from your selected template.
USM Content

Before you start
Every project you create in a portfolio uses a project template. The project template defines the structure and items (sheets, dashboards, reports, and others) that appear in each new project workspace when you activate a project.
You can use the Standard template included with your portfolio, which includes common project items such as a dashboard and a RAID log. You can also create a custom project template from scratch or bring in an existing workspace as a project template.
Set up your project template before you start adding projects. Any changes you make to a project template apply only to projects you activate after the change. Existing project workspaces don't update automatically.
Create a portfolio
There are multiple ways to create a portfolio:
- From the Create menu. Select +Create in the left navigation bar, then select Portfolios.
- From Home. Go to the Portfolios tab on Home. If you don't have any portfolios yet, a prompt appears to create one.
- From an existing workspace. Save a workspace as a template and use it to create a new portfolio or add it to an existing one.
Add a project to your portfolio
You can add a new project directly from the list view. Your Project List helps you keep track of your active and inactive projects.
To add a project to your Project List, do the following:
- Open your portfolio.
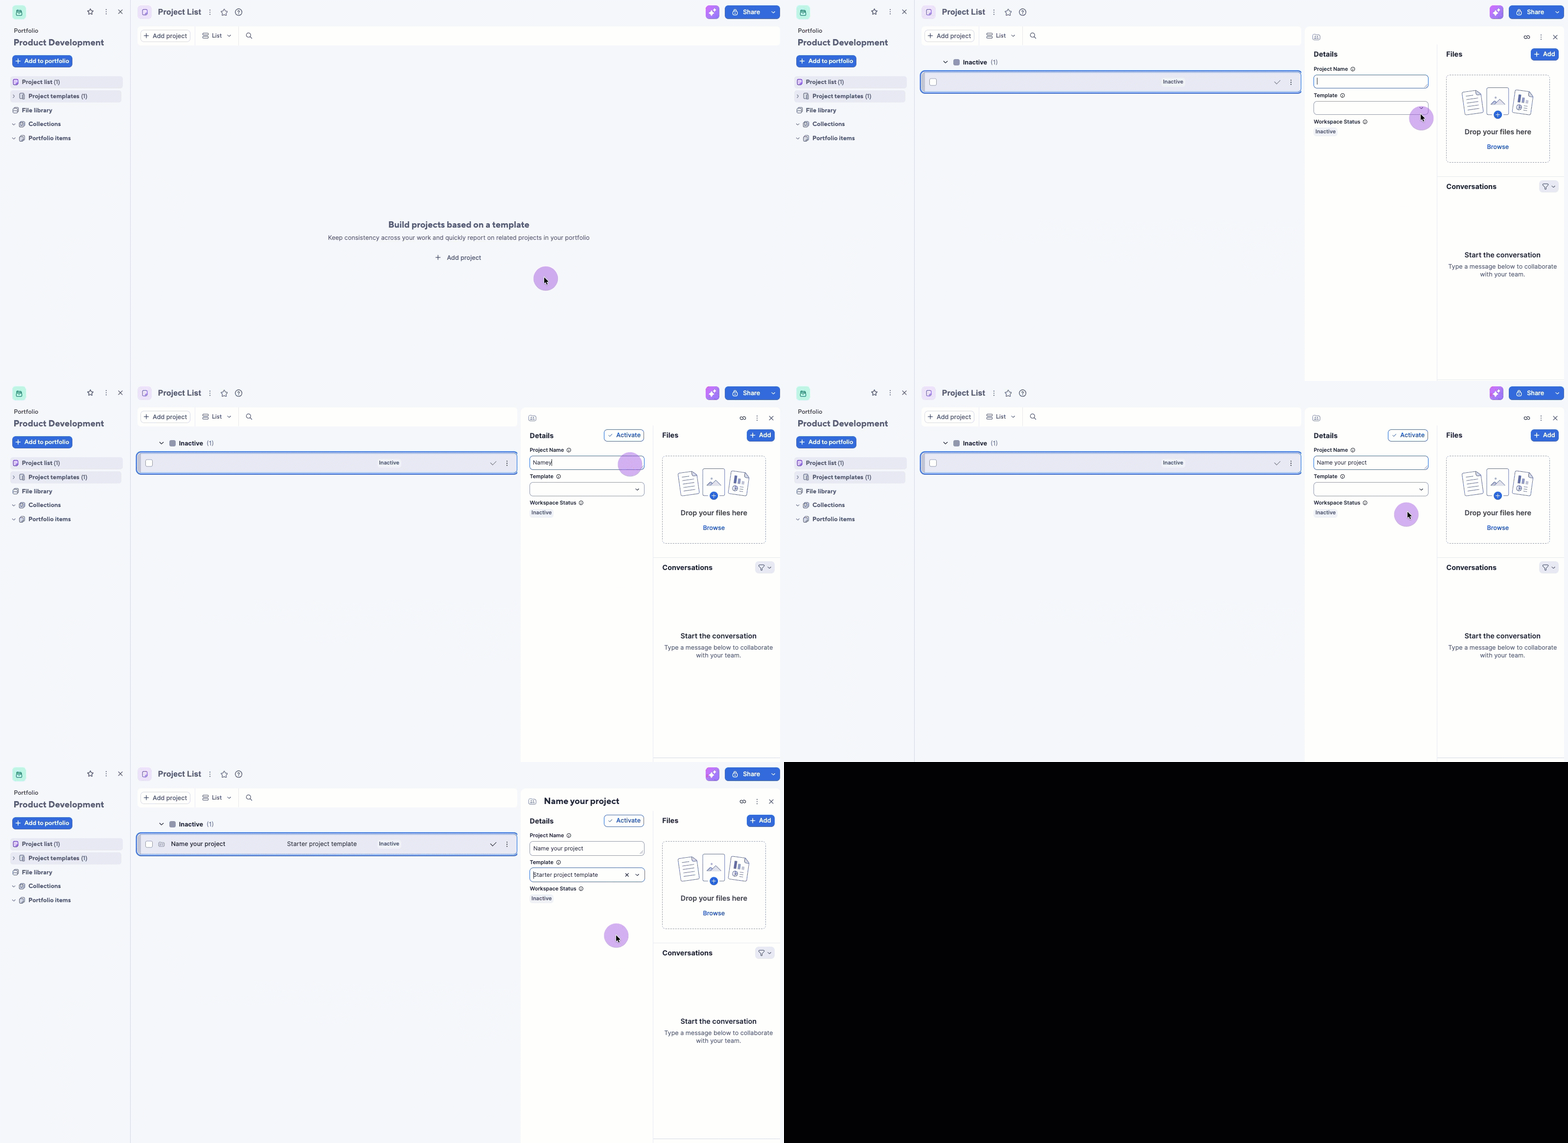
- Select +Add project in the toolbar at the top of the project list. An untitled project appears in the Inactive group of your project list.
- Select the project row to open the Details panel on the right.
- In the Details section, fill in the following:
- Project name — Enter a name for your project. This name is also the workspace name when you activate the project.
- Project template — Select a project template from the dropdown. The project template determines which items (sheets, dashboards, reports, and other items) are part of your project workspace.
- Project leads — Select a project lead from your contacts. Assigning a lead grants them Admin access by default. You can include multiple leads (up to 20) for a single project.
The Details panel lets you quickly access and edit all your project information, including attachments and comments, as well as adding or removing project leads.
You can create a form using the project list as the underlying sheet. Use the form to gather project data as part of your intake workflow, then approve, provision, and share projects directly from the project list.
Activate the project
Activating a project provisions a new workspace containing all the items from the selected project template.
- Select the project row to open the Details panel.
- Select Activate.
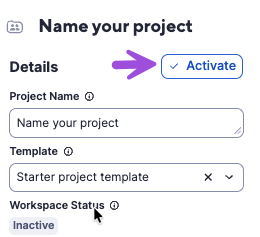
You can also activate a project without opening the Details panel. In the Project List, hover over the project you want to activate, then select the checkmark icon.
To open a project workspace, select the link in the Project Name column.
Understand the project list view
The project list view is specific to portfolios, and it's designed for quick project management. You can use it to provision, delete, and share projects.
Projects are grouped by status: The Active group for activated projects, and the Inactive group.
Active projects show a status in the Workspace status column, and the Project name appears as a hyperlink. Inactive projects show a blank Workspace status column, and the Project name appears as plain text.
The Project name, Project template, and Workspace status columns are system columns and can't be deleted.
Select the hyperlink under Project name to open the Details panel, where you can see and edit additional project information.
To access more data about your projects, switch to a different view (Table, Timeline, and Board) using the view switcher in the toolbar. Other views display additional columns where you can collect and review detailed project data that isn't visible in list view.
The Project List doesn’t support Grid, Gantt, and Card views.
List view is the only view where you can provision, delete, and share projects. These actions aren't available in other views (Table, Timeline, and Board).
Things to consider
- Each activated project creates a new workspace. The workspace inherits the project name, but individual items within the workspace retain the names defined in the project template.
- Rename items in the project workspace to make them easier to identify in reports.
- Activated projects appear in the Active group of the project list. Projects you haven’t activated yet appear in the Inactive group.
- The project list uses the list view, which is specific to portfolios. You can also switch to table view to see all columns and additional project data.
- You can’t add a contact as a project lead if they aren’t part of your organization's safe sharing list.
- If you’ve already shared someone to the portfolio, you don’t need to add them as a project lead to specific projects.
- Adding someone as a project lead shares them only to the selected project. To provide access to all projects, share them to the portfolio.
- There's no way to deactivate or archive a project at this time. This capability is planned for a future release.
- To keep change management sustainable, we recommend that your portfolios contain up to 5 templates and 100 projects, and that your workspaces contain up to 100 items.
- File library items in a template don't copy over to newly provisioned projects.
- The Workspace status column also tracks whether you’ve provisioned a project.