USM Content
Smartsheet columns have special properties that make using your sheet easier and more powerful. Columns define your data types in Smartsheet and unlock powerful functionality like views, forms, automation, filters, reports, and more. To learn more about how to select the appropriate column type for your data, review the information in this learning topic.

Column types
USM Content
Primary column
Each sheet features a primary column whose value describes each row. By default, it's a Text/Number field.
You can't change its type or delete it.
Other default columns
There are columns between the row number and the primary column that you can use for the following purposes:
- Attachments: Add attachments to the row, or view the row-level attachments.
- Comments: Add a comment to the row, or view the row-level conversations.
- Proof: Add a proof to the row, or view the row-level proofs.
- Row Action Indicators: Check reminders, locked rows, and allocation alerts associated with the row. Or add an update request.
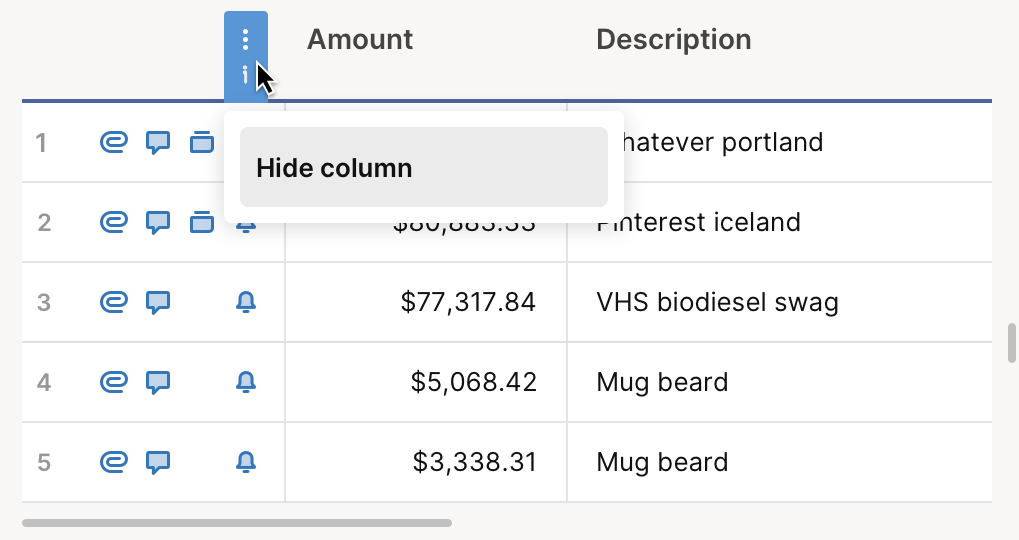
If you don't need any of the above columns, you can hide them. To hide a column:
- Hover your pointer over the header.
- Select Hide Column.
Configurable columns
Configurable columns are those you can modify according to your needs. These are the column types you can edit:
- Text/Number
- Contact list
- Date
- Dropdown list
- Checkbox
- Symbols
- Auto-Number
- System
- Latest comment
- Duration
Text/Number
In a text/number column, you can add texts, numeric values, or both. Use a Text/Number column for comment columns that have long entries or number-focused columns.
You can apply text or numeric formatting to the values in this column.
When the first character in a cell is a zero, followed by another digit or letter, Smartsheet automatically adds an apostrophe at the beginning of the value. This is done to ensure that the leading zero is preserved and displayed with the number. If you want to store the value as a number for calculations, you can double-click the cell to edit it. After that, remove the apostrophe and any leading zeros.
Contact list
In a contact list column, the only acceptable values are: contact name, email address, and name.
Only email addresses can work with automation or other contact-specific features. Other data is considered free text.
Use this column to:
- Assign rows to collaborators who are shared on a sheet or to contacts from your Smartsheet Contact List.
- Send reminders to shared collaborators.
- Generate reports listing tasks assigned to a specific team member.
If you allow multiple contacts per cell, you can select up to 20 contacts in one cell.
Add a contact
Type a contact name or email address in a cell. As you type, the list displays matching contacts from:
- Collaborators shared to the sheet.
- Contacts/email addresses assigned to other rows in the sheet.
- Contacts from your Smartsheet Contacts List.
- Contacts found in User Roles and Reports (User Management in the legacy model) in Admin Center.
If the list doesn't display matching contacts, you're most likely typing a name or email address that isn't in your contact list. To fix this, add them to your contact list by:
- In the contact list column, select a cell, then choose the dropdown arrow.
- Select Add New.
In table view, select Add contact and use the pencil icon to edit the contact.
- Type a name and an email address.
- Select OK.
Once you've added the contact, you can assign them to the row.
Remove a contact
To remove names or email addresses from the auto-resolve dropdown list, remove them from the other cells in the column and the Edit Column Properties form.
People shared to the sheet always appear as suggestions when you type in a contact list column.
Specify preferred contacts
You can restrict the available values in a contact list column to a set of contact values.
- Hover your pointer over the column header.
- Select Column Menu
 .
. - Choose Edit Column Properties.
- Enable Restrict to list values only.
- In the Add Contacts search bar, type and select a contact name or email address.
- Optional: To add or edit the contact name, hover over their email address. Then, select Edit Contact.
- After adding the contacts, select Ok.
After setting up your preferred contacts, you can see them as options in the contact list column. The same is true if you use the same contact list field in the sheet's corresponding Smartsheet form.
Remove a contact
You need to remove the contacts from the cells in the column and from the Edit Column Properties form.
If you added contacts to preferred contacts and now want sheet respondents to manually add them, you have to remove them:
- Hover your pointer over the column header.
- Select Column Menu
.
- Select Edit Column Properties.
- Hover over the contact.
- Select Remove Contact > Ok.
Date
Use this column to input date entries. You can also use date columns to enable dependencies or display items in the calendar view. To input dates, do any of these steps:
- Select a cell. Then, select the calendar symbol in the top corner of the cell.
- Type a date in a cell.
- Use keyboard shortcuts to populate the cells.
The dates appear in the format set up in your Smartsheet account's personal settings.
Dropdown lists
This column displays a list of values you can select. If you're a sheet Owner or Admin, you configure the dropdown list column to let users input either single or multiple values.
To enable multiple entries in the dropdown list column
- Hover your pointer over a column header.
- Select Column Menu
.
- Choose Edit Column Properties.
- Turn on the Allow multiple values per cell toggle.
After making it a multiple-entry column, you can input multiple values through either of these steps:
Type the values you want to appear in the list.
Or ,
- Select checkboxes if the values are restricted.
Press Enter or Return to separate each list item onto a separate line.
To remove an item from the dropdown list, select it and then press the Backspace or Delete key.
For more information about dropdown list columns, see Maintain Consistency in Data Collection with Dropdown Columns.
Duration
Use this column to:
Input task duration.
Or,
- Calculate duration in days using start and end dates.
Checkbox
The column offers a checkbox you can select or clear. You can display the checkbox as a box, flag, or single star. The checkbox appears in the cell only after you enter a value in another column in that row.
Symbols
The symbol column displays a visual image you can use to describe a row's status. You can select different symbols. However, you can't add your own (custom) symbols to the column.
Auto number
Auto number columns generate values for every row in the sheet that contains data. You can use this column when you want to assign the following without manually typing them in:
- Row IDs
- Part numbers
- Invoice numbers
- Customer numbers
- Other unique ID references
Learn more about auto number columns.
System
These are the different system columns and the information they record:
- Created by: Who created each row
- Created date: When each row was created
- Modified by: Who last modified each row
- Modified date: When each row was last modified
When you set them up, system column cells are initially empty: the values are generated when you save the sheet.
Latest comment
Use this column to show your team's latest comment/feedback without opening the Conversations pane.
Learn more about the latest comment column.
Duration
Duration represents the amount of time a task is expected to take. For more information, see Project sheet columns: Duration.