The workflow triggers when a checkbox is checked in a sheet in Smartsheet. It uses coordinates from that row to get the latest weather forecast from the US Weather Service and then populates the same row in Smartsheet with that data.
You'll use the US Weather Service to get forecasts since you don't need an account to access their weather data.
To get the forecast, you must make two API calls to the US Weather Service:
- One to locate the grip point a geographical location is in.
- A second one to get the forecast for that identified grid.
You don't need to be comfortable with API calls to follow the steps in this guide, which provides everything you need to complete the workflow.
These are the steps to build the workflow:
- Create the workflow
- Create the sheet
- Authenticate with Smartsheet and set up the trigger
- Set up Get Row
- Set up the junction
- Set up the first API Call
- Set up the second API Call
- Set up Update Row
Step 1: Create the workflow
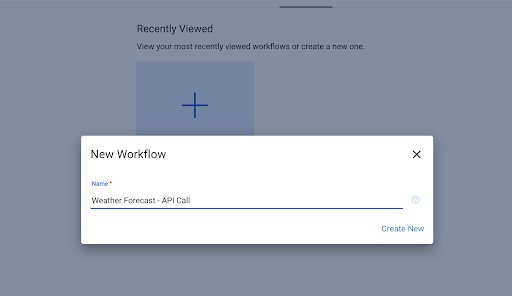
- In Bridge, select New Workflow from the Workflows dashboard.
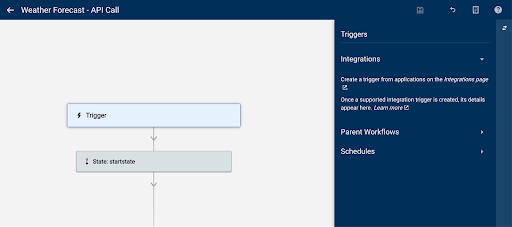
Give your workflow a name and select Create New. This takes you to the Designer.
All workflows start with a trigger and a state.
Step 2: Create the sheet
Before setting up the trigger in Bridge, you need a Smartsheet sheet with at least five columns.
Set up your sheet to have the following column names and types:
| Column name | Column type |
|---|---|
| Date | Date |
| Today | Checkbox |
| Longitude | Text |
| Latitude | Text |
| Weather Forecast | Text |
The Weather Forecast column can be your Primary Column or a regular Text column.
In the first cell of the Today column, paste the following formula:
=IF (Date@row = TODAY (), true, false)
- Select Enter. This checks the checkbox if the data set in the Date column is today's date, which you can then use to trigger your workflow in Bridge.
- Right-click the cell with the formula and select Convert to Column Formula. This ensures that all new rows added to the sheet use that formula in the Today column.
- Save the sheet.
- Before returning to the Designer in Bridge, copy the sheet ID. You can find the sheet ID by going to File > Properties.
Step 3: Set up the trigger
In the Designer, select the Trigger element at the top of the workflow. This opens a panel on the right-hand side of the Designer where you can set up the type of trigger you want to use. Since the workflow should be triggered by an event in Smartsheet, the type of trigger used is an Integration Trigger.
In the panel, select Integrations Page under the automatically expanded section Integrations.
This opens a new tab with the Integrations page.
- Find Smartsheet and select the logo.
- Select Continue.
- Select Authenticate.
- This brings up another window asking if you want to allow Bridge access to your Smartsheet account. Select Allow.
If the authentication is successful, the window changes to the Triggers tab.
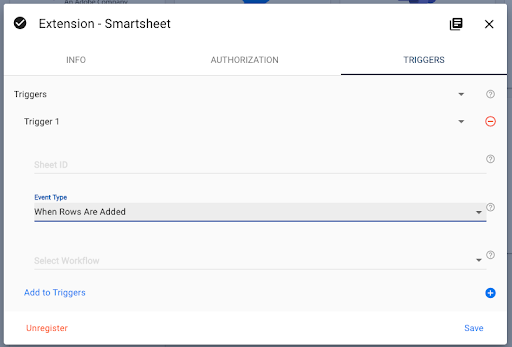
Expand the Triggers section and select the row with the plus icon:
- In the Sheet ID field, paste the sheet ID you copied when you created the sheet. If you know the sheet name is unique, type it in.
- In the Event Type drop-down list, select When Column Values Are Changed.
- In the field that is added when you select the Event Type, type in the column name Today.
In the drop-down Select Workflow list, choose the workflow you created earlier, and select Save.
You can tell the trigger was set up successfully because the pop-up will reload and collapse the Triggers section.
- Close the tab and go back to the Designer.
Errors when saving the trigger
If you receive an error message when saving a trigger, review the following items:
- Ensure you spelled the column name exactly as you did in the sheet.
- If you typed in the sheet name instead of using the sheet ID, check that you spelled this precisely the same.
- If you're not the sheet owner, check your sheet permissions to ensure you still have access.
- If other triggers are already set up, a different trigger may cause an issue. Review the other triggers to ensure that one of them didn't have permissions changed or that the sheet referenced in the trigger still exists
Step 4: Set up Get Row
You've set up the trigger to run the workflow when changing the Today column, this action will now send some basic information to Bridge. For the first step of your workflow, you must retrieve some of this initial information:
- Set the date cell on the first row to today's date. This automatically checks the box in the Today column because of the formula you entered earlier.
- Save the sheet and go back to the Designer in Bridge.
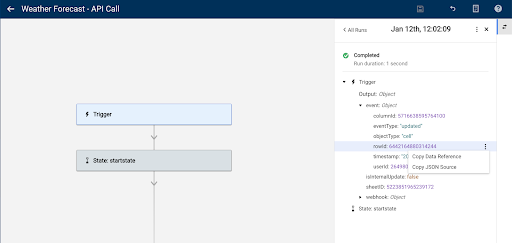
- Open the Run Log. It will be empty at first, so select Refresh. This will update the panel; one run should appear with the status Completed.
- To reveal the initial data sent to Bridge from Smartsheet, select on the run, expand the row Trigger, and then the row Event.
- Hover over rowId in the trigger data and select the more icon to reveal a drop-down list.
In the drop-down menu, select Copy Data Reference. This copies a reference to the row ID that changed to your clipboard.
Using the reference rather than the JSON source, the workflow always gets the changed row instead of always looking at the same row. This is important as the row changing will probably differ between each workflow run.
Update the state and add a module
Select the gray state and change the Name field to Get Row.
It's good practice to name the states according to what the modules below them do to make your workflows easier to read.
- Find the module Get Row in the left-hand menu. Use the search field or find it by expanding Integrations > Smartsheet > Get Row.
- Drag the module into the workflow under the gray state. A panel to set up the module opens automatically.
- In the Row ID field, paste the reference you copied from the rowId in the Run Log. The pasted value should read {{runtime.event.rowId}}.
- To get the sheet ID, open the Run Log again and expand the trigger data to find it. Copy the reference to the sheet ID as you did for the row ID earlier by selecting the more icon.
- Select the Get Row module again and paste it into the reference in the Sheet field. The pasted value should read {{runtime.sheetID}}.
Select Save at the top of the page.
Brandfolder Image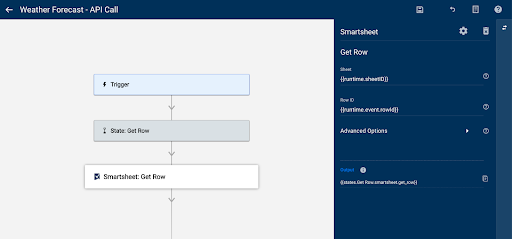
Step 5: Set up the junction
You need to determine if the change to the checkbox in the sheet was because the box was checked or unchecked. An unchecked box should be ignored; however, if the box changes to checked, it means the date set in the Date column is today's date, and you want to collect the weather forecast.
To do so, you need to reference the cell with the checkbox:
- Return to the sheet and change the date in the row you added earlier to uncheck the box. Then, save the sheet.
- In Bridge, open the Run Log again and select All Runs at the top left of the panel. Refresh the list to see a new completed run at the top.
- Open this new run and expand the step Smartsheet: Get Row to reveal the row data.
- Under row > cells > Today, you can see that the value is false. This tells you that the checkbox in the Today column was unchecked in the row that changed.
- Using the drop-down, copy the data reference of this value.
Add a Match conditional junction
The next step is to add a junction to check if the value matches the text values true (checked) or false (unchecked).
- In the search field, type in Match or expand Utilities > Conditional Junctions > Match to find the junction.
- Drag the junction under the Get Row module and name it Today's Date.
This junction consists of three components: the junction itself and two placeholder states. You can find more states to drag into the workflow at the top of the left-hand menu under Pinned Items > New State.
Add states to the junction
- Drag a new state into the success placeholder and name it true.
- Drag another new state into the failure placeholder and name it false.
Add the data reference to the junction
- Select the junction Today's Date to open the setup panel.
- Paste the reference you copied earlier into the First Value field.
The pasted value should be {{states.Get Row.smartsheet.get_row.row.cells.Today.value}} - In the field Second Value, type in the word true.
Save what you've created so far.
Brandfolder Image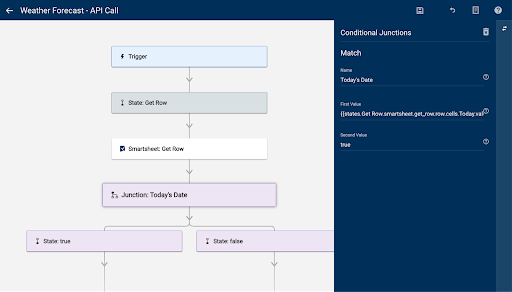
Step 6: Set up the first API call
Set up a profile for your API calls
To retrieve weather forecast data, you must first create a profile for your API calls to the US Weather Service. Profiles are a way to save essential information for the system APIs to which you want to connect your workflows.
- In your Bridge account, navigate to the Integrations tab.
- Select the Call API utility.
Select Continue > Add to Profiles.
Brandfolder Image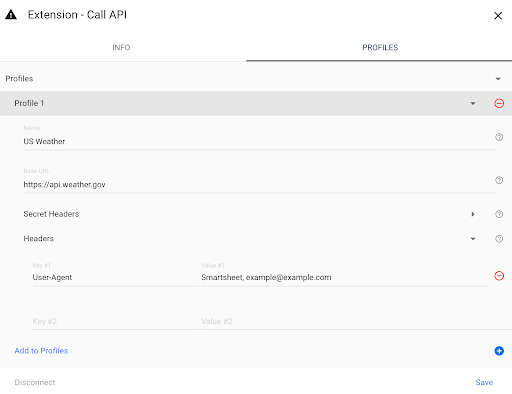
- Name your profile. Each profile name must be unique. For example: US Weather.
- In the Base URL field, enter https://api.weather.gov.
- Expand the Headers drop-down:
- In the Key #1 field, enter User-Agent.
In the Value #1 field, enter your company name and email, separated by a comma.
The US Weather Service requires this so they can contact you if they see unexpected activity or behavior in their logs.
- Save the profile.
- Return to your workflow.
Set up the Make API Call module in your workflow
The first API call identifies the grid point of a location entered in the sheet.
- Use the search field to find the Make API Call module or by expanding Utilities > Utility Functions> Make API Call.
- Drag it into the workflow under the true state.
- In the Make API Call module, select the profile you just created from the drop-down menu.
- In the Endpoint field, include the following points: points/{{states.Get Row.smartsheet.get_row.row.cells.Longitude.value}},{{states.Get Row.smartsheet.get_row.row.cells.Latitude.value}}
- Set the Method to GET.
Save the workflow.
Brandfolder Image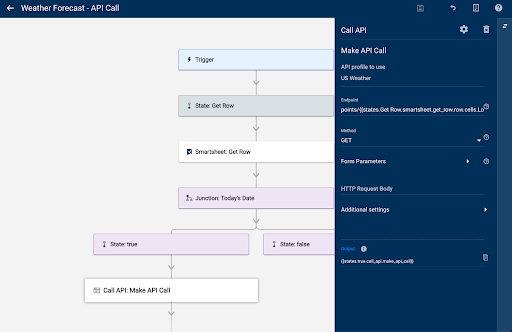
Data references for the grid call
The URL above is created for you since understanding how API requests work is optional for this guide. This URL references the longitude and latitude values on the row that triggered the workflow.
If you want to get these, you must trigger the workflow again. This time, you need to make sure the checkbox gets checked. Add information to a new row rather than using the first one, and make sure to set the date to today's date so that the workflow goes down the left branch of the junction.
Coordinates
The US Weather Service requires a maximum of four decimal places for the coordinates.
Required step
It would be best to have coordinates to enter them into the Longitude and Latitude fields. For example, you can use 47.6174 and -122.2001 to get the weather for Smartsheet's Bellevue office.
Step 7: Set up the second API Call
The second API call retrieves the forecast from the US Weather Service based on the previously located grid points. Add a new state and another Make API Call module to the workflow to set this up.
- Drag and drop a new state from the pinned items at the top of the left-hand menu, and name it Get Forecast.
- Then, drag another Make API Call module under the new state.
- In the Make API Call module, select the profile you just created from the drop-down.
- In the Endpoint field, include the following: gridpoints/{{states.true.call_api.make_api_call.response.properties.gridId}}/{{states.true.call_api.make_api_call.response.properties.gridX}},{{states.true.call_api.make_api_call.response.properties.gridY}}/forecast
- Set the Method to GET.
Save the workflow.
Brandfolder Image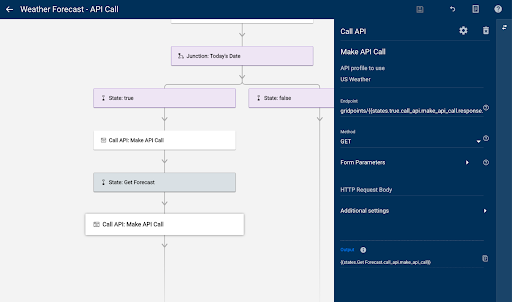
Data references for the forecast call
If you want the data references used in the endpoint above yourself, trigger the workflow again. Ensure the row changed or added has today's date so the checkbox changes to being checked.
When you've created the new row and saved the sheet, find the last run in the Run Log and expand the last step: Call API: Make API Call. Under Output > properties, locate the fields gridId, gridX, and gridY. You can then use these references in the URL to call the weather service.
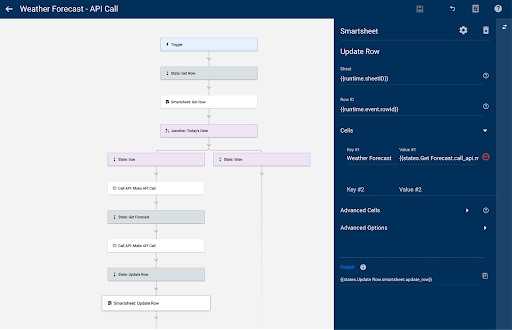
Step 8: Set up the Update Row
Now that you can get weather data with the workflow, the last step is to update the sheet with the forecast.
Add the sheet and row IDs
- Trigger the workflow again. Ensure the row changed or added has today's date so the checkbox changes to being checked.
- Add another state under the last API call module and name it Update Row.
- Search for the Update Row module or expand Integrations > Smartsheet > Update Row.
- From the Run Log, expand the Trigger of the last run and locate the sheet ID and row ID values.
- Use the data references to set Sheet ID and Row ID fields for the Update Row module.
Add the detailed forecast data reference
- Return to the Run Log and expand the last step (the last of the two Make API Call modules). The US Weather Service data, including seven-day weather forecasts, provide a range of information.
- Find the current weather under Output > properties > periods > 0.
- For this workflow, you want to use the reference to the detailedForecast. Copy the data reference.
- Open the Update Row module again and expand the Cells section.
- Paste the reference into the Value # field. The pasted value should read: {{states.Get Forecast.call_api.make_api_call.response.properties.periods.0.detailedForecast}}
- Enter the Weather Forecast column in the Key #1 field.
- Save the workflow.
If you want to ensure the workflow doesn't fail if the US Weather Service cannot return information, you can adjust the data reference in the Value # field to: {{states.Get Forecast.call_api.make_api_call.response.properties.periods.0.detailedForecast||Unable to fetch weather data}}
This ensures that the module updates the row with the text after the symbol '||' if there is no data in the detailed forecast.
Completed workflow
Your workflow runs anytime you add a new row (either going down the junction's left or right branch). It also runs anytime today, the date set on an existing row. The Weather Forecast column in your sheet automatically populates if the workflow goes down the left branch of the junction or if the Today box is checked.