Read about the different ways you can track time, how to choose what hours & fees are incurred, along with how certain account-wide settings (official holidays) can impact your organization’s availability.
Time tracking settings in Resource Management
In Resource Management, you can track time in three different ways. Each option offers different levels of flexibility and detail. Choose what makes the most sense for your organization, depending on your company’s culture and reporting needs.
To change your time tracking settings, navigate to Account Settings.
- If you are working in Resource Management in Smartsheet, select the kebab menu in the top right corner, then select Account Settings.
- If you are working in standalone Resource Management, select Settings > Account Settings.
Hours and minutes: Precise, efficient tracking
Hours and Minutes time tracking allows people to enter the exact time spent on each project or phase. Your people can confirm the suggested hours for the days they work according to the plan, or enter their own hours. Day View includes a timer in for more precise time entries.
This setting gives your team the ability to track and report on actual time spent per project.
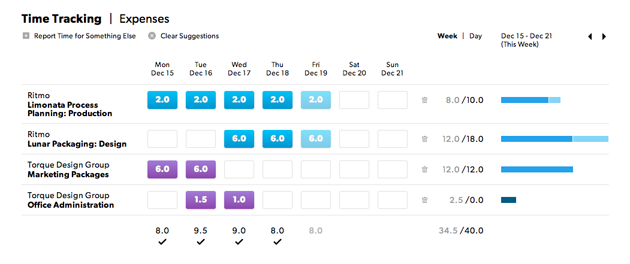
½ days: Fast, high-level time entry
½ days works best for teams with little variation in their daily activities, when people are working on one or two projects at a time. Enter time n 4-hour increments. The Confirm Suggestions button makes entering time an easy, one-click process.
![]()
½ days won’t provide the accuracy you get with the other time tracking settings, but if you’re looking to keep time entry as efficient as possible, ½ days works well.
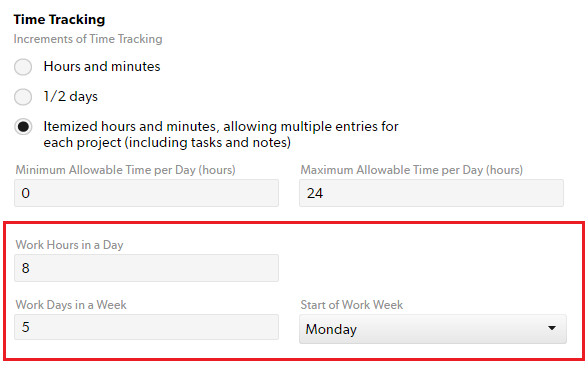
Itemized hours and minutes: Additional details and reporting options
Itemized time entry provides the most detailed time entry. People can categorize their time and add notes. Project managers can budget by category within a project, providing an additional layer of reporting.
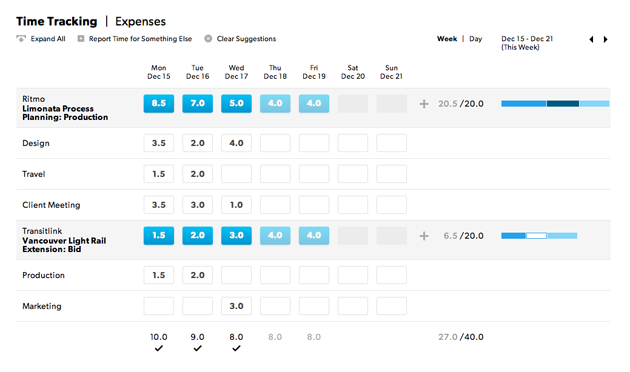
Use Itemized Time Tracking to break down time into specific activities (meetings, travel, etc.).
Customize activities in Settings > Time + Fee Categories. Day View includes a timer in for more precise time entries.
When you set up itemized time tracking, you can select Require a category entry when entering time. Use this setting for billing clients or other projects that require detailed time entry information.
Requiring a category with each time entry deactivates the option to bulk confirm suggested hours for a given day.
Other time tracking settings
You can also set:
- Minimum and maximum allowable hours to track per day
- Work hours in a day
- Workdays per week
- The day your work week starts
When people enter fewer hours than the minimum for a day, a warning reminds them the entry is incomplete. When people enter more hours than the maximum for a day, a notification lets them know they’ve exceeded the maximum.
Hours entered are considered confirmed even if they don’t follow the guidelines established in your Account Settings.
Approval workflow
Enable the approvals workflow (including bulk approvals) in Account Settings.
To ensure users can not add any time or expenses to approved entries, enable the setting that automatically locks time and expense entries upon approval. This is done in the approvals Workflow Section of Account Settings.
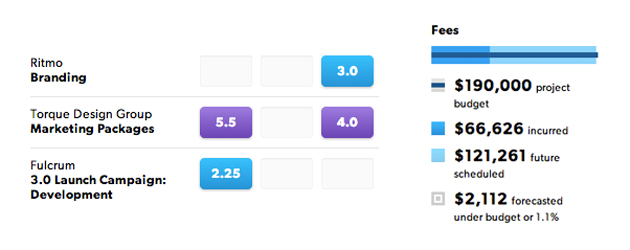
Tracking project progress
You can see a project’s progress in time (days or hours) or currency amounts (fees and expenses). This information appears on the project page, under Status.
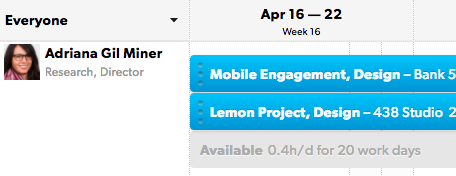
Availability and allocation
In Account Settings, select percentage (%) or hours per day. This setting determines how availability appears on the schedule. It's the default method for how people get allocated when assigned to projects.
Availability and allocation appear on the schedule below projects as hours per day.
You cannot restrict time tracking for specific projects or users at this time. However, approvals could be used to ensure time tracking is accurate.
Select a default time tracking method
To set time tracking for your account:
- Open Account Settings.
- If you are working in Resource Management in Smartsheet, select the kebab menu in the top right corner, then select Account Settings.
- If you are working in standalone Resource Management, select Settings > Account Settings.
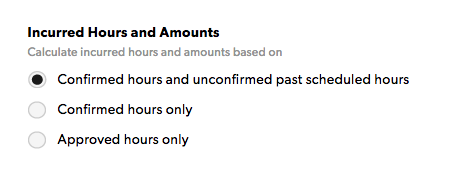
- Scroll down to Incurred Hours and Amounts.
You can mix time tracking; you are simply choosing a default setting for your projects. You can still request your team submit their timesheets according to a project’s requirements.
Track confirmed and unconfirmed past scheduled hours
When you track confirmed and unconfirmed hours, you focus on the time allocated for the work. Hours still appear as suggestions on timesheets. Your team may still submit timesheets, which allows you to track how they spent their time. However, this is not a requirement for you to track the project.
The schedule—which you may update as the project progresses—remains your source of information.
To use this method, select Confirmed hours and unconfirmed past scheduled hours in Account Settings. Incurred time will include both confirmed and unconfirmed hours from timesheets.
If you track confirmed and unconfirmed hours, consider setting the Incurred Period to include past days only. This will ensure incurred time and fees include only historical data.
Track confirmed hours
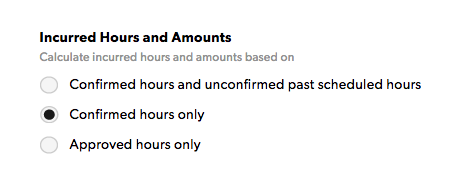
When you track confirmed hours, your team reports all hours worked and submits regular timesheets.
Hours reported are incurred; you can use these hours to calculate how much of your budget you’ve spent.
Hours assigned on the schedule appear as time entry suggestions on a person’s timesheet; each person can confirm or change their hours when they submit a timesheet. Confirmed hours appear as incurred time or fees under Project Status.
Hours from timesheets show up on Project Status.
If you track confirmed hours, consider setting the Incurred Period to include past days and today. This provides the most up-to-date information about incurred time and fees.
Track approved hours
Approved hours treat only those hours that have been through the approval process as incurred. Resourcing Admins need to enable approval workflows in order for approved hours to appear.
Use Approved hours if you’re invoicing clients on an hourly basis, or you need to meet audit compliance requirements.
Incurred hours do not include future hours, even if they’re approved. Reports will only show hours worked.
Configure holidays and weekends
By default, a work week in Resource Management is five days. The work week begins on Monday, making Saturday and Sunday nonworking days.
Your team could work a four-day workweek for members unavailable Friday through Sunday, or you could have some team members working every day of the week. Some companies consider Friday and Saturday as nonworking days and Sunday as the start of the work week. You can adjust the length of the work week based on your needs.
Set your work week
- Open Account Settings.
- If you are working in Resource Management in Smartsheet, select the kebab menu in the top right corner, then select Account Settings.
- If you work in standalone Resource Management, select Settings > Account Settings.
- Scroll down to Time Tracking.
- Enter details for your work week in these fields:
- Work Hours in a Day
- Work Days in a Week
- Start of Work Week
- Select Save.
On the Schedule page, nonworking days appear as light gray vertical bands. Resource Management doesn’t include nonworking days (official holidays or weekends) in availability calculations.
Manage holidays
Official holidays
Official holidays occur at all locations and appear as non-working days.
Before you begin
Part-time availability takes priority over official holidays. For example, if you work with a part-time employee whose schedule falls on an official holiday(s), the worker appears as available on the holiday.
To make the part-time employee appear unavailable on an official holiday, remove their part-time availability schedule on that day.
- Open Account Settings.
- On the left menu, select Official Holidays.
- Enter the details for the holiday.
- Select Add.
You have to add holidays one at a time. You can not add them in bulk.
Regional holidays
For events that affect only certain locations, create a Leave Type (for example, Regional Holiday) and assign it as needed.
- Open Account Settings.
- On the left menu, select Leave Types.
- Enter the details for the holiday/leave type.
- Select Add. Once you add a new leave, it appears as an Assignment option.
Workdays with leaves aren’t automatically subtracted from the budget. Any time dedicated to Leave is considered available time.
Remove project assignments that overlap with regional holidays
You can’t undo the removal of overlapping assignments. Double-check your schedule before you make this change.
- Select the assignment, and then select Allocation.
- Select Remove overlapping assignments.
Configure leave types and official holidays
Resourcing Administrators can configure leave types and official holidays.
Leave types
Add leave assignments the same way you would add project assignments.

Non-working days and official holidays
You can indicate days of the year that your entire organization does not work. Resource Management excludes non-working days (official holidays and weekends) from your project budget by default. No time sheet suggestions appear for non-working days.
Non-working days appear on the Schedule as light gray vertical bands, which show how project timelines overlap with weekends or holidays.
Set official holidays
- Open Account Settings.
- If you're working in Resource Management in Smartsheet, select the kebab menu in the top right corner, then select Account Settings.
- If you're working in standalone Resource Management, in the top-right of the screen, select Settings > Account Settings.
- Select Official Holidays.
- Name the holiday, select the date, and then select Add.
Edit a holiday
Select the row, make changes, and then save your changes.
Delete a holiday
Select the row, and then select Delete.
Create non-billable people
You must have Resourcing Administrator permissions to add or update user profile information.
- Go to the profile page for the non-billable person, and then select the Edit Profile button.
- In Utilization Target %, enter 0.
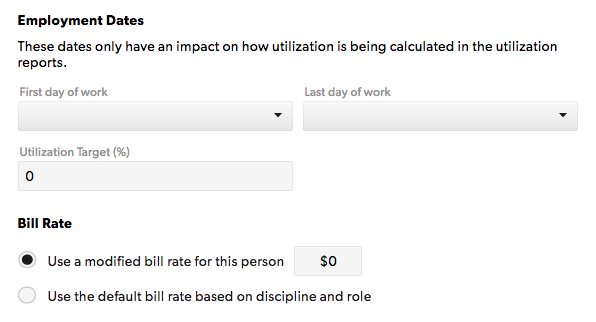
- Scroll to the bottom, and select the Save button.
On the Schedule, under People Filters, you can filter by billable or non-billable.