In the Admin Center, System Admins can add and edit users individually or in bulk, generate reports, and more.
In the Admin Center, you can:
- Add and edit users individually or in bulk
- Generate various user reports
- Transfer Owner permissions of items
- Revoke access to your account’s shared Smartsheet items from external users
- Define the roles and user types
As a best practice, be sure to assign more than one System Admin to your account in case the primary System Admin isn't available. Learn more about user types.
Select your account icon and then select User Management (Legacy Collaborator Model) / User Roles and Reports (User Subscription Model).
If you're unsure about your model type, learn how to determine the model your plan is on.
Bulk actions
Refer to the articles below to learn how to:
To bulk-update premium app permissions
- Select More Actions > Bulk Update Premium App Permissions…
- Select Generate User List. The list will go to your email.
- Open the email and download the .csv file.
The file shows all your users and a column for each user role.
- To grant a role to a user, enter TRUE into the cell for that role.
- To remove a role, type FALSE into the cell for that role.
Group Admins or Resource Viewers must be paid users.
- Save your updated file and upload it to the drag-and-drop box on the Bulk Update Premium App Permissions window.
- Select Update to apply the changes.
Access additional controls
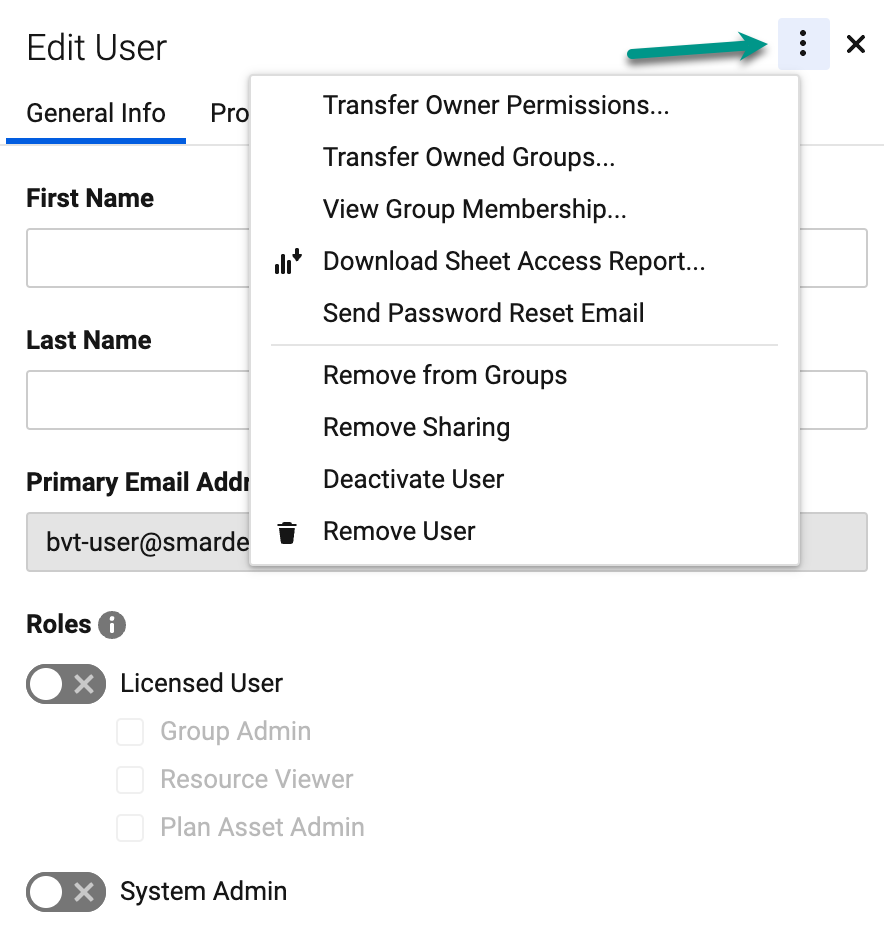
Select at the top right of the Edit User form to access additional actions for the user.
| Use this option | To do this |
|---|---|
| Transfer Owner Permissions... | Transfer the user's Owner permissions on Smartsheet items to another user in your plan. For more information, see Change Owner permissions of a sheet, report, or dashboard. |
| Transfer Owned Groups… | Transfer the user’s Owner permissions on groups to another user in your plan. |
| View Group Membership... | See the names of all contact groups the user is part of. You can also remove them from specific groups or view the group details. |
| Download Sheet Access Report... | Download a CSV of all the sheets that the user is shared to within your Smartsheet account. |
| Send Password Reset Email | If you have Email + Password authentication enabled, send the user a link to reset their password. |
| Remove from Groups | Remove the user from all groups in your account. |
| Remove Sharing | Remove the user's sharing access to all sheets, reports, dashboards, and workspaces in your plan on which they don't hold Owner permissions. |
| Deactivate User | Revoke a user's access to Smartsheet. Content managed by the user is retained within its existing sharing structure and System Admins can transfer Owner permissions of assets as needed. See Remove, deactivate, or reactivate users. |
| Remove User | Remove a user’s access to your Smartsheet plan. System Admins should transfer Owner permissions of assets as needed. See Remove, deactivate, or reactivate users. |
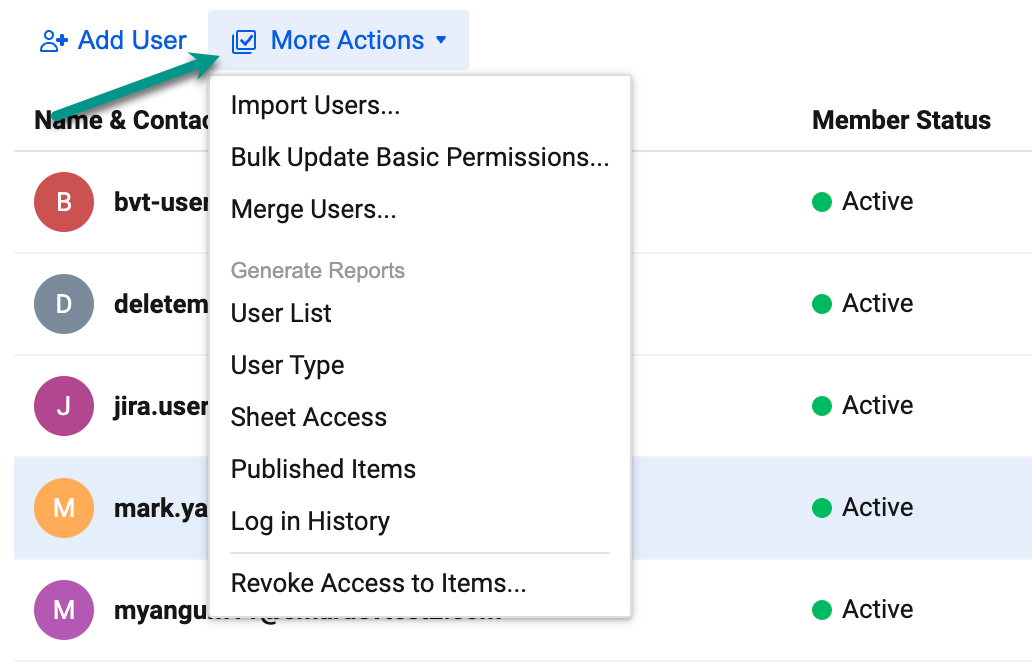
More actions in User Management / User roles and reports
The screen name is User Management for plans on the Legacy Collaborator Model and User roles and reports for plans on the User Subscription Model.
Select More actions in the top left to do the following:
| Use this action | To do this |
|---|---|
| Generate Reports > User List* | Creates and emails a report of all users and their associated roles in your account. |
| Generate Reports > Sheet Access | Creates and emails a report of all users shared to sheets in your account, including their sharing permission levels. This includes external collaborators not found in user management. |
| Generate Reports > Published Items | Creates and emails a report of all published items in your account. |
| Generate Reports > Login History* | Creates and emails a report of the last six months of login history for all users in your account. |
| Revoke Access to Items | Remove an email address from sharing on all items in your account. This can be a member of your account or an external collaborator. |
*Last login reports the time a user initiated the session.
You can search for users or apply filters using the options at the top-right of user management. You can sort the user list by name in alphabetical ascending or descending order by selecting the Name & Contact column header.