Approvals can be used to manage your organization’s time and expenses.
Activate the approvals workflow
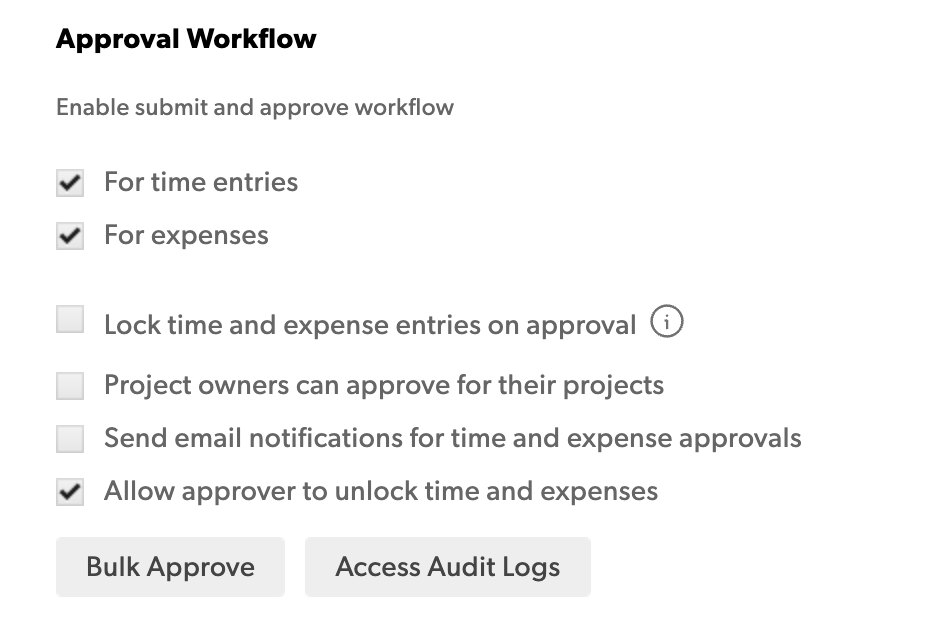
Resourcing Admins can set up approvals for time and expense entries for their organization. In Account Settings, navigate to the Approvals Workflow section.
- If you are working in Resource Management in Smartsheet, select the kebab menu in the top right corner, then select Account Settings.
- If you are working in standalone Resource Management, select Settings > Account Settings.
Here you can:
- Enable the approval workflow for time and expenses
Lock entries upon approval
You need to have this setting enabled in order to ensure users cannot add any additional time or expenses after entries have been approved. Without this setting enabled, users cannot edit any approved time or expenses, but they can add additional time or expenses to approved entries.
- Allow project owners to approve time and expenses for projects they own
- Set up email notifications for time and expense approvals
- Allow the approver to unlock any submitted time and expense entries
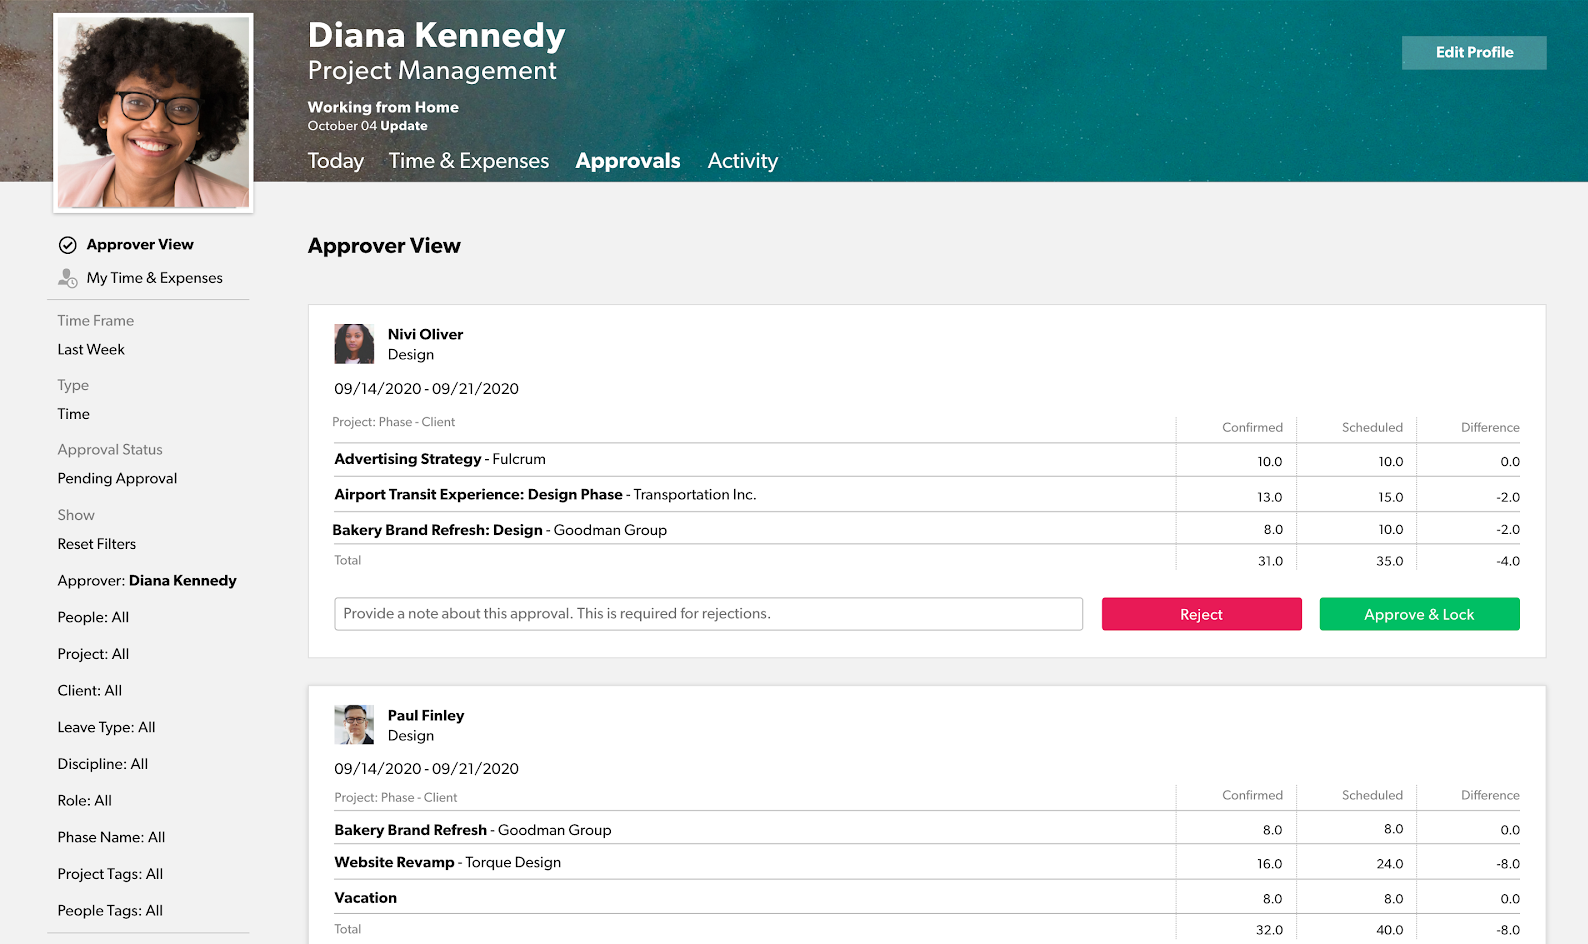
Approver view
Set who approves time and expenses in the person's profile settings.
To go to the approver view,
- Select My Work (your profile page).
- Select the Approvals tab.
- In the left pane, select Approver View.
If you're an approver, you'll see this view by default. Project editors see this view by default when project owners are approvers.
Approvals as a project owner
You can configure Resource Management so that project owners can review and approve time and expenses for projects they own. If you are a project owner, you will see time sheets for time related to your projects but won't see time entered for projects owned by others.
You can filter the time sheets you see by the following categories:
- Time frame: View time sheets by this year, this quarter, this month, this week, last year, etc.
- Approval status: View time sheets by their current approval status
- Rejected: Time sheets you didn't approve
- Approved: Time sheets you approved
- Pending approval: Time sheets users have submitted for your approval
- Unsubmitted: Time sheets users have accessed but haven't edited the value or accepted the schedule
- [none]: Time sheets of users who haven't yet taken action on the schedule you assigned them
- Approver: View time sheets assigned to you or other approvers
- Project owner: Filter time sheets by their project owners
- People: View time sheets of specific users
- Project: View time sheets associated with a specific project
- Client: View time sheets of users assigned to a specific client
- Discipline: View time sheets by the nature of users' work (for example: HR, IT, etc.)
- Role: Filter time sheets by the users' role (for example: manager, copywriter, etc.)
- People tags: Filter time sheets by the users' People Tags
- Phase name: View time sheets associated with a specific project phase
- Project tags: Filter time sheets by their project category
- Leave type: Filter time sheets by the users' leave types
- Skills: Filter time sheets by people's skills
The approver view groups the time entries into weekly time sheets. Each time sheet shows hours tracked for each project per person per week.
You can see the total confirmed and scheduled hours for each project, along with a computed difference (positive for more than scheduled, negative for less than scheduled).
Resources that submit time against a project are not visible to the Project Owner unless the Resource is added to the project as a team member and has submitted time against the project. Please ensure you have added that resource as a team member to your project in order to approve time.
Project Owners can not view time submitted by resources assigned to other projects unless they have Portfolio Editor permissions or higher, or the project owner is mapped as a resources approver, or the Resources are added to the project as a team member and have submitted time against the project. Please ensure you have added that resource as a team member to your project in order to approve time.
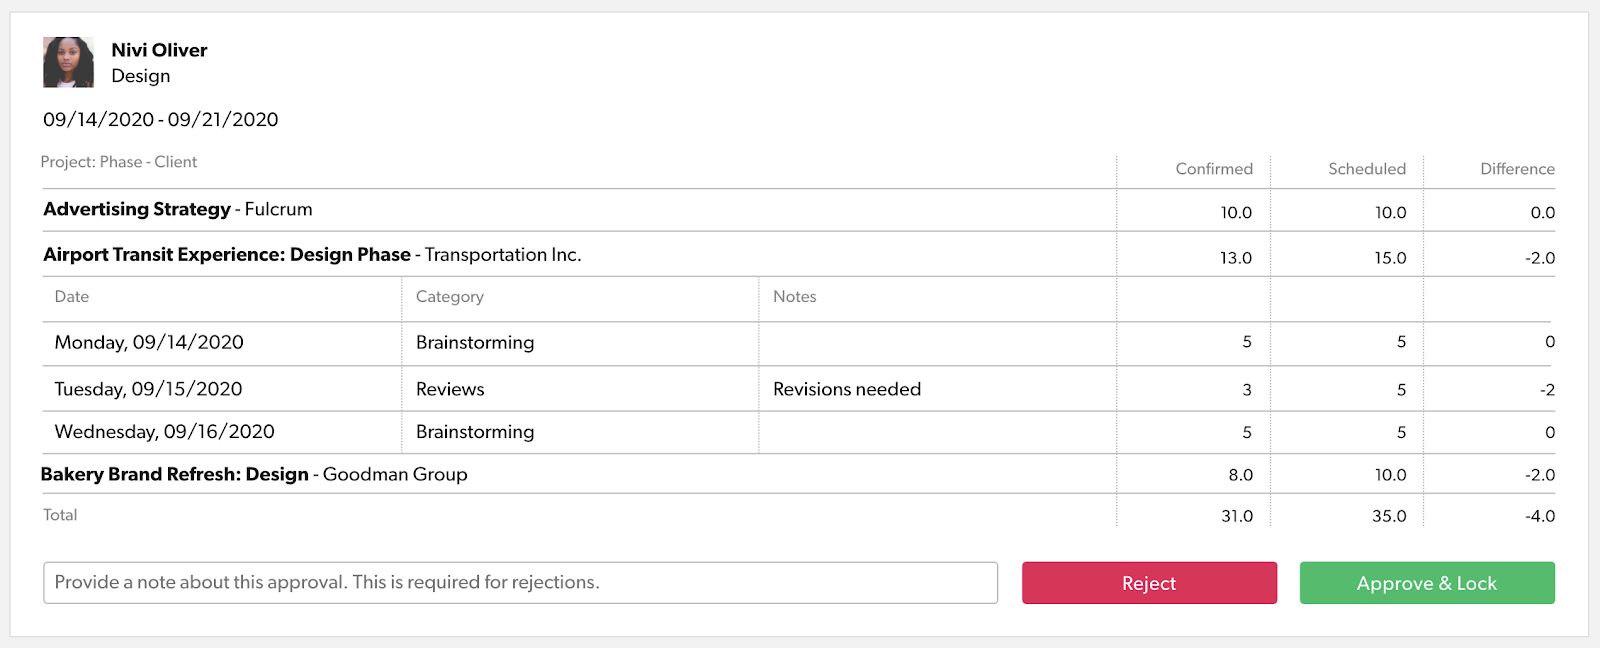
View time and expense details
You can view more details in the time sheets you see in your approver view.
| To do this | Follow this step |
|---|---|
| To do this Check the day-by-day breakdown of hours, including categories and notes. | Follow this step, Follow this step In the time sheet, select a project row. |
| To do this View the detailed breakdown of expenses, including categories and notes. | |
| To do this Go to a person's profile page and view their time entries. | Follow this step Select the person's name. |
Filter time or expense sheets
You can approve time for specific projects rather than the entire time or expense sheet. To display time entries for a specific project or set of projects and approve them:
- In the left pane, use the project or project tags filters.
- After setting up those filters, you'll see only time sheets for projects or project categories you selected.
- In the time sheet, select Approve & Lock.
Entries for other projects you didn't select in the filter won't be affected
To approve time or expenses
Use notifications to alert people when their time or expense entries get rejected or approved.
At the bottom of the time sheet, select Approve & Lock to approve the time or expense entry.
To ensure users can not add any time or expenses to approved entries, enable the setting that automatically locks time and expense entries upon approval. This is done in the approvals Workflow Section of Account Settings.
To reject time or expense sheet
- In the lower-left area of the time or expense sheet, enter a note in the text box.
- If you reject the time entry without leaving a note, you'll be prompted to leave a note.
- Select Reject.
After rejecting the time or expense sheet, it will be reset to Unsubmitted. The submitter will need to adjust their time or expense entry and resubmit it for approval.
Use my views
Create a saved view or multiple saved views for different scenarios.
When you create a saved view, you'll see the view you created in the My View section. You'll then be able to access them easily.
To create a saved view
- Go to the Approvals tab.
- In the left pane, select Approver View.
- In the left pane, adjust the desired time frame, approval status, and other filters.
- Scroll up to the My Views section.
- Select + Save Current View.

