USM Content
Legacy Resource Management (RM) is no longer available for new users. If you already use Legacy RM, your data won't change and you can continue to access your resource views. Also, Resource Management by Smartsheet is available to all new customers; learn more here.
With Legacy Resource Management, you can track and review how people are allocated across all of the projects they are working on to adjust and make better decisions about workloads. Owners and Admins can modify the sheet project settings.
This article is about enabling Legacy Resource Management at the sheet level. If you want to enable Legacy Resource Management at the plan level, see the Global plan settings article.
Here's an overview of how legacy resource management works (note that the bullet points below offer links to other help articles):
- System Admins: Set up resources and resource viewers in your plan with User Management.
- Enable resource management in the Dependency Settings of your project sheet
- Use project-specific and cross-project resource views for a high-level visual of your resource allocation
- As you assign tasks to other users on your plan, Smartsheet will alert you when a resource is overbooked, and you can manage the resource allocation percentage per task so they can work on multiple things simultaneously
- People designated as Resource Viewers can also access resource views to see how all Smartsheet team members are allocated across tasks in a sheet, or even across tasks in all project sheets
This feature isn't available for Pro plans. Not sure which plan type you have? See Identify your Smartsheet plan and user or seat type.)
Set up people on your plan as resources
Only people that have been added to your plan can be tracked by resource management. To ensure that the right people are included in the plan, a System Admin can use the User Management page to review, add, and manage users.
Set up Resource Viewers
To see how people are allocated across projects, you must be a designated Resource Viewer. Any System Admin can set this up in Account > User Management. Note that you must be a user on a plan to be a Resource Viewer.
If you would like to view resources, contact your Smartsheet System Admin. For more information, see Admin Center: Add, edit, or deactivate users.
Enable Legacy Resource Management to make decisions about workloads
Sheet owners and team members on the same plan that are shared to the sheet with Admin-level permissions can turn on resource management in the sheet so that resource viewers can track and make decisions about workloads.
To turn on Legacy Resource Management in an existing project sheet:
- Ensure that your sheet has a Contact List column so that you can assign resources to tasks. (More information on this in Assign People to a Task.)
- Type contacts into the Contact List column to assign team members to each task.
- Click the dropdown arrow below any column header and select Edit Project Settings. Verify that the Dependencies Enabled checkbox is selected.
Select the Resource Management tab. The Resource Management form appears.
Note: Are you using Resource Management to manage resources? Learn more about tracking resource allocation in Resource Management here.
- Check the box for Legacy RM and designate your Assigned Resource column by selecting a Contact List column from the dropdown.
- Click OK.
Tasks assigned to team members in this sheet will now appear in resource views. Review Assign People to a Task for instructions, tips, and best practices.
Notes
- Parent tasks assigned to your resources will not be included in resource views because parent tasks summarize their children. For more information about this, see our articles about Hierarchy: Indent or Outdent Rows and Parent Rollup Functionality.
- Formulas can't be used in the Contact List column being used for resource management. You can, however, reference resource management fields in formulas that are placed in fields not being used for resource management.
Track and allocate resources
Resource Viewers can see cross-project resource views from Browse in the left panel and from project-specific views from within project sheets.
See Resource Views from Browse (Navigation Menu)
- Click the Menu icon (upper-left corner of the Smartsheet window) > Browse.
- Click Resource Views.
- Select the resource view that you'd like to display.
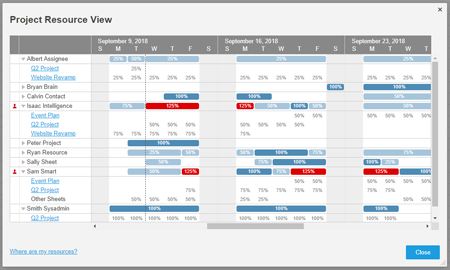
From here, you'll be able to do the following:
- See a red icon on overallocated people and red bars on the overallocated days
- Expand each resource to see all of the projects they are assigned to
- Click to open a project to resolve allocation issues
- Click Edit to view resources by project, user, or group
- Save a New View for a custom view of select people or projects
NOTE: If you’re not shared to a project sheet that a resource is assigned to, you'll see "Other" instead of the project name.
See Resource Views from a project sheet
To open the Project Resource View for a sheet, switch to Gantt View, and then select the Resource View icon ![]() in the upper-right corner of the Gantt View.
in the upper-right corner of the Gantt View.
NOTE: If you don’t see the Resource View icon, contact your Smartsheet System Admin to become a Resource Viewer.
A red allocation alert icon ![]() will alert you when people are overallocated in the project. As a resource viewer, you can click the allocation alert icon to open the Project Resource View which lists the sheets where resources in your project are assigned tasks.
will alert you when people are overallocated in the project. As a resource viewer, you can click the allocation alert icon to open the Project Resource View which lists the sheets where resources in your project are assigned tasks.
TIP: If a resource is overallocated, select their name to review their allocation by project. Click a sheet name to open any sheets you’re shared to. If a user is over-allocated, consider re-assigning some tasks to another resource or adjusting the allocation of the task.
Allocate Resources
Allocation is the percentage of each day that resources should devote to a particular task. By default, Smartsheet assumes tasks require 100% of the assigned resources’ day when you assign a task to resources, and you can adjust this percentage by entering a new value into the cell.
When a resource is assigned multiple tasks on the same day which cause their total allocation to exceed 100%, Smartsheet will show the red allocation alert icon in the Row Action Indicators column. Hover over the icon to see the details of the alert and navigate to the resource view.

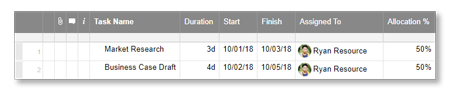
Specify an Allocation % column in the Project Settings if you’d like to specify allocation percentages less than 100% so that your resources can work on multiple tasks per day. For each task, the resources you assign will be allocated at the percent you specify.
To allocate a resource across two or more tasks, you’ll need to create an Allocation % column:
- Insert a text/number column in your project. Name it so that you know it will be used as the Allocation % column.
- Format the Column Properties to percent (%). See Formatting Options for more details.
- Navigate to Edit Project Settings > Resource Management and choose your new column as the Allocation % column. To edit the project settings, you can right-click any column header to select Edit Project Settings from the menu.
- Change allocation for overlapping tasks: for example, change allocation to 50% for two simultaneous tasks.
The allocation alert icon won't appear on over-allocated rows if the end date for the task occurs in the past, but it will appear in resource views.
If you’re allowing multiple contacts to be assigned to a task, the allocation percentage for the task will be applied to all of the assigned resources. If you want to assign each resource to the same task with different allocations, you can list the same task on multiple rows in your sheet and assign each duplicate task to a different person. See Insert or Delete Rows or Tasks for more information.