Use Project Settings in grid and Gantt views to define working days, non-working days, and holidays at the sheet and account levels.
USM Content
Project settings are now sheet settings in table, board, and timeline view. In sheet settings, you can define the month that starts your fiscal year, the day that starts your week, the number of hours in a workday, working days, and non-working days (including company holidays). Learn more about working with sheet settings.
Keep this in mind about non-working days and holidays:
- Non-working days and holidays are excluded from duration calculations.
- If you view your Gantt view in days, Smartsheet highlights non-working days in grey and holidays in pink.
- Tasks and milestones can start on non-working days and holidays, but can never end on such days.
Working days, non-working days, and holidays at the sheet level
Use Project Settings to set the length of working days (in hours), designate days of the week as non-working, and specify holiday dates.
Project settings only appear on sheets that have dependencies enabled.
Follow these steps to edit your working days, non-working days, and holidays for your sheet:
- Select the Project Settings
Brandfolder Image
 gear icon in the Gantt view header, or right-click on any column header in grid or Gantt view, and select Edit Project Settings.
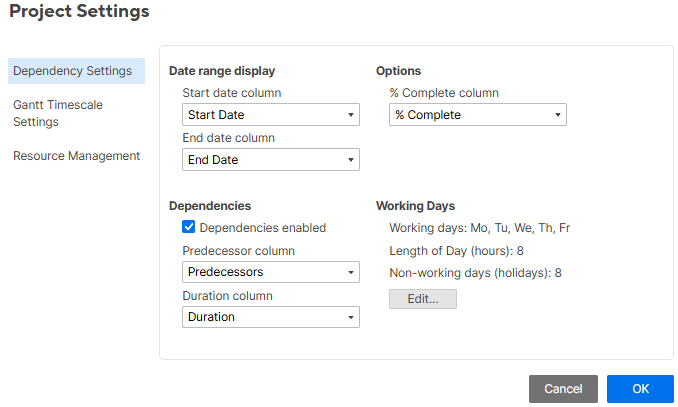
- In the Working Days section, select Edit.
- Select the checkbox for each weekly working day, and leave the checkbox blank for each non-working day.
- In the Length of Day (hours) field, enter the number of hours per working day. By default, Smartsheet 8 hour workdays.
- In the Non-Working Days (holidays, exceptions) section, enter specific dates of any non-working days or holidays.
- Select OK.
If a task's start date is a non-working day or holiday, Smartsheet considers that day a working day for the task regardless of the settings.

Working days, non-working days, and holidays at the account level
If you're a System Admin on a Business or Enterprise plan, follow these steps to set and manage your account's working days, non-working days, and holidays.
- Select your user icon and then select Admin Center.
- Scroll down to the Working Days box and select Working Days.
- In the Working Days section, select the days of the week.
- In the Length of days (hours) box, enter the number of hours.
- In the Non-Working Days box, denote holidays and exceptions by using the date picker or entering dates in the format shown in the image above.
Keep in mind
- If a task's start date is a non-working day or holiday, Smartsheet considers that day a working day for the task regardless of the settings.
- Your selection applies to all new sheets users added on the plan. Your changes don't affect existing project sheets.
- New sheets created from templates always inherit the template's working days regardless of the settings for account-level working days.
You can learn more at Admin Center capabilities.