You can create, move, and delete items when you manage content in a workspace.
Once you’ve created a workspace, you or anyone with Admin-level sharing permissions can create new items, move items in or out, or delete items from the workspace.
You must be a user on a plan to create new items or move items out of a workspace.
Create a new item in a workspace
You must be an Admin or the Owner of the workspace to create a new item. Once you create an item, it gets saved to the workspace and all collaborators shared to the workspace can access it.
Collaborators have the exact same view of the workspace that you have, including the folder structure and sheets it contains.
- On the left navigation bar, select Home. From Home, select the workspace name from the Suggested or All workspaces lists. This opens the workspace panel.
- On the top left, select Add and select the item (such as Sheet, Report, Dashboard, and more) that you want to create in the workspace.

Move an existing item to or from a workspace
You can move any item that you own to or from a workspace. You must be an Admin or the Owner of the workspace.
- On the left navigation bar, select Browse.
- In the left pane, navigate to the item that you want to move.
- Select the name of the item and drag it to the desired workspace.
Moving an item into a workspace automatically shares it with everyone who can access that workspace, while maintaining sheet-level sharing permissions.
Move an item out of a workspace
You must have appropriate sharing permissions to the workspace to perform this action.
- On the left navigation bar, select Browse.
- In the left pane, navigate to the item that you want to move. The items in the workspace (for example, the sheets, reports, and dashboards) appear in the middle of the screen.
- Select and drag the item into your Sheets directory in the left pane or to a workspace where you have permission to add items.
If you move a folder, you also move all of its contents.
Removing an item or a folder also removes sharing from all workspace members, but retains sheet-level sharing permissions.
When you move an item or a folder out of a workspace, you become the new owner of the items that you move.
Delete an item from a workspace
You must have appropriate sharing permissions to the workspace to perform this action.
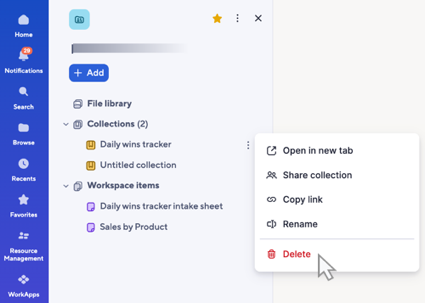
- On the left navigation bar, select Home. From Home, select the workspace name from the Suggested or All workspaces lists. This opens the workspace panel.
- Select the item that you want to delete.
- To delete the item, select the three-dot menu and select Delete.
Deleting a folder also deletes the sheets, reports, templates and subfolders it contains.
Reports in workspaces
Anyone with Admin permissions to a workspace can delete and rename the reports it contains. If you delete a report from a workspace, you can recover it for 30 days from the sheet owner's Deleted Items folder. Admins can see the item in their folder, but don’t have permission to recover the item.
Deleted sheets, reports, and templates go into the Deleted Items section of the owner's Browse tab. You can recover items in Deleted Items for up to 30 days.
Access forms in workspaces
There are three ways in which you can access forms:
Search
Open the Search icon on the left rail and search your form by name.
Forms menu
In your sheet, select Forms > Manage Forms…
Workspaces
Open the workspace panel and find your forms under their associated sheet to perform any of the following actions:
- See, select, and load the form
- From the Form menu within the workspace panel:
- Open the form in a new tab with the published form URL
- Copy the published form URL directly from the workspace
- Select Edit to open up the form in builder mode
Use the navigation header to navigate between the submission page, the form builder, and the sheet where you’re storing form responses

