Use this Bridge workflow to delete a row from your sheet on a specific condition. When this workflow runs, it grabs all the data in the row from the source sheet and then deletes the row.
Prerequisites
- A sheet
- The source sheet ID.
- A checkbox column that indicates when to delete a row. In this example, we’re using a checkbox column named Delete with Bridge.
- Bridge
- Smartsheet integration
- When Column Values Change trigger
- Bridge workflow modules:
- Smartsheet—Get Row
- State (optional)
- Smartsheet—Delete Row
Get started
To build this workflow in Bridge, authenticate the Smartsheet Integration for your Bridge workspace. Read the steps on how to set up the Smartsheet integration for Bridge.
While building your workflow, keep your sheet and your Bridge workflow open in two separate tabs. This makes navigating the build process easier.
Construct the basic workflow model
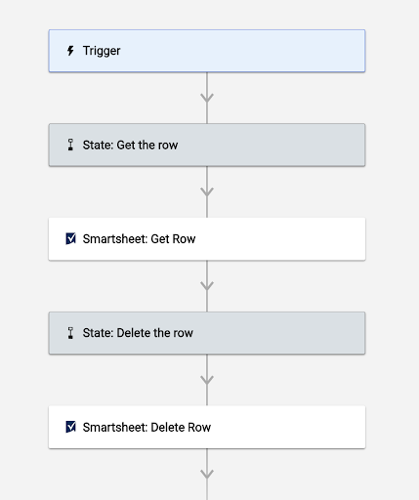
Before everything else, pull all the modules you need for the workflow.
- Create a new workflow in Bridge.
- In the workflow builder, use the panel to add modules in this order:
- Smartsheet—Get Row
- State
- Smartsheet—Delete Row
- Save the workflow.
This is what your workflow looks like:
Set up the workflow trigger
After creating the basic workflow model, start setting up the workflow trigger:
- Select the Trigger module.
- To open the Integration panel in a new tab, in the Integrations section, select Integrations Page.
- Locate Smartsheet from the integration list. Use the Connected option under the Bridge logo to get a list of only the integrations authenticated for that workspace.
- Expand the Triggers row.
- To create a new trigger, select .
- Fill in the following fields:
- Trigger Name: Create a custom label for your trigger.
- Sheet ID: Paste the sheet ID for your source sheet (where we’ll pull row data from).
- Event Type: Select When Column Values are Changed.
- Column Name or ID: Type the name of the Smartsheet column that will trigger your row deletion. For this example, we’re using the column Delete with Bridge.
- Select Workflow: Select the new workflow you just created from the dropdown list.
- Select Save.
- Return to your workflow. If you want to return to the original tab, refresh the page to see the trigger.
Test the trigger
We want to test the trigger before starting the module setup. This will ensure the workflow responds correctly and bring the data we need into the workflow’s Run Log.
- Go to your sheet.
Check the box in the trigger column. In this example, the workflow triggers from the Delete with Bridge column.
Brandfolder Image
Save the sheet.
There’s now a workflow run entry in the Run Log of your Bridge workflow. We’ll use the trigger data to populate the modules.
Set up the workflow modules
Set up the Get Row module
In this workflow, the Get Row module gets all the data from the row that triggered the workflow. When the Get Row module runs, Bridge pulls the row data. Then, it pushes the data into the workflow's Run Log.
From the Run Log, you can reference data in the next stages of the workflow.
- In the Sheet field, paste the runtime reference for the sheet ID.
- In the Row ID field, paste the runtime reference for the row ID.
- Save the workflow.
Bridge builder mindset
Technically, the Get Row module isn’t required, but it’s added here as a backup in case of accidental deletions. Because the Trigger data doesn’t include information from inside the row, you may find it helpful to include Get Row to have the row data in the Run Log for 30 days if you need to troubleshoot or refer back to the data.
If you don’t want to have the data for reference later, you can build this workflow with just the trigger and Delete Row module.
Set up the Delete Row module
In this workflow, the Delete Row module deletes the row that triggered the workflow. If you set up the Get Row module for this workflow, you can use the same references again in their respective fields.
- In the Sheet field, paste the runtime reference for the sheet ID.
- In the Row ID field, paste the runtime reference for the row ID.
- Save the workflow.
Test the workflow
After setting up the workflow, check if it's working as expected.
On your sheet:
- Create a new row.
- Check the Delete with Bridge checkbox
- Save the sheet.
In Bridge, the workflow should be triggered, get the row data (if Get Row is used), and then delete the row.
Sheet automation
Your Bridge workflow will trigger every time the Delete with Bridge column changes. From here, you can check (or uncheck) the box anytime you need a row to be deleted.
If you want this to happen on a specific condition, you can add modules (e.g. Conditional Junctions) to your Bridge workflow to check for conditions or you can create a sheet-level automated workflow to check the box for you and hide the column from view in the sheet, which ensures Bridge will only run when the automated workflow checks the box.

