Use Bridge to move specific requests into ServiceNow for more in-depth triage/progress while tracking at a high level in Smartsheet.
USM Content
You can create an intake form in Smartsheet to capture issues with a suggested severity level and a Bridge template to automatically convert any high-severity rows to records in ServiceNow.
What you need
The ServiceNow Integration and the Smartsheet Integration must be authenticated.
You also need the following permissions to build the workflow:
- Smartsheet: At least an Editor permission on the sheet.
- ServiceNow: Permission to add records to the table they're targeting.
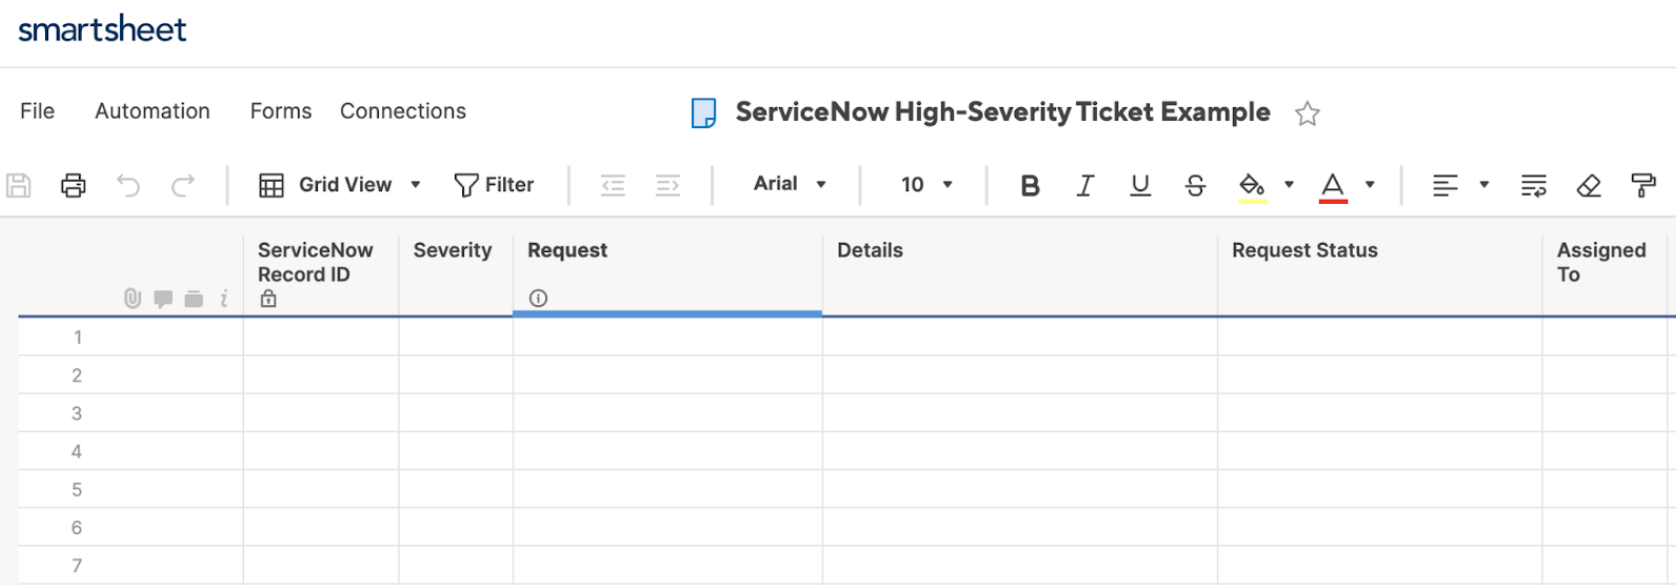
Set up the sheet
Create a new sheet with the following columns, or add them to your existing sheet:
- The Sheet ID - To find this, on your sheet, select File > Properties
- A Dropdown (Single Select) column - Enter Severity as the column name and add these as the list options:
- Low
- Medium
- High
- A Text/Number column - Enter ServiceNow Record ID as the column name
Depending on how your ServiceNow table is configured, the columns in your sheet should align with the fields in your records. In the example below, the Request, Severity, and Details columns are used in the workflow.
Deploy the template
- Log in to your Bridge account.
- In the Solution Center, select the Convert High-Severity Requests to ServiceNow Records template.
- Give your workflow a name.
- To add your workflow to the list of workflows, select Deploy.
- Select which workspace you want to deploy to. Your new workflow becomes available in the list of workflows in that workspace.
- To open the workflow you created, select the name.
Set the record fields
You need:
- The name of the table in ServiceNow where you want to add records
- The names of the fields you want to populate from Smartsheet into your ServiceNow record
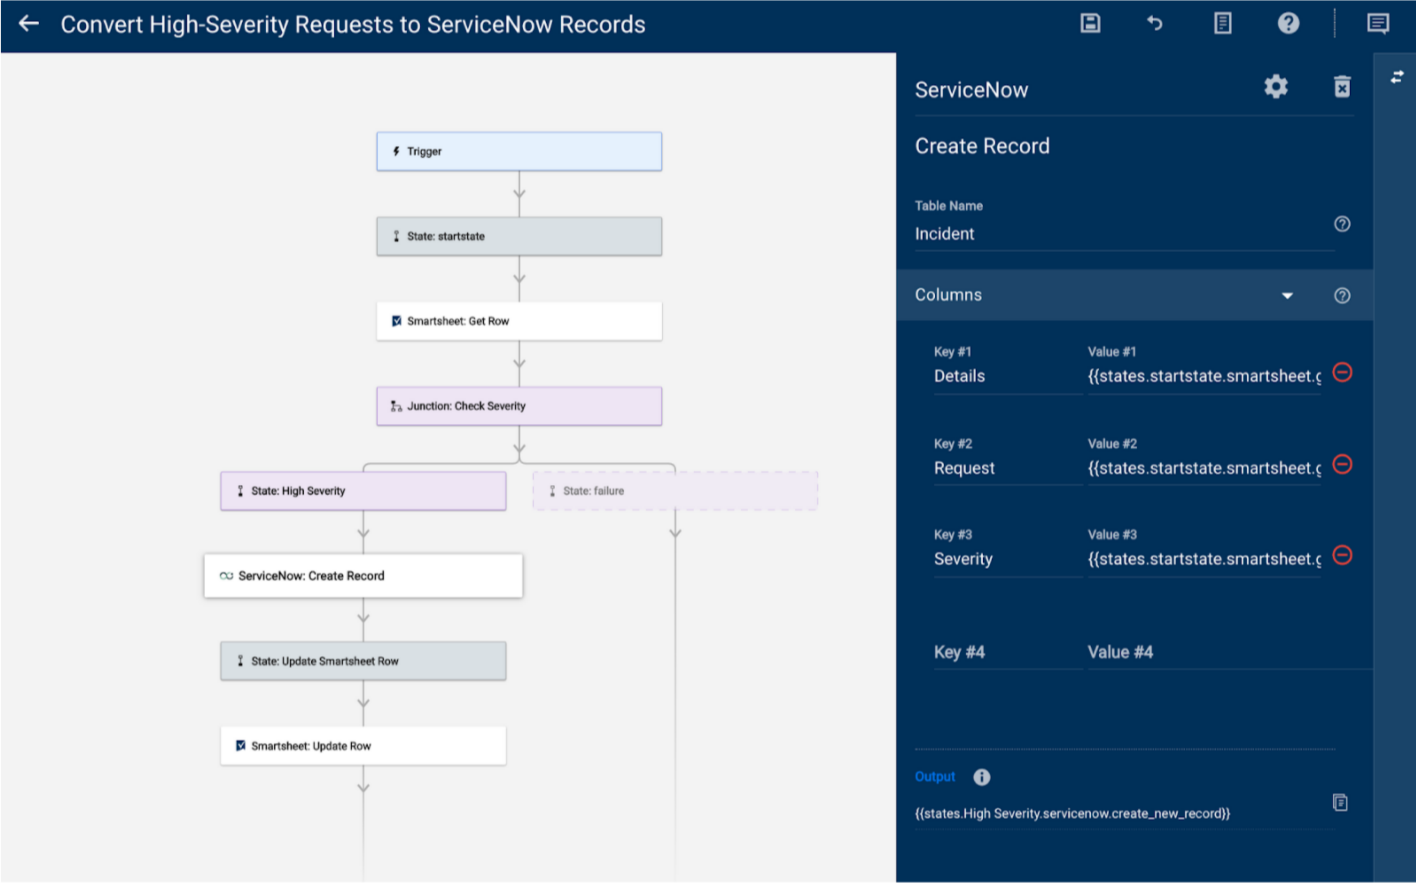
You must map the fields to move data from the Smartsheet row into your new ServiceNow record.
Some mapping is prefilled for you; you must adjust the Key field values to match the fields on your record.
In the photo below, you can see the Key and Value fields. Replace the Key field values to match the fields available in your ServiceNow record (this is specific to your ServiceNow setup).
- In the workflow, select the ServiceNow: Create Record module.
- Add the name of your ServiceNow table in the Table Name field.
- Expand the Columns section.
- In the Key #1 field, replace the value with the field name in the ServiceNow record where you want the Details column data to appear.
- In the Key #2 field, replace the value with the ServiceNow record field’s name for where you want the Request column data to appear.
- To insert the Severity column value, replace the value in Key #3 with the appropriate field name.
If you want more data in your record, add the record field’s name in the following Key field. Then include the data reference in the Value field.
Set up the trigger
The trigger you set up runs your new workflow every time the Severity column values change.
- Select the Triggers tab once authenticated and expand the Triggers section.
- Select Add to Triggers.
- In the Trigger Name field, add a unique name for your trigger.
In the Sheet ID field, enter the unique ID of the sheet.
To find this in your sheet, select File > Properties.
- In the Event Type field, select the When Column Values are Changed trigger.
- In the Column Name or ID field, type Severity.
- In the Workflow list, select your new workflow.
Workflow breakdown
- Smartsheet: Get Row: When the workflow detects a change in the Severity value in your Smartsheet sheet, the Get Row module grabs the data from that row.
- Junction: Check Severity Column: This checks the value in the Severity column, which compares a static value with a data reference. In this case, it compares High with the cell value in the Severity column from the Get Row module. If the value in the data reference matches the static value, the workflow follows the path to create a ServiceNow record. Any other value results in the opposite path, which stops the workflow.
- ServiceNow: Create Record: Creates a record on a specific ServiceNow table. You need a table name to direct where the record should be created. The Key and Value fields in this module pull references from the Get Row module and put the column values for the Details, Request, and Severity columns into your ServiceNow record fields. You must rename the Key values in this module to match where you want that data to appear in your ServiceNow record.
- Smartsheet: Update Row: This workflow uses the number in the data reference from the created record. Then, it inserts the value into the ServiceNow Record ID field in the Smartsheet sheet. Once this value appears in your sheet, the workflow has run successfully and has the ID to locate your record in ServiceNow.
Customize this template
Below are some ways to customize this template:
- Use a checkbox column and have the Update Row module select the box if the row has been converted to a ServiceNow record
- If a specific team only works in ServiceNow, convert all rows assigned to that team into ServiceNow records instead