Use the Call API module to call out to any external system to automate an action.
The Call API tool allows you to manage public API calls you make across your automation workflows in Bridge. It has two main components:
- Profiles —retains information about the system APIs you want to connect your workflows to.
Make API Call module —uses profile data and specific details that you provide to make an API call to a system API.
This setup requires API and coding knowledge.
Bridge Builder tip
Profiles simplify changing workflows in case key information changes, like your authorization token or the Base URL. An update to the Profile ensures that all modules calling the profile get the latest data to make the call.
API call fields
Base URL
This field is contained in the profile and is the part of the API URL that always stays the same. For Smartsheet, you'd use the base URL: https://api.smartsheet.com/2.0/
Endpoint
This field is contained in the Make API Call module and specifies the action you want to take (for example, sort the sheet). In this value, you can add any data references you need from your Bridge triggers.
Here are examples of how to set up for static or dynamic data:
- Static ID value — The URL format for this type of data is this: https://api.smartsheet.com/2.0/sheets/{sheetId}/sort. Specify the sheet ID in this URL, so the API call always sorts that specific sheet.
- Dynamic Run Log data reference — The URL format for this data is similar to that of the static ID value: https://api.smartsheet.com/2.0/sheets/{{sheetIddatareference}}/sort. However, instead of adding the sheet ID, you must add the sheet data reference from the Bridge workflow’s Run Log. This is useful if your Bridge workflow triggers on changes or brings data from multiple sheets. When you use this type of URL, the API call sorts the specific sheet referenced in this URL.
Method
Method defines the type of operations that you're trying to do. Define a method for each API call in the Make API Call module. Most APIs outline the method required for a given API endpoint. For example, with Smartsheet, these are the methods you get to use:
- GET: Bring data into your Bridge workflow by “getting” a row from a sheet.
- POST: Create something. For example, add a row to a sheet.
- PUT: Update something. For example, update a row on a sheet.
- DELETE: Delete something. For example, delete a row from a sheet.
Headers
Headers are the values that you need for the request, and the key-value pairs. They’re usually used to handle authorization (permissions). For example, in Smartsheet calls, you'd have a key Header named Authorization with the value set to Bearer [Enter your API token].
Headers that are required for every call to a system can be set up in the Profile. You can configure additional headers for specific actions in the Make API Call module in your workflow.
Form Parameters
Form parameters are also known as query parameters or arguments. Form parameters are additional items that you can define in the request. You set them in the Make API Call module.
A sample scenario would be to apply paging with Smartsheet calls to include some items in the response. For example, you only want to get the first page of a report with 20,000 rows.
Body
A body has the relevant request details that you must send. It's usually in JSON format.
Sending Form Parameters overrides any Body data.
In a Sort Sheet API call, a body would look like this: {"sortCriteria": [{"columnId": {smartsheetcolumnID}, "direction": "DESCENDING"}]}. The body in this example could use either of these value types:
- A static value for a specific column in a sheet, or
- A dynamic Run Log data reference where the column ID shows.
Depending on the kind of request you're making, a body might not be necessary. For example, you don't need a body for GET calls.
Returned data
If the responding API sends back a JSON object, it's saved in the Run Log. This enables you to reference the returned data in later parts of the workflow.
What you need to get started
- A sheet
- The sheet ID
- A column that, when changed in your rows, you want to trigger your Bridge workflow on
- Bridge
- Smartsheet integration
- Bridge workflow trigger: Smartsheet - When Column Values are Changed
- Bridge workflow modules: Make API Call
- A Smartsheet API Key. Learn how to generate an API key for Smartsheet.
To build this workflow in Bridge, authenticate the Smartsheet integration for your Bridge workspace. Learn how to set up the Smartsheet integration for Bridge.
While building your workflow, keep your sheet, Smartsheet API documentation, and your Bridge workflow open in three separate tabs. This makes navigating the build process easier.
Step 1: Construct the basic workflow model
Pull all the modules that you need for the workflow.
- Create a new workflow in Bridge.
- In the workflow builder, use the panel to add the Make API Call module.
- Save the workflow.
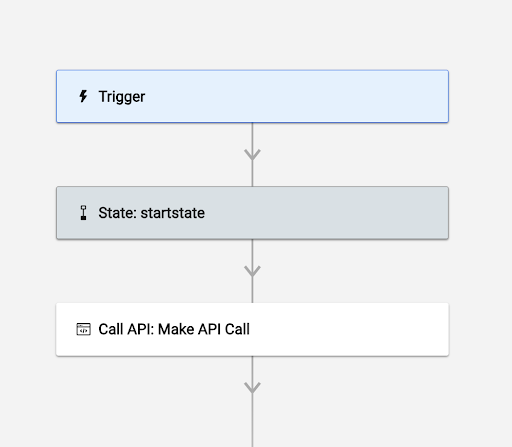
This is what you should see in your workflow when you're done:
Set up the workflow trigger
- Select the Trigger module.
- To open the Integration panel in a new tab, in the Integrations section, select the Integrations Page.
Locate Smartsheet from the integration list.
You can use the Connected option under the Bridge logo to get a list of only the integrations authenticated for that workspace.
- Expand the Triggers row.
- To create a new trigger, select .
- Fill in the following fields:
- Trigger Name: Create a custom label for your trigger.
- Sheet ID: Paste the sheet ID for your sheet (the sheet you want to sort).
- Event Type: Select When Column Values are Changed.
- Column Name or ID: Type the name of the Smartsheet column that you want to respond to. For example, if you want to sort rows on the sheet every time the priority changes, then type the name of your priority column.
- Select Workflow: Select the new workflow you just created from the dropdown list.
- Select Save.
- In the Trigger info, copy the column ID.
- The column ID becomes available in the Trigger info once you save the workflow trigger.
- Paste it in a notepad or any word processor. You need the column ID for a later step.
Return to your workflow.
If you want to return to the original tab, refresh the page to see the trigger.
Get the API call details
Value changes in the priority column of your sheet trigger in this workflow. Once this workflow detects the trigger(s), it performs the necessary actions on the same sheet. To fill out the Smartsheet modules, we use the runtime (Run Log) data references from the trigger.
For this workflow, you must make an API call to the Smartsheet Sort Sheet endpoint. Use the Smartsheet API documentation to change the sample to cURL.
Step 2: Set up your first Profile
Profiles are a way to save key information for the system APIs you want to connect your workflows to. When you select a Profile in the Make API Call module, some of the information needed to make your API call is set up for you already.
- Log into your Bridge account.
- Navigate to the Integrations tab.
- Select the Call API utility.
Select Add to Profiles.
Brandfolder Image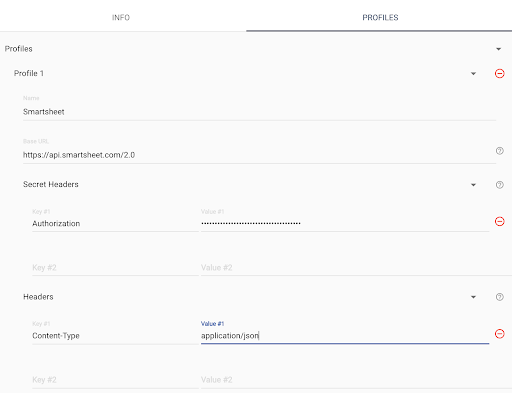
- Name your Profile. Each Profile name must be unique.
- Add the Base URL for the system API you want to connect to.
- In this example, the base URL for Smartsheet is https://api.smartsheet.com/2.0/
- Under Secret Headers, add any headers that contain tokens or secret information (e.g. API tokens).
- For example, in Smartsheet calls, you typically have a key Header named Authorization with the value set to Bearer [Enter your API token].
- Under Headers, add any headers that should be included in all API calls you make with this profile.
- In this example, we've used Content-Type as a header with a value set to application/json.
- Save the Profile.
- Return to your workflow.
Bridge Builder tip
The Base URL is the part of the system API's URL that always remains the same, no matter what you're trying to do in that system. The endpoint in the Make API Call module is for including the specific details and action you must take with that API call.
Example: We're using the Smartsheet API to sort a sheet. The Base URL for our Smartsheet API Profile is https://api.smartsheet.com/2.0 and the specific action we're taking with the module is to sort a specific sheet, so we must put sheets/sheet_id_or_data_reference_here/sort in the Endpoint field of the module.
Step 3: Set up the Make API Call module in your workflow
- In the Make API Call module, select your desired Profile from the drop-down.
- In the Endpoint field, include the portion of the URL field that didn't get added to the Base URL field in the profile.
- In this example, we used sheets/sheet_id_or_data_reference_here/sort.
- Fill in the following fields. Note that you may not use all of them:
- Set the Method to POST.
- In the HTTP Request Body field, a body would look like this: {"sortCriteria": [{"columnId": column_id_here, "direction": "ASCENDING"}]}
- Form Parameters (if using — not using for this workflow)
Save your changes.
Brandfolder Image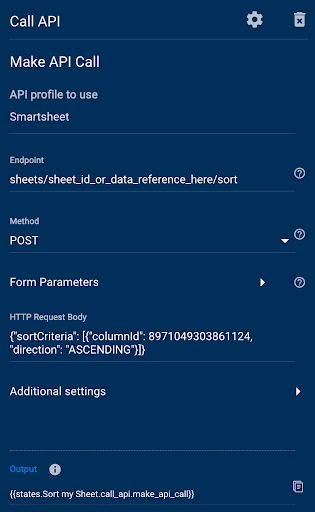
Step 4: Test the workflow
- Open your sheet.
- Change a value in your priority column.
- Save the sheet.
If your priority column is a drop-down, the sorted rows are in ascending or descending order (depending on what you defined in the body of the API call) of the values as they show in the column settings.
Additional settings for the module
- The Make API Call module returns all API calls as a JSON object. If you need the response to return as a string, you can check the Return raw response checkbox under Additional settings in the module.
- If you must include additional headers for a specific call, copy them into the HTTP Request Headers section.
Alternative options for this workflow
Here are some ideas on how you can customize this workflow:
- Trigger from a different sheet or column than the one you want to sort. This requires you to change the API Call details to suit the sheet and column you want to sort.
- Add a condition to your sort. After the workflow is triggered, use a junction module to assess your column value and take different actions based on what change was made in the Priority column (for example: if Priority is 0, move the row off the sheet and if Priority is 1, sort the sheet).
- Use a Schedule trigger. When you use this trigger, you don't need to respond to changes as it sorts the sheet once a day, week, or month.
Use Call API tools across your solutions
- Profiles apply to the workspace, so all workflows in your workspace can use the same Profile in any Make API Call modules used.
- When Profile details must change because a user's permissions have changed or the system API makes changes, there's a single place to make those adjustments and have them apply to workflows in the workspace that are using that Profile.
- For each additional system API you must connect to, you can set up a new unique Profile.
- The Make API Call module succeeds if it receives any response from the target API, including if it receives an error. This is helpful in later steps to determine paths in your workflow for unexpected responses from the API (e.g. if the API call returns an error, you can send an update to a row saying there was an issue). If you prefer that the workflow stops if the API returns an error, you can check the box under the Additional Settings section of the module.