The User Management page in Admin Center is where you can add, edit, and manage users within your Smartsheet plan.
To access the User Management page:
- Sign in to Admin Center.
- Select the Menu icon in the top left.
Navigate to Users and Groups > User Roles and Reports.
The User Management page displays.
You can also access the User Management page from the Smartsheet app by selecting your account icon and then User Management.
Add users individually
- Select Add User at the top left of the User Management page.
- Fill out the user details in the Add User panel on the right.
Select Invite to send that user an invitation. The user must accept the invitation to become an active member of your plan.
To find users with a specific status, select Show All Users at the top right and then make your selection.
Add users in bulk
To add multiple users at a time, you must create a comma-separated values (CSV) file containing the names and email addresses you want to use. Each CSV file you upload is limited to 1,000 rows; therefore, you can only add up to 1,000 new users per CSV file.
Once you've done that, you can import the list via the User Management page.
If your CSV file includes the email addresses of anyone that has already been added to your plan, they won't be added again.
- Select More Actions > Import Users….
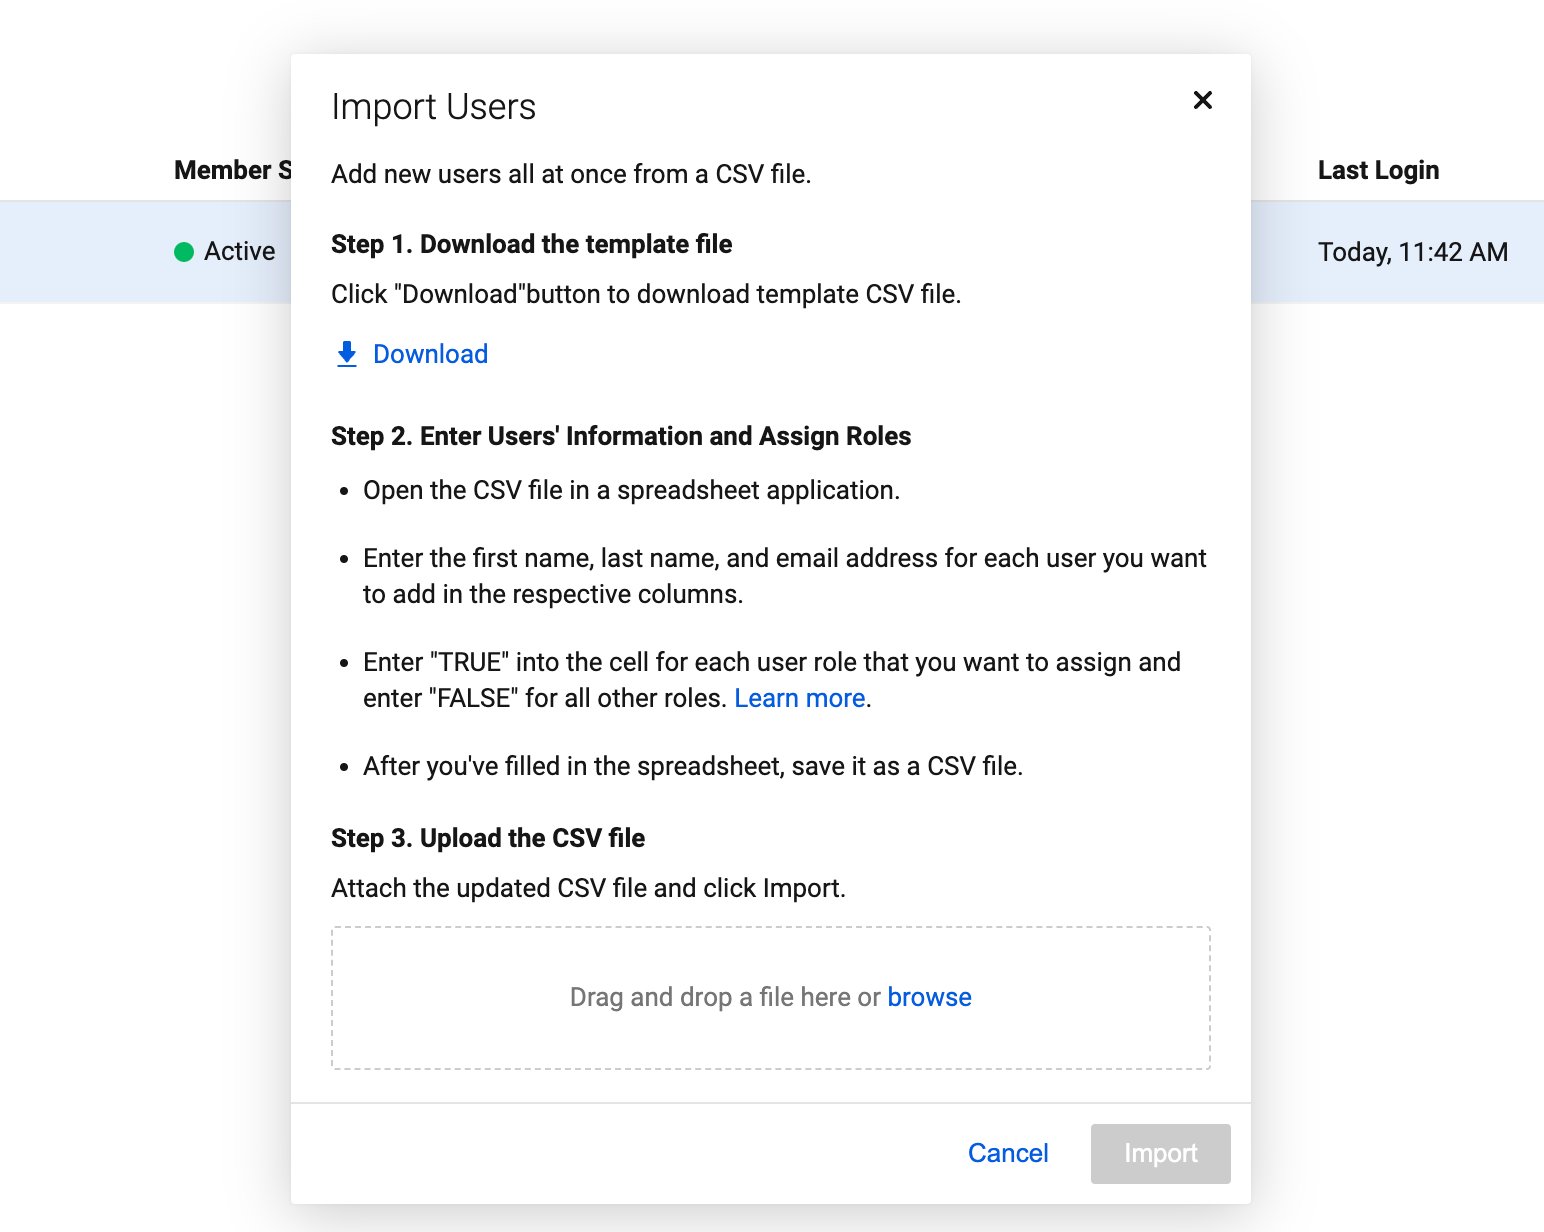
- Follow the steps in the Import Users pop-up window to create a CSV file containing the names, email addresses, and roles that you want to add:
- Download the template file
- Enter users' information and assign roles
Upload the CSV file
Select Import.
A confirmation email is immediately sent to all the email addresses listed in the CSV file. Recipients must select Accept in the email.
Here's an example of how to format your CSV file:
| First name | Last name | Email |
|---|
| First name Sally | Last name Smart | Email sally.smart@smartsheet.com |
| First name Ian | Last name Intelligent | Email ian.intelligent@smartsheet.com |
| First name Dave | Last name Diligent | Email dave.diligent@smartsheet.com |
Keep this in mind
- Any sheets created by or shared to the user remain available to them even after they accept the invitation to join your plan.
- All new non-System Admin users you add are created as Provisional Members.
- Adding users to the plan enables you and everyone else listed on the User Management page to assign rows of tasks to the user from a contact list column.
- While it's advisable to assign more than one System Admin to your account in case the main System Admin isn't available, a single System Admin can serve as the primary System Admin for only one plan at a time. Learn more about user types.
- By default, all users on the team are listed on the User Management page. You can filter the list by user type via the drop-down list at the top. You can also type into the text field to search for users by name or email address.
The User Management page in Admin Center is where you can add, edit, and manage users within your Smartsheet plan.
To access the User Management page:
- Sign in to Admin Center.
- Select the Menu icon in the top left.
Navigate to Users and Groups > User Roles and Reports.
The User Management page displays.
You can also access the User Management page from the Smartsheet app by selecting your account icon and then User Management.
Add users individually
- Select Add User at the top left of the User Management page.
- Fill out the user details in the Add User panel on the right.
Select Invite to send that user an invitation. The user must accept the invitation to become an active member of your plan.
To find users with a specific status, select Show All Users at the top right and then make your selection.
Add users in bulk
To add multiple users at a time, you must create a comma-separated values (CSV) file containing the names and email addresses you want to use. Each CSV file you upload is limited to 1,000 rows; therefore, you can only add up to 1,000 new users per CSV file.
Once you've done that, you can import the list via the User Management page.
If your CSV file includes the email addresses of anyone that has already been added to your plan, they won't be added again.
- Select More Actions > Import Users….
- Follow the steps in the Import Users pop-up window to create a CSV file containing the names, email addresses, and roles that you want to add:
- Download the template file
- Enter users' information and assign roles
Upload the CSV file
Select Import.
A confirmation email is immediately sent to all the email addresses listed in the CSV file. Recipients must select Accept in the email.
Here's an example of how to format your CSV file:
| First name | Last name | Email |
|---|
| First name Sally | Last name Smart | Email sally.smart@smartsheet.com |
| First name Ian | Last name Intelligent | Email ian.intelligent@smartsheet.com |
| First name Dave | Last name Diligent | Email dave.diligent@smartsheet.com |
Errors when adding users
A user can belong to multiple plans, but must use a unique email for each plan. If you invite a user to your plan with an email that's already in use for a different plan, you'll receive this error message: “This person belongs to another account.”
To correct this, the user can provide a different email address so that you can re-invite them with the new address. The user can also ask the System Admin for their other plan to remove them from that plan. Learn how to free up an email address.
Note that Smartsheet doesn't recognize distribution lists as valid email addresses for new accounts or as destinations for automated communications in a workflow.
Keep in mind
- Any sheets created by or shared to the user remain available to them even after they accept the invitation to join your plan.
- Adding users to the plan enables you and everyone else listed on the User Management page to assign rows of tasks to the user from a contact list column.
- By default, all users on the team are listed on the screen. You can filter the list by user type via the drop-down list at the top. You can also type into the text field to search for users by name or email address.