Formatting data in Smartsheet allows you to enhance your information visually, making it easier to interpret and analyze.
You can format numbers and text in your sheet using the buttons on the top toolbar.
Some toolbar buttons may not be visible for particular views or screen sizes. Select the More icon (called out in the image below) if you don't see a button you need.

You can also complete formatting tasks with Keyboard Shortcuts.
Conditional formatting
You can set rules to change the format of a cell when the conditions you define are met. For example, you can highlight a row in red when a deadline is past due and a task is not marked as complete.
Select Conditional Formatting and follow the instructions on your screen.
Select data to format
You can format groups of data all at once. Follow the guidance below to help with this.
| To apply formatting to | Take this action before you click a formatting icon |
|---|---|
| To apply formatting to an entire row | Take this action before you click a formatting icon Select the row number to apply row formatting to existing and newly added cells in the row. |
| To apply formatting to an entire column | Take this action before you click a formatting icon Select the column header to apply column formatting to existing and newly added cells in the column. |
| To apply formatting to an entire sheet | Take this action before you click a formatting icon Highlight all columns in the sheet by selecting the left-most column's header, scrolling to the right, then Shift+click the right-most column's header. When you release your click, all columns and rows in the sheet should be highlighted, and you can then set formatting for the entire sheet. |
Format options
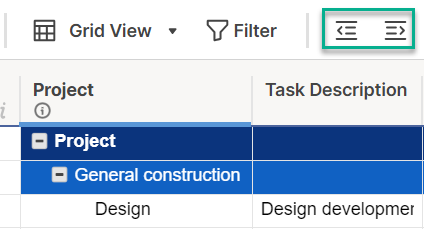
Indent and outdent
Indent rows to create an organized structure for your sheet, with child rows that fall under a parent row. For example, you can use these hierarchical relationships and formulas to automatically calculate a parent task's weighted percent complete based on data in its child tasks. Details about how to do this are included in the Parent Rollup article.
The image below highlights the outdent and indent buttons and shows a hierarchy of rows.
Font and cell format
Draw attention to certain elements of your sheet by setting various font and background formats. For example, you can set bold font for parent rows to make them stand out more.
After selecting data to format, you can set these formatting characteristics:
- font type
- font size
- background color
- alignment
- text wrapping
You cannot apply borders to cells or rows.
All available fonts and cell formats are under your sheet's name in the top toolbar.
Brandfolder Image

Wrap text
Select Wrap Text to wrap text in your selection.
Clear formatting
Use Clear Format to return your selection to the default font and cell background. This is useful for quickly removing formatting without removing cell data.
Format painter
To quickly copy an existing format on your sheet to other cells, use the Format Painter tool.
- Select the cells that contain your desired format.
- Select Format Painter
.
Select the desired cell to copy that formatting to.
Double-click the Format Painter icon to lock the format. You can then continuously apply the locked format to cells. Select the Format Painter icon again, or press Esc to release the locked format.
Highlight changes
Enable Highlight Changes to make new sheet edits stand out.
Numeric formatting
The numeric formatting buttons are grouped at the end of the top toolbar. You may need to select the More icon in your toolbar to see these buttons.
Here are the numberic formatting options:
- Currency Format
formats numeric values to use the appropriate currency symbol and decimal position.
- Percentage Format
formats numbers as a percentage. If you format a cell this way, the value 0.95, for example, is displayed as 95%. The value 95 is shown as 9,500%.
- Thousands Format
integrates the thousands separator and decimal.
- Increase Decimal
and Decrease Decimal
move the decimal point.
- Date formats
menu icon applies various date formats.
Keep in mind the following...
- Smartsheet treats numbers and other characters (letters, punctuation) as text. You can’t use the numbers tools with text values.
- The symbols used for decimal and thousands separators for currency and number format are controlled by the Regional Preferences specified for your account. For more information, see the Change the Language and Date Notation article.
- Column headers are always formatted in white, bold text with a grey background. You cannot change this style.
- Formatting is automatically applied to a cell if it's directly above, below, or between two cells that contain the same formatting and are on the same indent level.