The Smartsheet Jira Connector is available as a premium offering. If you have the Smartsheet Jira Connector purchased on your plan, log in to create workflows between Smartsheet and Jira.
See Create workflows with the Smartsheet Jira Connector to learn about the permissions required to create or edit a workflow.
Find and fix sync errors
You can use the following resources to find and resolve workflow errors:
- Run History: Go to this page to see a count of the number of sync errors for a workflow and the error message with the issue details.
- Error Reports: When issues occur, the workflow owner and the person who edited the field or workflow row that caused the issue will receive an email.
- Error Column: Check this column in your sheet to review a message on rows with a sync issue.
Run history
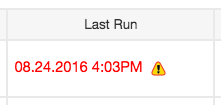
After creating a workflow, you can go to the Run History page to see the sync history and any errors that occurred. You can access Run History by selecting the timestamp in Run Date for your workflow.

You’ll see the following run Types in your Run History:
- Sync to Smartsheet: Workflow runs for changes from Jira that were synced to Smartsheet
- Sync to Jira: Workflow runs for changes from Smartsheet that were synced to Jira
- Filtered Row Finder: Workflow runs for changes made to any issues that should be filtered out based on your workflow configuration. Filtered Row Finder is a background process that runs every 2 hours. Filtered out issues will be added to your sheet's Filtered Out by Connector—Not Synced hierarchy. The Filtered Row Finder process will only run with automated workflow types. This process will run even if you have not specified filters in your workflow.
Best practices
Save and refresh often
To minimize sync errors as users work across both systems, save changes and refresh your sheets as you make updates. Saving and refreshing frequently will ensure that others see your changes. Learn more about saving and refreshing Smartsheet sheets.
Lock columns to avoid errors
Do not modify data in the required Issue Key field in Smartsheet. To secure the integrity of the data in this column, the sheet Owner or someone who shared the sheet with Admin privileges should lock the Issue Key column. For more information, see Locking & Unlocking Columns and Rows in the Smartsheet Help Center.
View changes
Use the Smartsheet View History feature to see a record of changes made to a cell. For sheets that include data shared between Smartsheet and Jira, the name of the user associated with the difference will be the person who created the workflow. This can help pinpoint a specific user’s workflow if unexpected changes are being made to your sheet.
For more details on tracking changes in Smartsheet, see Viewing Cell History in the Help Center.
Check sheet permissions on unexpectedly blank columns
If a column appears empty on a sheet you’ve mapped in your workflow, the column may be locked. Have the sheet Owner (or another Admin) grant you Admin permissions on the sheet.
Push data from Smartsheet to Jira for specific rows only
To give you greater control over which rows explicitly push data back to Jira, you can create an Update Issue in Jira column on your sheet and a Sheet Filter in the Smartsheet Jira Connector workflow to sync only those rows with the Update Issue in Jira checked.
Jira webhooks
As of November 15, 2023, we've upgraded the webhook scheme of the Smartsheet Jira Connector for enhanced efficiency. Now, all bi-directional workflows created after this date will benefit from a shared webhook system. This strategic enhancement is designed to align with the July 2024 Atlassian Jira Cloud limit change to 100 Jira webhooks per Jira environment, which introduced a limit of 100 Jira Webhooks per Jira Cloud environment. The advantage? You're now equipped to establish as many workflows as necessary, circumventing Jira's webhook constraints.
Convert existing workflows to the new model
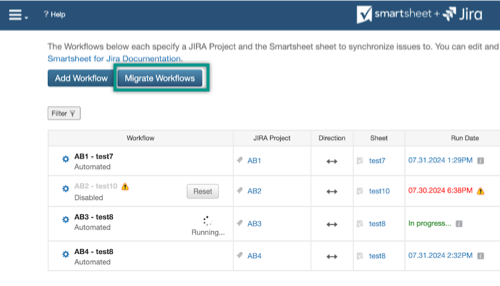
With the recent update to Atlassian's Jira webhook limit in July 2024, it's now recommended that you migrate all your workflows to the new shared webhook model. To start this process, a System Admin or Jira Connector Admin from your account must do the following:
- Navigate to the Jira Connector Admin Dashboard.
Select the Migrate Workflows button.
If you receive an alert indicating that some workflows failed to migrate after selecting the button, you should try again. Once all workflows have been successfully migrated, the Migrate Workflows button will no longer be visible. Note that this change won't impact existing workflows, and there's also no need to re-enable them.

Consolidate automated workflows when possible
Atlassian’s best practices for webhooks suggest having as few webhooks as possible. One way to consolidate workflows is by using a more general filter on the workflow and use the connected sheet as a staging site for your data. You can then use DataMesh to filter and send data between sheets.
If you have a lot of workflows and are experiencing Jira slowness, visit Atlassian’s webhook troubleshooting guide to find ways your Jira Admin can diagnose which webhooks could be causing the slowness.
Enable asynchronous webhook processing
By default, Jira Server and DataCenter process these webhooks individually after every change to an issue.
Jira has an unofficial dark feature will tell Jira to process webhooks asynchronously, making the UI more responsive after changes. Enabling this change will require a user with Jira Administrator permission.
According to this Jira ticket, you can enable the feature by:
- Manually enable the com.atlassian.jira.webhookEventsAsyncProcessing feature flag with the following instructions.
- Restart your Jira instance (or each node in case of DC)
The following versions of Jira Server and DataCenter can enable this feature:
- 8.13.25, 8.20.12 or later
- 9.2.0 or later
Connector limitations
- The Smartsheet Jira Connector has a maximum capacity of 20,000 rows, which aligns with Smartsheet’s row limit.
- Limit data pulls to ten projects at once for best performance.
- Avoid mapping to the End Date column if Dependencies are enabled.
- The connector will re-sort the sheet each time it runs; use reports for custom sorting.
- Manual reordering of Jira tasks could cause errors; use Custom Grouping instead.
- Assign tasks to Jira sprints, not Smartsheet, due to one-way connection restrictions.
- The Jira Portfolio add-on, which introduces the Initiative issue type, is not supported.
- System-generated, unique ID and specific Project Settings columns may cause complications (one-way or no mapping) when mapping the connector.
- Ensure you have admin or editor access on both platforms to avoid permission-related errors in workflow updates.
Error reports
As issues occur, error reports are emailed to the workflow owner and the person who edited the issue/row in the workflow that caused the problem. Here are some common errors and issues.
Issue: Row order is not as expected
When running an automated workflow, issues are sorted by ascending Issue Key, even if they are sorted differently in Jira. To sort issues synced with an automatic workflow, utilize Row Grouping.
For manual workflows, the Filtered Row Finder process does not run. In this case, you can manually sort rows in your sheet.
If you want to sort issues manually while still using an automated workflow, follow these steps:
- Sync Jira to a different sheet.
- Use a cross-sheet index/match or vlookup formula to bring the values into your main sheet using the issue key. Example formula: =INDEX({Range that contains value to return}, MATCH([Search Value]@row, {Range that contains search value}, 0))
Error: Field '<field name>' cannot be set. It is not on the appropriate screen or is unknown.
This error appears if the field value you want to set is not on Jira's Edit screen. Only fields on the Edit screen in Jira are editable from the Smartsheet Jira Connector.
To resolve this issue, do either of the following:
- Configure the Edit screen in Jira and add the specified field to the screen. For more information about Jira screens, including the steps to change the configuration, please see Defining a Screen in the Jira documentation.
-or- - Map the specified field in one direction only, from Jira to Smartsheet. This will create a one-way map. Any revisions you make to the fields in Smartsheet will not be written back to Jira.
The issue could not be saved to Jira
You must have write permissions to the connected Jira projects to save data to it.
Data is not removed from a sheet after filter updates
Smartsheet will not delete data pulled from Jira because each row might contain important column data, attachments, or comments.
When the Jira Issues in your sheet no longer meet the workflow filter criteria, Smartsheet creates a Filtered out by Connector—not synced section at the top to retain the information that the Connector filters out. Any rows that are filtered out will not sync until they meet the filter criteria again, and these rows can be deleted if your team no longer needs them included in the sheet.
Error updating error column in Smartsheet
You will see an error if you remove the Sync Error column from the connected sheet. Make sure that the sheet includes a Sync Error column; it is required. You can edit your workflow to remap the Sync Error column to your sheet. See modifying workflow to learn more.
Error Column
This column is automatically added to your sheet by the connector and will display details about any sync issues that occur for the row.
..is not a valid user for the given JIRA project
This message can occur when an invalid email is entered into a Smartsheet field synced to Jira and can cause issues with contact syncing.
Additionally, within Jira Cloud, this error can occur if the user is not assigned to the project in Jira or if, in Jira, external services (such as the Smartsheet Jira Connector) have been prevented from viewing email addresses. A per-user configuration can be modified by accessing Profile > Manage your account > Profile and visibility and modifying the Who can see this? setting for the Contact field at the bottom. If this is set to Only you and the admins, then the Jira Connector cannot access email address information for the user with this setting and will not populate the email field.
Webhook limit exceeded
If you've received this message, this means you're using more than 100 webhooks within your Jira environment. As Atlassian is enforcing a 100 webhook limit per Jira Cloud instance, you should take the following actions to reduce your webhook count below 100.
- Identify how many bi-directional workflows you're using,
- Disable enough bi-directional workflows to drop below the 100 webhook count (i.e. will need to have at minimum less than 100 bi-directional workflows).
- Once the bi-directional workflows are disabled by an admin or the workflow owner, you can convert existing workflows to the new system.
- Have the workflow owner refresh the page, then select the Reset button to re-enable the workflow. After confirming the workflow has successfully reset, continue this process for the remaining disabled bi-directional Jira workflows.
This action should be taken by the workflow owner as any Jira user can disable a workflow but only the owner can re-enable a workflow.