This article contains the steps used to create and edit synchronization workflows in the Smartsheet Jira Connector.
The Smartsheet Jira Connector is available as a premium offering. For information about pricing, contact our sales team. If you have the Smartsheet Jira Connector purchased on your plan, log in to start creating workflows between Smartsheet and Jira.
Log in to the Smartsheet Jira Connector
Get started
Before you create your first workflow between a sheet in Smartsheet and Jira, both applications must establish a connection. Ensure that an administrator on your plan has performed the initial connection setup.
Prerequisites
To create workflows in the Smartsheet Jira Connector, you must have the following permissions:
- You must be a Smartsheet user with Editor permissions or higher on any mapped sheet.
- A Jira account. You must be able to sign in to Jira have access to the Projects you’d like to build a workflow to.
- If your System Admin activates the Restrict Users setting in the Jira Connector, they must assign you the Smartsheet Jira Connector User role. This role can be assigned either in the Smartsheet Admin Center or directly in the Jira Connector interface.
Create a workflow
Once permissions and the initial connection to your Jira environment have been established, users can create workflows to sync information between Jira and Smartsheet.
With the Smartsheet Jira Connector, you can push information in a single direction (from Jira to Smartsheet or from Smartsheet to Jira) or bi-directionally, instantly updating issues in both applications.
You can sync with an existing sheet or create a new sheet to launch a Smartsheet project using issues in Jira.
While you're only required to have Editor permissions or higher on the target sheet, we recommend that you have at least Admin permission levels, as you may need to add new columns to the sheet during the workflow-building process.
Step 1: Start the workflow wizard
- Log in to the Smartsheet Jira Connector.
- Select Add Workflow to start the workflow wizard.
Step 2: Configure the settings
- Choose the desired direction for the workflow — you can't change this once you have saved the workflow. This determines whether the workflow is manual or automatic.
To make any fields bi-directional or syncing between Smartsheet and Jira automatic, choose Keep issues automatically updated in both Smartsheet and JIRA. As with this setting, you can decide later to make a specific field bi-directional or just a one-way sync.
- Select the sheet to which you want to sync Jira data or Create a new sheet… — you can’t change this once you've saved the workflow.
You can only create one Connector workflow per sheet.
- Select the Jira project(s) you want to sync to the sheet. You can’t change this once you've saved the workflow.
You can select up to 25 individual or All projects on the server.
Select Continue.
Brandfolder Image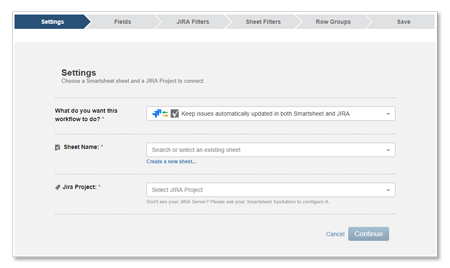
Step 3: Map the fields
Smartsheet maps fields from Jira to columns. The Jira fields you can select from depend on what fields are available in the project(s) you select for the workflow. When you set up field mapping, you can specify the direction in which you want data to flow.
Complete the mappings on this page, delete or add Jira fields and Smartsheet columns as desired, and select Continue when done.
Things to consider
- You must specify a Smartsheet column to map Jira fields. The Smartsheet column can't be blank.
- You must include the Issue Key and Error Column, which automatically map to your field and only flow from Jira to Smartsheet. If you use an existing sheet, the system will add a new Issue Key and Error Column, but you can map these fields to existing columns. The Issue Key serves as Jira's primary issue identifier and should map to the sheet's primary column for correct parent row and hierarchy creation. Deleting either of these columns from your Smartsheet will disrupt the workflow and trigger an error code during the next data sync.
- Specific fields from Jira appear with only a unidirectional mapping option (Issue Key, Jira Link, Issue Link, Created Date, etc.). These fields are read only from Jira and can't be written from Smartsheet. You can only see specific Jira fields depending on your Jira account permissions.
- If you select new column in Smartsheet when creating a mapping, the column type will depend on the field being mapped (e.g., a Date from Jira will map to a Smartsheet Date column), and the type is shown in parentheses.
- The Reporter field in Jira shows the Reporter Email Address and Reporter Display Name options in the workflow wizard.
- The Assignee field in Jira shows the Assignee and Assignee Display Name options in the workflow wizard.
- To use the Assignee field in Jira with a Contact List column in Smartsheet, ensure your email is the same in Smartsheet as in Jira login.
You can map Jira’s Time to Resolution and Time to First Response fields, though this requires the following considerations:
- Time to First Response and Time to Resolution is broken up into subcategories (such as Earliest Duration Goal, Earliest Duration, and Ongoing Duration Goal), so each subcategory must be mapped to its column in the sheet.
- Data from these fields are displayed in minutes as an integer.
- Time to Resolution’s Earliest Duration and Longest Duration only have values when the Jira issue is resolved at least once.
- Time to Resolution’s Ongoing Duration is only valuable when the issue is unresolved.
Step 4: Optional filters
Creating filters is an optional but helpful way to control the data synced between Smartsheet and Jira. If you would not like to filter down your data, select Continue through the JIRA Filters and Sheet Filters pages and skip to Step 5.
You can choose between Jira filters and Sheet filters based on your data needs. Use Jira filters to import specific Jira information into Smartsheet, like issues tied to a specific assignee. Opt for sheet filters to sync with Jira if you want only specific Smartsheet rows, such as those with a checked checkbox.
Jira filters
If you are only syncing one Jira project, define your filters by selecting add filter, the Jira field to filter by, and the filter criteria. All filters set in this way will have an AND relationship.
You can set Jira filters with a Custom JQL query if you're syncing multiple Jira projects. This will allow you to use both AND and OR operators.
An invalid JQL filter disables the workflow. If you’re having issues with a JQL query in workflow, try verifying if it's valid in Jira.
Sheet filters
Define sheet filters by selecting add filter, the Smartsheet columns to filter by, and the filter criteria. All filters added have an AND relationship.
Filter criteria available to choose from depend on the columns present in your sheet. If you want to filter options that aren't listed, add the new column to the sheet first.
Step 5: Define row groups (Optional)
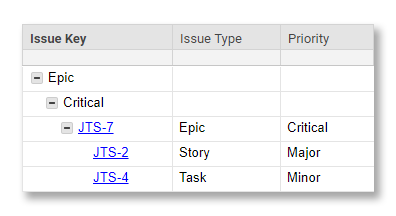
By default, Jira Connector Workflows maintain the hierarchy of your Story, Task, and Subtask relationships from Jira. For example, issues that are children of a Story appear in the sheet beneath that Story as child rows. To disable this, uncheck Maintain Jira hierarchy grouping: Story, Task, Subtask, etc.
As an optional step, you can add rows and sub-groupings by Jira fields or Primary column values in your sheet. To add a row grouping, select add group and either select the Jira field you would like to group by, or in Add Custom Group, list the Primary column value you’d like to group by.
If Jira hierarchy is maintained in your workflow, child issues will still be sorted under their parent issue.
When you define custom row groups by the Primary column of your sheet, you can use an existing value in your Primary column or create a new value to create a new parent row grouping. If your custom row group is not placed within the existing hierarchy, the new parent row will appear at the bottom of your sheet.
Keep the following in mind when defining row groups:
- If your Issue Key field is mapped to a column that is not the Primary column in the sheet, you can’t create new issues in Jira from Smartsheet while Row Grouping is enabled. You can still create new Issues in Jira and sync them to Smartsheet.
- Issues with no grouping value set in Jira will appear in a hierarchy named Field [Group] not set.
Step 6: Save your workflow
The Update Summary field on the Save page shows the number of fields to be updated in Jira and Smartsheet. If the Update Summary count appears unexpectedly high or low, go back to add or remove filters as needed.
- Label your workflow under Workflow Name once satisfied with the Update Summary count. This helps you quickly locate it later on the Jira Connector dashboard.
- To convert new rows in Smartsheet to items in Jira, check the box next to Sync new rows created in Smartsheet to Jira.
- Finally, after all your adjustments, click on Save Workflow.
Once you have saved the workflow, you can’t change any of the values on the Settings page, such as the direction of the workflow, the sheet being synced, or the Jira projects included in this workflow.
After saving your workflow, you will land on the dashboard, and your workflow automatically runs and updates records based on your workflow configuration settings. A bi-directional sync continues to run automatically unless disabled or deleted. You must manually run the workflow for a one-way sync setup to update.
Edit workflows
You can always edit your created workflow. Smartsheet Jira Admins can disable or delete any organizational workflows but not edit.
To edit the workflow, select the gear icon to the left of the workflow name and select any of the following:
- Edit Workflow: Go back to the workflow wizard to make changes to the workflow (can't change the direction of the workflow, sheet synced, or Jira projects included)
- Rename Workflow: Change the workflow name
- Disable/Enable Workflow: Stop or start the workflow automation
- Delete Workflow: Delete the workflow entirely (you can't recover deleted workflows)
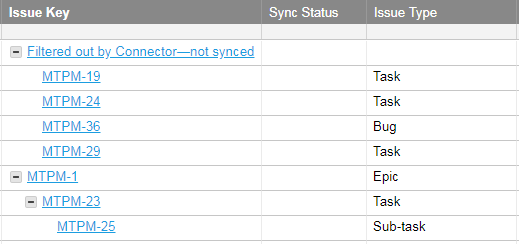
Filtered out by Connector—not synced
If a sheet row will not sync with Jira, either due to filter conditions in the workflow or because the issue no longer exists in Jira, the row is automatically moved to the Filtered out by Connector—not synced section of your sheet. Even though a row is no longer synced, it might contain essential column data, attachments, or comments. Because of this, Smartsheet will not delete rows from your sheet. Instead, it creates this Filtered out by Connector—not synced section to retain the information filtered out by the Connector.
You can't turn the Filtered out by Connector—not synced functionality off; it protects against data loss due to accidental workflow or other changes. If you are sure you do not need the items listed under the Filtered out by Connector—not synced row, you can delete the rows from your sheet. The rows in question will not be returned to the sheet until they meet the filter criteria set in the Connector workflow.
For example, in the image below, four child rows are currently being filtered out (not being synced) by the Connector.
If a row was moved to Filtered out by Connector—not synced but begins to match the filter criteria again, it will automatically begin syncing again and will be moved from the Filtered out by Connector—not synced section of your sheet to the correct sheet section (based on row groupings, etc.).

