Applies to
Schedule daily sheet save
Save your sheet daily and update the TODAY function in your sheet, with no need to open or edit the sheet.
The TODAY function in Smartsheet returns the current date within formulas. However, for the TODAY function to recognize the current date, you must update and save the sheet. If the sheet doesn’t have enough daily activity for TODAY to update, this Bridge workflow can automatically do that for you each day.
When this workflow runs, it grabs the current status of the Save Sheet column. Then, to cause a change in the sheet and force the sheet to save, it selects or clears the box. Once those changes are applied and saved, the workflow updates the TODAY formula.
What you need to get started
- A sheet:
- The sheet ID
- A checkbox column named Save Sheet
- The row ID for a row that will always stay on the sheet
- Bridge:
- Smartsheet integration
- Bridge Schedule trigger
- Bridge Workflow modules:
- Smartsheet - Get Row
- Smartsheet - Update Row
- Conditional Junctions - Match Junction
- States
Get started
To build this workflow in Bridge, authenticate the Smartsheet integration for your Bridge workspace. See how to set up the Smartsheet integration for Bridge.
While building your workflow, keep your sheet and your Bridge workflow open in two separate tabs. This makes navigating the build process easier!
1. Create a hidden field
- In the sheet you want to save on a daily basis, add a column and name it Save Sheet.
- Make it a checkbox type of column.
- Check the box on your selected row.
- Hide the Save Sheet column.
- Save the sheet.
You’ll only be using one row in the column for your workflows. So, choose a row that makes sense to your process and that you know won’t be deleted. It won't interfere with any other columns on the same row.
2. Construct the basic workflow model
Before everything else, pull all the modules you need for the workflow.
- Create a new workflow in Bridge.
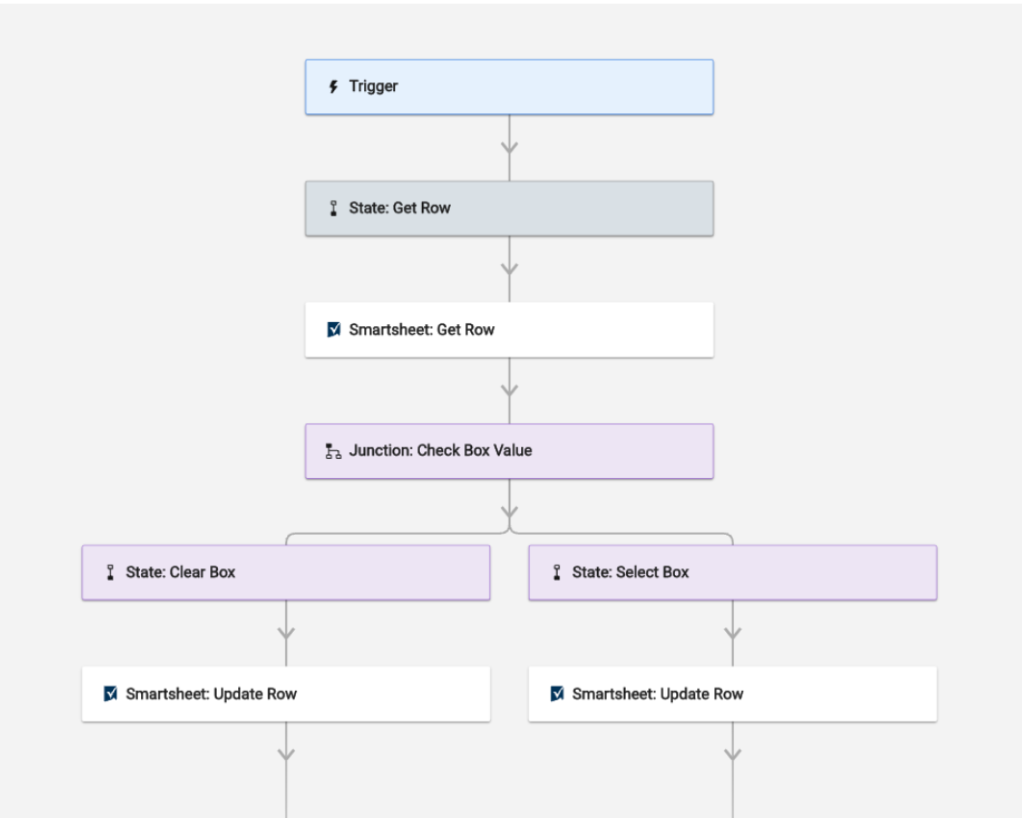
- In the workflow builder, use the panel to add modules in this order:
- Integrations > Smartsheet: Get Row
- New Junction: Label it Check Box Value. Label one state Clear Box and the other one Select Box
- Integrations > Smartsheet: Update Row. You need two of these modules, one under each Junction path.
- Save the workflow.
This is what you should see in your workflow when you are done:
3. Set up the workflow modules
Step 1: Set up the Get Row module
You have to manually enter values in the Get Row module. Then, fill out the remaining modules, use runtime (Run Log) data references from the Get Row results.
- In the Sheet field, enter the sheet ID.
- In the Row ID field, enter the row ID.
- Save the workflow.
- Open the Run Log, on the right pane.
- To run the workflow, select Play
 .
.
What does the Get Row module do in this workflow?
The Get Row module pulls data from the row and pushes it into the workflow's Run Log. From the Run Log, you can reference data in the next stages of the workflow.
Step 2: Set up the Junction Match module
- Open the Run Log.
To see the test run created when you selected the Play button, refresh the Run Log.
The Run Log entry will say Stopped. That's expected because you haven't yet completed the setup.
- Locate the data references needed.
- Expand the Smartsheet: Get Row line.
- Expand the row: Object line.
- Expand the cells: Object line.
- Locate the Save Sheet column entry from the list of sheet columns. Then, expand the entry.
- On the right side of the value entry, select
 .
. - Select Copy data reference.
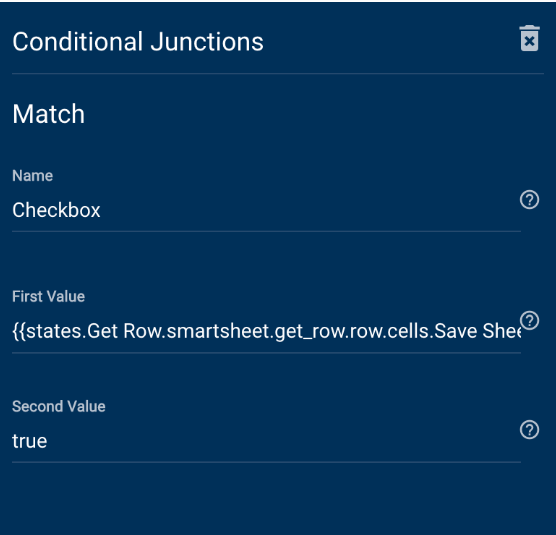
- Open the Junction: Match module.
- In the First Value field, paste the reference you copied.
- In the Second Value field, type true.
- Save the workflow.
This is what you should see in the Junction Match module when you’re done:
What do the Junction Match modules do in this workflow?
The Junction Match module analyzes the Save Sheet column data from the Get Row module results, to determine whether the Save Sheet column box is checked or not. If the box is checked, the Junction Match module follows the Clear Box path. If the box is unchecked, the Junction Match module follows the Select Box.
Step 3: Set up the Update Row modules
- Get the sheetId value from the Smartsheet: Get Row module.
- Reopen the Run Log.
- Locate the sheetId value from the Smartsheet: Get Row data.
- Copy the data reference.
- Open the Update Row module.
- Get the id value from the Update Row module.
- Return to the Run Log.
- Locate the id field.
- Copy the data reference.
- Open the Update Row module.
- In the Row ID field, paste the reference.
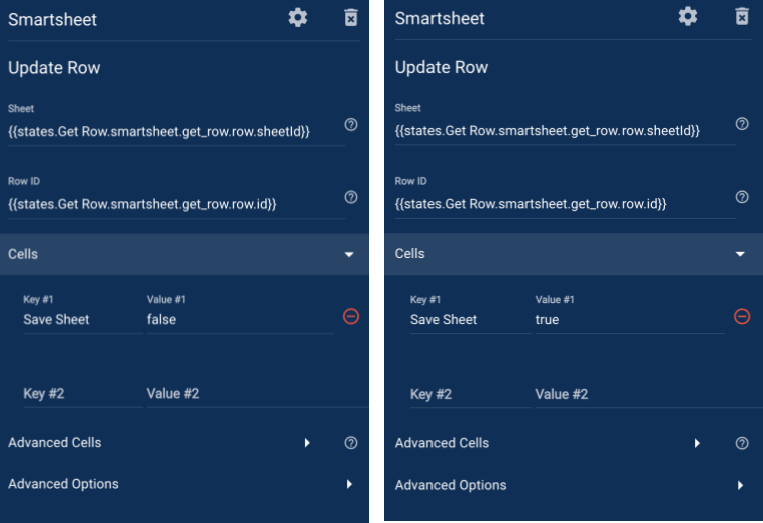
- In the Uncheck Box path of the Update Row module, follow these steps:
- Expand Cells.
- In the Key #1 field, enter the column name Save Sheet.
In the Value #1 field, type false.
In a checkbox column, false clears the box.
- In the Check Box path of the Update Row module, use these steps:
- Expand Cells.
- In the Key #1 field, enter the column name Save Sheet.
In the Value #1 field, type true.
In a checkbox column, true checks the box.
- Save the workflow.
This is what you should see in the Update Row modules when you are done:
What do the Update Row modules do in this workflow?
The Update Row modules check or uncheck the box in the Save Sheet column, to force a change to the cell and a sheet save.
Step 4: Test the workflow
To ensure the workflow is running and taking the right actions, test both conditions. Before you start, check if the Save Sheet column in your sheet row is checked.
- Open the Run Log .
- Select Play
 .
. - Go back to the sheet.
- Wait until the checkbox clears in your row.
- Once the checkbox clears successfully, return to Bridge.
- Play the workflow again.
- To see the box become selected again, return to the sheet.
Now you’ve seen both workflows complete their actions successfully. It’s time to set up the trigger to run the workflow on a daily basis.
If the workflow isn’t running as expected, go through each step of the setup again. Make sure every field and data reference appear as directed.
4. Set up the workflow trigger
- In the workflow builder, select the Trigger module.
- Expand the Schedules panel.
- Choose Add a new schedule.
Choose a time to run the workflow each day.
All times are in UTC. Be sure to adjust for your process needs.
- Choose a start date in the future for your workflow.
- In the Frequency list, choose Daily.
- Save the trigger.