Proofing review requests include a link that takes you to a review page in a new browser tab. On that review page, you can do any of the following:
• Leave annotated comments linked directly to a piece of content
• Have conversations with other stakeholders
• Approve a proof or require changes

Who can review a proof?
Anyone who has been invited to review can participate.
Where you take action depends on whether you’ve been shared to the sheet on which the proof resides:
- If you have access to the sheet where the proof resides: You can review the proof directly in the sheet or on the external review page.
- If you aren't shared to the sheet: You'll be able to take action only on the external review page.
Review a proof
When someone sends you a proofing review request, you receive a notification. Select Review Proof to start your review.
What you do next depends on whether you already have a Smartsheet account:
- If you have a Smartsheet account: You land on the external review page.
- If you don’t have a Smartsheet account: You’re prompted to create a free account before you can view the external review page.
Review the proof on the external review page
Anyone with permission to view the sheet can review the proof. Whatever permissions you have on the sheet are the same as on the external review page.
If you're on the sheet, you can go to the external review page by following these steps:
- In the proof view, select Export
 .
. - Choose Open proof in new tab.
Include comments with your feedback
Use the comment box to add a comment if you have general feedback.
To add a comment
- In the proof view, type your comment.
- Press Enter.
Use the @mention feature to let the requestor know you’ve completed the review. When you @mention someone, they receive a notification with a link to the proof where you tagged them.
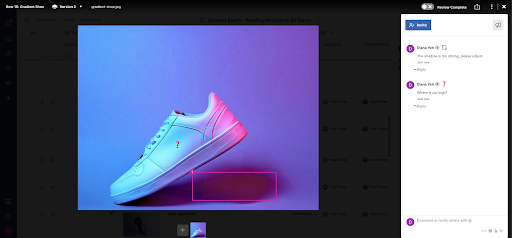
If you want to leave feedback on a certain area of the content you’re reviewing, use a markup tool to combine your comment with an annotation.
Include annotations with your feedback
You can use the following types of annotations to mark up the content in a proof:
- Pin annotation
- Box annotation
- Arrow annotation
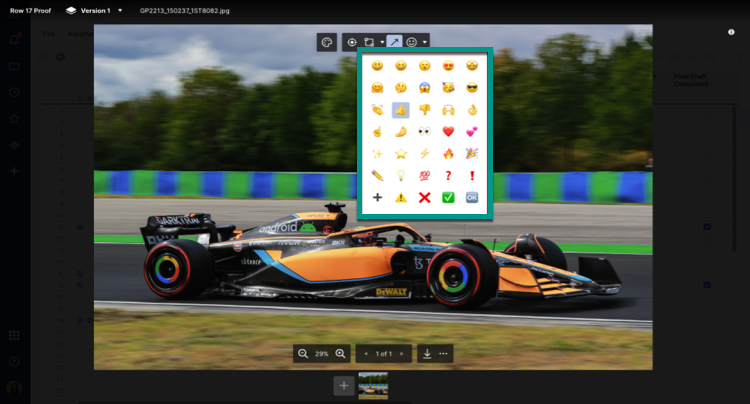
- Symbol annotation
All annotation are available for the desktop app. However, only pin annotations apply for both the mobile and desktop apps.
To add a pin annotation
In the proof file, select the location where you wish to leave a comment.
After doing this step, you’ll see an annotation pin on the proof.
- In the comment box of the proofing view, type your comment.
- Press Enter.
To add a box annotation around a specific area on the proof
- Hover your pointer over the proof.
- Select Comment on an area
 .
. - Optional: To change the annotation object’s shape, in the list that appears, select any of these options:
- Box
- Dashed Box
- Circle
- Dashed Circle
- Select and drag the pointer to highlight an area on the proof. Doing this adds an annotation box with your desired dimensions. A pin appears at the tail end of the box.
- In the comment box of the proofing view, type your comment.
- Press Enter.
Once you submit your annotation, a numeric value is added to the pin annotation on the proof. The annotation number reflects the order in which the annotation was added.
To add an arrow annotation between two locations on the proof
- Hover your pointer over the proof.
- Select Comment with an arrow
 .
. - Select the location where you wish the arrow tail to begin.
- Select and drag the mouse to where you want the arrowhead to appear. Doing this adds an annotation arrow with your desired direction and size. A pin appears at the tail end of the arrow.
- Type your comment in the comment box.
- Press Enter.
To add a symbol annotation
- Hover your pointer over the proof.
- Select the Comment with a symbol icon.
- Choose an emoji.

Customize your annotation object
You can change the annotation object’s color. To customize the color, follow these steps:
- Hover your pointer over the proof.
- Select the Comment color icon.
- Then, in the color picker, choose your color of choice.
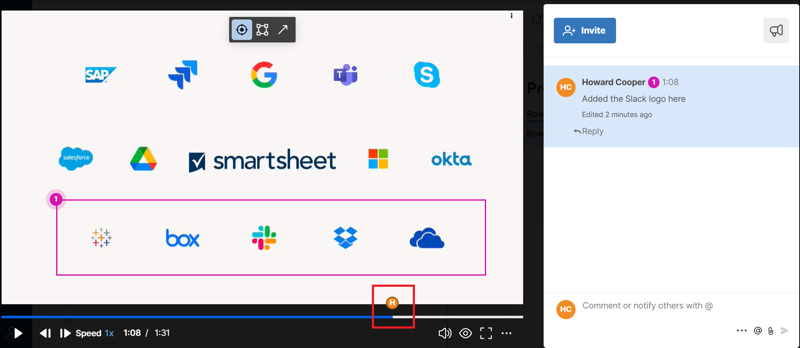
Add an annotation to a video
When reviewing a video proof, you can use the same markup tools to add annotations to specific frames. You have four options for navigating to a frame that requires an annotation:
- Select Play. Then, select Pause when you reach the correct frame.
- Select Step Forward to move the video one second forward.
- Select Step Back to move the video one second back.
- Select anywhere on the video timeline to move to that moment.
When you add an annotation, the frame is marked in the video timeline with your profile image.
After adding an annotation to a video frame, there are two ways to jump back to that frame:
- Select the associated comment.
- Select your profile image in the video timeline.

Approve a proof or require changes
To approve a proof or require changes, select either of these buttons:
- Approve: Select this option if the version you’re reviewing requires no further revisions.
- Requires Changes: Select this option if you need the requester to make a few more changes to the proof.
Only people who have been invited to participate in a review can see these options.
As others make their approval decisions, each viewer of the proof can see a tally of the following:
- Approve/Require Changes responses
- Pending review requests
You can check the names of people who have chosen an option or have yet to review. To see their names, hover your pointer over the Approve or Requires Changes button, or the Pending tally.

