Applies to
Capabilities
Who can use this capability
The Dynamics 365 Connector is available as a premium offering. For information about pricing, contact our sales team.
Sync Smartsheet with Microsoft Dynamics 365
Use the Microsoft Dynamics 365 Connector to have Leads, Opportunities, Accounts, Contacts, and other Dynamics 365 entities sync between Smartsheet and Dynamics 365 automatically.
Once the Smartsheet for Dynamics 365 Connector has been purchased, a user that has Smartsheet System Admin and Dynamics 365 Admin permissions must install it following these steps.
Before you begin
To create workflows in the Dynamics 365 Connector, you must be a licensed user. Your Smartsheet System Admin can grant you a license by following these steps.
Sign in to the Connector
Once you've configured the Microsoft Dynamics 365 Connector, use this URL to create and sync workflows with either integration:
Create a workflow
After logging in to the Connector, you can create workflows that handle the automatic sync. The workflow wizard can guide you through this process.
To get started creating a new workflow:
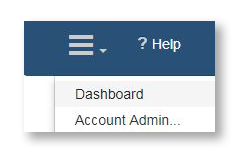
- Select the menu in the upper-left corner of the page and select Dashboard.

- Select Add Workflow to start the workflow wizard.
Workflow wizard
Use the workflow wizard to select your sheet and Microsoft Dynamics entity, and map their respective columns and fields for synchronization.
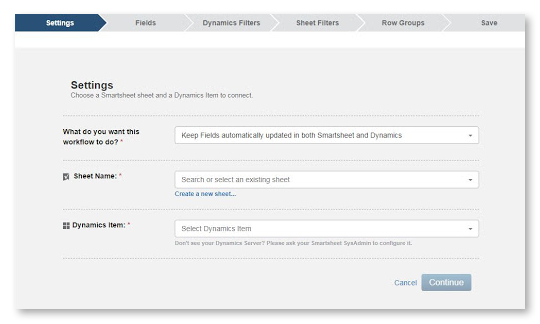
- On the Settings page, establish the basics for your workflow:
- Next to What do you want this workflow to do? choose the sync direction of the workflow (to Dynamics 365, to Smartsheet, or bidirectionally between the two applications).
- Next to Sheet Name, select an existing sheet or select Create a new sheet to immediately create a new sheet in Smartsheet.
- Select a Dynamics 365 entity from the next dropdown.
You can't modify the workflow, the sheet, Dynamics 365 entity, and their sync directions once you've saved them; however, you can create a new workflow to select different settings.
2. Select Continue to confirm your settings.
3. Use the Fields section to map the fields between Dynamics 365 and Smartsheet.
If needed, you can select New column in the dropdown picker to insert a new column in the sheet. To include more Dynamics 365 entity fields in the workflow, select Add field.
4. You can alter the sync direction using the flow dropdowns ![]() between entity fields and columns.
between entity fields and columns.
You may not be able to modify the sync directions of certain mappings based on your permissions in both Dynamics 365 and Smartsheet, as well as the field’s use in the integration (such as the Dynamics ID).
5. Select Continue to confirm your field mapping choices.
6. On the Dynamics Filters and Sheet Filters pages, you can create filters to better control the type and amount of data that’s shared between the two applications.
7. On the Save page, you can name your workflow, save it, and review a summary of updates to be made to your Dynamics 365 entity and sheet.
If you find that the Update Summary displays an unexpected amount of changes to be made, you have the opportunity to step back through the wizard and make additional changes to the workflow, such as adding filters.
8. Select Save Workflow to start the workflow sync, adding any Dynamics 365 records and rows specified in the Update Summary.
Once you save the workflow, you can complete the wizard and go to the Dashboard. Your workflow then runs and automatically updates records in Dynamics 365 and rows in your sheet in Smartsheet according to the rules you set up in the workflow.
Use filters to fine-tune data synchronization
Dynamics filters
You have the option to add filters to better regulate the Dynamics 365 records that flow into the sheet. These filters can help ensure that you sync only fields that pertain to a specific project, client, or employee, for example.
To create Dynamics filters:
- Select Add filter to populate the list of available entity fields, and then select one of them to create the filter.
Use the dropdown to select the condition of the filter. For example: equals, contains, is blank.
A text field appears on the right if you need to enter additional filter criteria.
- Select Continue to confirm and apply the filters.
You can see the number of fields to be updated in your Dynamics 365 entity on the Save page of the wizard next to Update Summary. You can use this to measure the amount of data flowing into the entity from your sheet.
If the Update Summary count appears unexpectedly high or low, you can go back to add or remove filters as needed.
Sheet filters
You have the option to add filters to control the rows that sync to objects in Dynamics 365. You can use these filters to better regulate the records that sync back to your object. For example, use a filter to sync only specific rows that have a Status Reason value of In Progress, back to the Opportunity entity in Dynamics 365.
To create sheet filters:
- Select Add filter to populate the list of available sheet columns, and then select a column to populate the filter.
Use the dropdown to select the condition of the filter. For example: equals, contains, is blank.
A text field appears on the right if you need to enter additional filter criteria.
- Select Continue to confirm and apply the filters.
You can see the number of fields to be updated in your sheet on the Save page of the wizard next to Update Summary. You can use this to measure the amount of data flowing into the entity from your sheet.
If the Update Summary count appears unexpectedly high or low, you can go back to add or remove filters as needed.
Keep related records together with Smartsheet hierarchy
Define row groups in your workflow to keep your Dynamics 365 records together as parent and child tasks in Smartsheet. Create row groups to have your workflow organize your Dynamics 365 records by the options of a specific field, like Opportunity Stages (such as Qualify, Proposal, Contract), without having to manually move them around in your sheet after they sync.
Keep the following in mind when defining row groups:
- In Group by, you can select an existing Dynamics 365 field or type a new value to group records as they sync to your sheet. The Group by determines the Primary column value of the parent rows in your sheet. For example, when you Group by the Stage of an Opportunity, parent rows are created in your sheet for each stage (such as Proposal, Qualify, Contract).
- New parent rows appear at the bottom of your sheet unless your Group by completely matches an existing Primary column value of the sheet.
- You can define a sub group for an additional layer of organization. Have records sync, for example, underneath an International parent row that is also a child to a Sales row in Smartsheet.
- Dynamics 365 records must have the correct hyperlinks in the Primary ID column on your sheet. (If a Primary ID column doesn’t exist yet, it gets added to your sheet automatically when the workflow runs for the first time). Manually copying and pasting Dynamics IDs from Dynamics 365 into your sheet may cause the workflow to not sync as expected.
Manage workflows
You can manage workflows from the Dashboard. Select the three-line menu in the upper-left corner of the page and select Dashboard to see a list of the workflows you’ve created.
Settings
Select Settings to expand the following options:
- Edit Workflow: Takes you back through the workflow wizard to make changes to the workflow.
- Rename Workflow: Change the title of the workflow.
- Disable/Enable Workflow: Stops or starts automation of the workflow.
- Delete Workflow: Removes the workflow from the Dashboard.
The action of deleting a workflow can't be undone, and deleted workflows can't be recovered.
Find and fix sync errors
Several resources are available to help you with detecting and resolving workflow errors, including:
- The Run History page: This provides a count of the number of sync errors for a workflow and displays an error message with details on the issue.
- Error Report Emails: As issues occur, email messages are sent to the workflow owner and to the person who edited the field or row in the workflow that caused the issue.
- The Sync Error column in Smartsheet populates a message on rows with a sync issue. (This column should exist on any sheet associated with a Dynamics 365 entity).
Use the Run History page to troubleshoot sync errors
After creating a workflow, you can see the workflow’s Run History page to review its sync history and any errors that occurred.
To get to the Run History page:
- Select Dashboard from the menu to view the list of workflows.
- Select the link under Last Run to see a workflow’s Run History page.
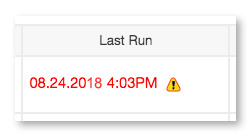
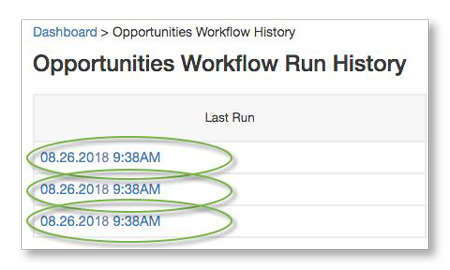
- You can then select the timestamp (under Last Run) of a specific run instance to see any error messages.
Connectors workflow best practices
Save and refresh often
Working across two applications increases chances of synchronization errors. To help minimize this risk, save changes and refresh your sheets as you make updates. This ensures that others see your changes and that they're synced to Dynamics 365 and Smartsheet according to the workflows you've set up.
Give Viewer permissions on sheets
To prevent accidental changes to the sheet that could potentially cause sync issues between Smartsheet and Dynamics 365, you can give Viewer permissions to collaborators on your sheet. This way, collaborators can see the sheet data but can't edit data.
View changes
Use the View History feature to see a record of changes made to a cell. For sheets that include data shared between Smartsheet and Dynamics 365, the name of the user associated with the change is the person who created the workflow.
This information can help you isolate down to a specific user’s workflow if you’re finding unexpected changes in your sheet that can be possibly from incorrectly mapped columns or if you’re not receiving errors in the Sync Error column.
Push data from Smartsheet to Dynamics 365 for specific rows only
To have control over which rows explicitly push data back to Dynamics 365, create an Update in Dynamics 365 column in the sheet in Smartsheet and a filter in the Connector workflow:
- In the sheet that you plan to connect to the Dynamics 365 entity, create a new column, select the Checkbox type, and name the column Sync to Dynamics.
- Log in to the Smartsheet for Dynamics 365 page, and follow the steps to create a workflow.
- In the workflow wizard, specify a bi-directional workflow and create filters to sync only rows from the sheet that have the Update in Dynamics 365 column checked.
The next time the sheet and the Dynamics entity sync, data gets pushed back to Dynamics only for the rows for which the Sync to Dynamics checkbox is checked.
Check sheet permissions on unexpectedly blank columns
Data may not update to a sheet depending on your sharing permissions, but you may not receive an error. If a column appears blank on a sheet that you’ve mapped in your workflow, the column may be locked on the sheet. Have the sheet Owner (or another Admin) grant you Admin permissions on the sheet.